Multiplayer Map Guide — Sub Base

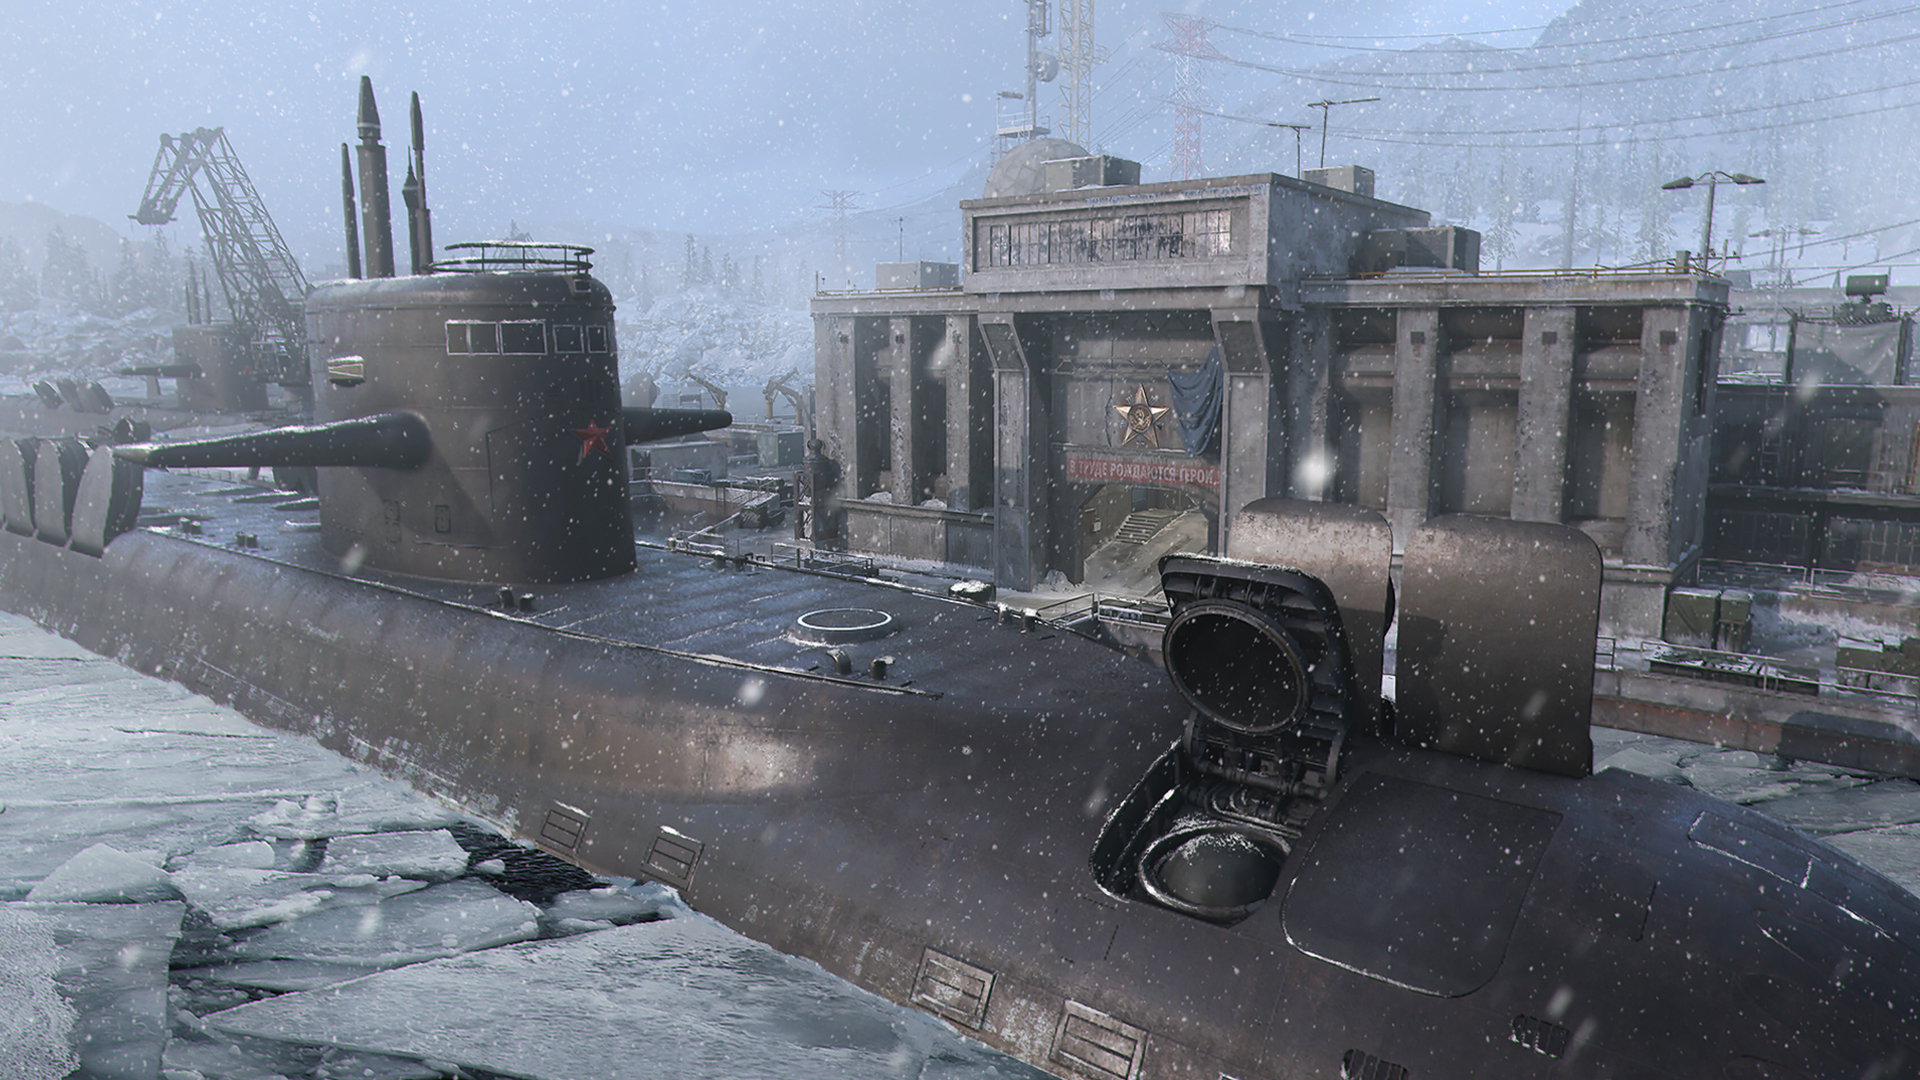
Submarines dock for maintenance and refueling at a a naval base on the high seas. Deploy dockside and battle for control over the locale, a midsized map packed with vantage points, flanking routes, and a deadly center ground where only the most stalwart Operators dare pass.
Prebrief
At the top of the third act in Call of Duty®: Modern Warfare® 2 (2009), Captain Price teams up with Roach and Ghost to strike a naval base in “Contingency.” They must secure a docked submarine before its payload can be deployed, though Price enacts a plan of his own that changes the course of the war.
In Sub Base, Operators return to the naval base in a medium-sized Multiplayer map where players face off over the docks and across the central Loading Bay. Take up a position in one of the buildings looming over the middle passage or keep to the ground floor and take the fight directly to the enemy.


-
Show areas

-
Show hardpoints

-
Show domination flags

-
Show search & destroy sites

-
Show spawn points

-
Reset all overlays

// INTEL CARD
- MWIII
- WZ
- WZM
Sub Base
// MULTIPLAYER // MAPS

From way out: Snipers will find success with several long sightlines through the map, most prominently across the North Dock route, up and down the West and East Docks, and throughout the central Loading Bay.
Midrange power: The sightlines outside many of the buildings here look out on midranged distances, so pack an Assault Rifle or something similar to get the most out of these power positions.
Close-quarters backup: Within the buildings themselves, close-quarters weapons are the way to go. Take a Shotgun or SMG as your Primary Weapon to clear enemies from their vantage points or have one on backup to respond to enemy breaches.

In team-based game modes, teams will either spawn by the Dry Dock (west) or the East Dock (east).
A deadly Loading Bay separates the two, surrounded by multiple entry points above and below, with buildings along its sides featuring frenetic interior battles.
We’ve divided Sub Base into six sections based on key areas around the map:
- MAIN SPAWN POINT: Dry Dock (+ Control Room, Maintenance Yard, Catwalks)
- MAIN SPAWN POINT: East Dock (+ Crane)
- ADDITIONAL AREA: North Dock
- ADDITIONAL AREA: Loading Bay (+ Base Entrance, Tank)
- ADDITIONAL AREA: Garage Bay (+ Fueling Station)
- ADDITIONAL AREA: Helipad Roof (+ Warehouse, Tunnel, Power Station, Server Room)
MAIN SPAWN POINT: Dry Dock (WEST)

From the left border, the Dry Dock comprises a tight rectangle with bulky crates and other large cover pieces, including the small Control Room with openings on all sides. Combat within the area caters to close-quarters fights, though its east-facing openings offer longshot opportunities toward the middle of the map.
The area opens up by the docked submarine, surrounded by pulleys and low railings. A central bridge provides a walkway over the docked sub, and Operators can get on top of the sub and the metal platforms around it.
There are multiple paths east, but the staircase leading up to the Catwalks makes for a great starting route. The Catwalk wraps around the two closed off buildings and extends along the front, overlooking the central Loading Bay. Land precision shots up and down the middle of the map and across to the opposite rooftop. Keep an eye out for enemies near the doorways to either side of the front walk.
MAIN SPAWN POINT: East Dock (EAST)

The East Dock presses right up against the eastern buildings with a single traversable pier protruding over the water. Midranged fights tend to dominate play when moving west, while longer-ranged skirmishes break out along the extended north-south corridor. Use the available cover to keep out of this long sightline as much as possible unless you’re utilizing it yourself for its sniping opportunities. If you need to get out of sight fast, dive into the water.
Watch out for enemies up high on the far north and south ends as well, where upper-level vantage points provide a means to fire down into the East Dock. Push up against the central building to cut off their lines of sight.
When moving toward the middle, consider your route based on your Loadout. The North Dock path offers the longest sightlines, while heading through the Tunnel or Power Station keeps the fight up close. For a more balanced approach, head through the southern Warehouse.
ADDITIONAL AREA: North Dock

This narrow route provides the most direct access between the Dry Dock and the East Dock, managing to avoid passing through the middle Loading Bay. However, an opening into at center provides Operators a means of entering and exiting the area. Thankfully, some well-placed supplies face the opening, providing a solid point from which to attack and defend against enemies within.
An Optic with a high-powered zoom can help Operators eliminate enemies along the North Dock from deep within the Dry and East Docks. If an enemy sniper pesters your forces in the area, try equipping your own Sniper Rifle and countering them from the other end; you might also take another path entirely to flank them in their own territory.
As with the East Dock, the water is navigable here for those times when you need to make a stealthier crossing.
ADDITIONAL AREA: Loading Bay

You’d better be ready to engage when entering the Loading Bay; entry points surround the area from above and below. In addition, its length gives rise to longshots from end to end with room for every other playstyle in between.
Midranged Loadouts perform well on the Catwalks and Helipad Roof, as well as on the ground floor, provided you’re smart about using cover to cut off longer sightlines. Short-ranged Loadouts can do well around the large containers in the south near the Tank or by trawling through the Loading Bay’s adjacent buildings in search of prey that’s focused on the middle.
Map awareness is of critical importance here, so use your intel-gathering capabilities and communicate the position of enemy Operators. And when enemy aerial streaks threaten from above, get under cover fast.
ADDITIONAL AREA: Garage Bay

The Garage Bay marks a critical juncture between the western Dry Dock and the Loading Bay. Within its confines, watch the upper walkway as well as the more hidden back office, which makes for a great location when defending the interior.
In addition to its large windows overlooking the Dry Dock starting spawn, the Garage Bay also provides a view over the Helipad Rooftop and access to the Catwalks that opens up a wide view over the middle.
The Fueling Station south of the Garage Bay leads to the Tank end of the Loading Bay. This is an ideal location for snipers and other Loadouts using magnified scopes. The area contains several large containers and other useful cover pieces, which are great points from which to launch an ambush against nearby enemies.
ADDITIONAL AREA: Helipad Roof

The building block sandwiched between the Loading Bay and East Dock features several interior locations and an accessible rooftop.
The southern Warehouse is the largest building in the area. It’s filled with midranged sightlines and a catwalk that wraps around the upper level, giving access to the Helipad Roof and providing vantage points toward the East Dock, the Loading Bay, and over the parked Tank. There’s sparse cover on the rooftop, so use what’s available to avoid standing out in the open.
Across the rooftop to the north is the Server Room, a tight building where close-quarters engagements break out from within. There are also midranged sightlines outside the Server Room. Descend the stairs to the Power Station to reach the ground floor with access to the Loading Bay and East Dock.
Lastly, there’s the Tunnel underneath the Helipad Roof connecting the east and center of the map. Though it’s a mostly wide-open space, some stacked barrels and the small Office present possible ambush points against Operators hurrying through.
Objective Overview
Overall Tactics
Sub Base is an intense, highly tactical locale where fights break out over control of the center in addition to frequent skirmishes in and around its buildings and docks.
The map’s layout packs a lot of movement options in the environment, so Operators who move with purpose can improve their odds by outflanking and outsmarting their less-informed opponents.
The Loading Bay tends to draw the most attention, with the Catwalks and Helipad Roof pulling in Operators looking for a full view of the middle. For greater success, however, keep in mind all the various views over this area, some offering greater concealment than others.
Try sniping from the southern Tank, or firing down from the northern Server Room, using its staircase to quickly move between the upper and lower floors. Use the angled views outside of the Garage Bay and Warehouse; it’s far more difficult for enemies to react when getting fired on from here, and it’s easy to back off into cover when they do.
Put these principles into action when engaging opponents around the rest of the map, always keeping in mind the various routes to your current target. By utilizing less prominent sightlines, you improve your bag of tricks and keep the enemy guessing.
Domination
The battle for the middle intensifies in Domination, with B sitting wide open in the Loading Bay and A and C not far off on the sidelines.
Use the tactics described above to overtake the middle by attacking from multiple angles. Fan out for better map coverage, take B, and defend it with everything you’ve got.
While forgoing the B flag works on some maps, Sub Base usually requires taking it as one of your two objective priorities. The A and C flags are easily accessible from the two main spawn points, so attempting to capture both can be an uphill battle unless you’re doing it as a temporary tactic to pull the enemy out of the center.
Don’t be afraid of moving within the Loading Bay when approaching B. Though getting up high certainly has its advantages, there are a good number of midsized cover objects surrounding the flag; take your time moving from cover to cover and then jump on the objective when the timing is right.
Hardpoint
Teams rush for the center as the first Hardpoint starts in the Loading Bay in a small boundary around the north half of the zone. Several midsized cover pieces offer some protection against the surrounding environment, but with this many eyes on the spot, you’ll want backup to ensure a firm footing.
The remaining four Hardpoints are a mix of indoor and outdoor locations, with the final objective returning to the center around the Tank.
With three out of five Hardpoints exposed to the skies, aerial streaks can help get enemies off the point. Choose the air-to-ground Streaks that suit your preference, and once earned, wait for the enemy to stack up in or near the point before letting loose.
Use smart positioning when the objective moves to the Garage Bay or Tunnel, each offering their own means of protecting the point. In the Garage Bay, set up in the lower office if someone’s already on the point; in the Tunnel, scoring players should remain near the stacked supplies while someone in the Office provides much needed cover fire.
Cutthroat
Though many rounds are bound to evolve into frenetic firefights, Sub Base offers enough complexity and breathing room for teams to adopt a more tactical approach in Cutthroat as well.
Improve your chances of winning the match by using a variety of strategies to keep the enemy off balance or by finding the one tactic that exploits their biggest weaknesses.
Though it’s tempting to rush to the Loading Bay to find the action, remember that you have the full run of the map for the opening minute of the round. Equip a Sniper Rifle and seek enemies along the North Dock; take on enemies up close in the Garage Bay and Fueling Station, or work your way into the eastern buildings and hunt down Operators at their vantage points.
Once the round timer nears completion, pivot to the overtime flag. If your team has the most overall health, you simply need to cover it to ensure another squad doesn’t capture it for the round win; if your squad is lower on health than another squad, get after that flag.
Search & Destroy
Opportunity for tactical play really opens in Search & Destroy. You can take it slow, evaluating every angle and pathway, or break out at top speed, getting in position without a moment to lose. Both tactics have their place, with a mix of the two working to throw off the enemy.
Whatever your approach, remain vigilant and communicate with your teammates. With so many possible angles of attack, every bit of intel becomes crucial to winning the round.
Whether approaching the A or B bomb site on the attacking team, it’s probably best to minimize your exposure to the Loading Bay. With one life per round, the risk is too high. For A, consider moving south through the Warehouse. Send some Operators to the second level for its long view over the bomb site, with the rest moving over the ground floor to approach the objective.
For planting at B, approach from the North Dock or, if enemy snipers have locked down that route, move up through the Power Station, sending one or two squad members up the stairs to the Server Room for overhead protection.
On defense, try taking up more general central positions to cover a wider view until you spot the enemy, fanning out so that you can attack from multiple angles.
Top 10 Tips

1. Strike and move. While you might have a favorite spot or two from which to attack the Loading Bay, be open to moving around and consistently changing your sightlines, expanding your area of influence over the center.
2. Hot knife through butter. Take out pesky Operators stationed near windows by equipping weapons like LMGs that use higher caliber rounds and ammunition that increases bullet penetration. Keep inflicting damage even when they attempt to pull back to cover behind thin walls.
3. Drill activated. The Drill Charge offers another means of dislodging enemies inside buildings. Equip the valuable item to blast opponents from their beloved power positions.
4. Hope you brought a wetsuit. The navigable water around the North and East Dock adds a new element of strategy to the map. Taking a swim down the North Dock is a great way to avoid detection from marksmen covering the path, while the large body of water around the East Dock provides ample room to escape a bad situation or to reposition out of sight.
5. Give ’em the squeeze. If you or another teammate can cover the North Dock route with your marksman skills, it’ll force the enemy team to move through the Loading Bay to cross the map. Send another by the southern Tank to squeeze them farther into the most dangerous portion of the center.
6. Best view in the house. The catwalk on the upper level of the Warehouse leads to power positions all around the building. By holding the area and moving around, you’ll exert dominance over a large portion of the map.
7. Can’t see a thing. Need to cross the Loading Bay but don’t have time to engage with every enemy along the way? Deploy a Smoke Grenade to block the enemy’s vision as you pass through. Don’t overdo it or the enemy might get wise and swap to a smoke-piercing thermal Optic.
8. Take it dockside. Though the Loading Bay often sees the most action, there’s still a lot of map left on the sides. If the enemy is outplaying you in the middle, pull back to the Docks and make them fight you on more favorable ground.
9. Above and below. Bring a teammate along when fighting from one of the two-level structures, with one of you fighting from above and the other from below. This reduces the chance of getting ambushed, and if one player gets eliminated, they can forewarn the other to take back control.
10. Check the temperature. Though snow lies over the Sub Base, the action here gets hot fast. Take a measure of the match flow from time to time to better gauge your actions. If the enemy is moving slow and steady, rethink your routes to catch them off guard. If they’re running with wild abandon, set up in a power position and cut them down with ease.

© 2024 Activision Publishing, Inc. ACTIVISION, CALL OF DUTY, and MODERN WARFARE are trademarks of Activision Publishing, Inc. All other trademarks and trade names are the property of their respective owners.
For more information, please visit www.callofduty.com and www.youtube.com/callofduty, and follow @Activision and @CallofDuty on X, Instagram, and Facebook. For Call of Duty Updates, follow @CODUpdates on X.
