
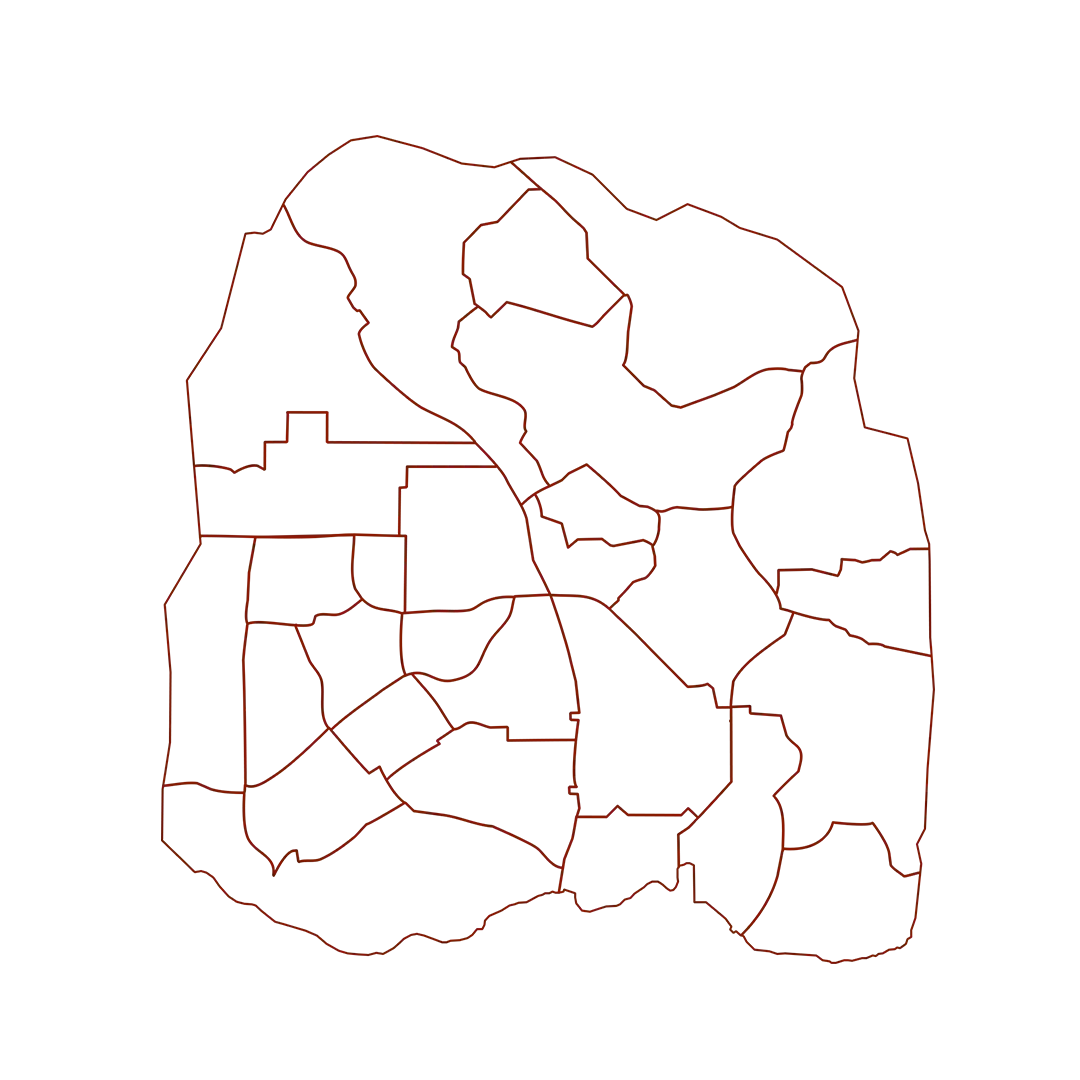
Your Guide to Verdansk
Verdansk is a vast place and requires a large-scale investigation of every location across the Tac Map. With 40 total Points of Interest (POIs) — 20 of which are major (most shown in-game on your Tac-Map, as well as across the map as you drop in at the start of the match) — detailed in this guide, expect tactical overviews of areas ranging from the huge to the often overlooked. In addition, we provide an interactive map and details on ambush points, traversal strategies, and much more.
Welcome to Verdansk!
-


-
The Call of Duty®: Warzone™ Mobile — Verdansk Tac Atlas is your go-to guide for finding and exploring all of Verdansk. You can view POI territory zones and can turn the variety of interactive icons on or off based on your areas of interest. Here is what’s being tracked:
-
Point of Interest

A Point of Interest is a landmark, location, or cluster of adjacent locations worth exploring. These are represented by an “arrow pin” icon on the relevant guide maps. Select the POI you are interested in. From there, you can read up on all the pertinent data for the POI.
-
Buy Stations

Purchase a variety of items, including Self-Revive Kits, Killstreaks, Armor, and more, at these randomly appearing stores. Every possible (but not guaranteed) Buy Station spawn is shown.
-
Major Landmarks

Some locations and actual POIs are named after the major landmarks found within them. These are called out on the map, and where appropriate, icons have been added to the interactive guide map so you can easily pinpoint their locations.
-
Minor and Reoccurring Landmarks

There are certain smaller landmarks that appear multiple times across the map. Learning where these are (and their layout) enhances your situational awareness and lessens confusion. Here are the tracked lesser landmarks of Verdansk: Bank, Burger Town, Car Dealer, Comms Tower, Fire Station, Gas Station, Gun Store, Helipad, Metro Station, Pharmacy, Police Station, Post Office (Downtown), Public House, School or Library, Memorial, and Toilets.
-


-
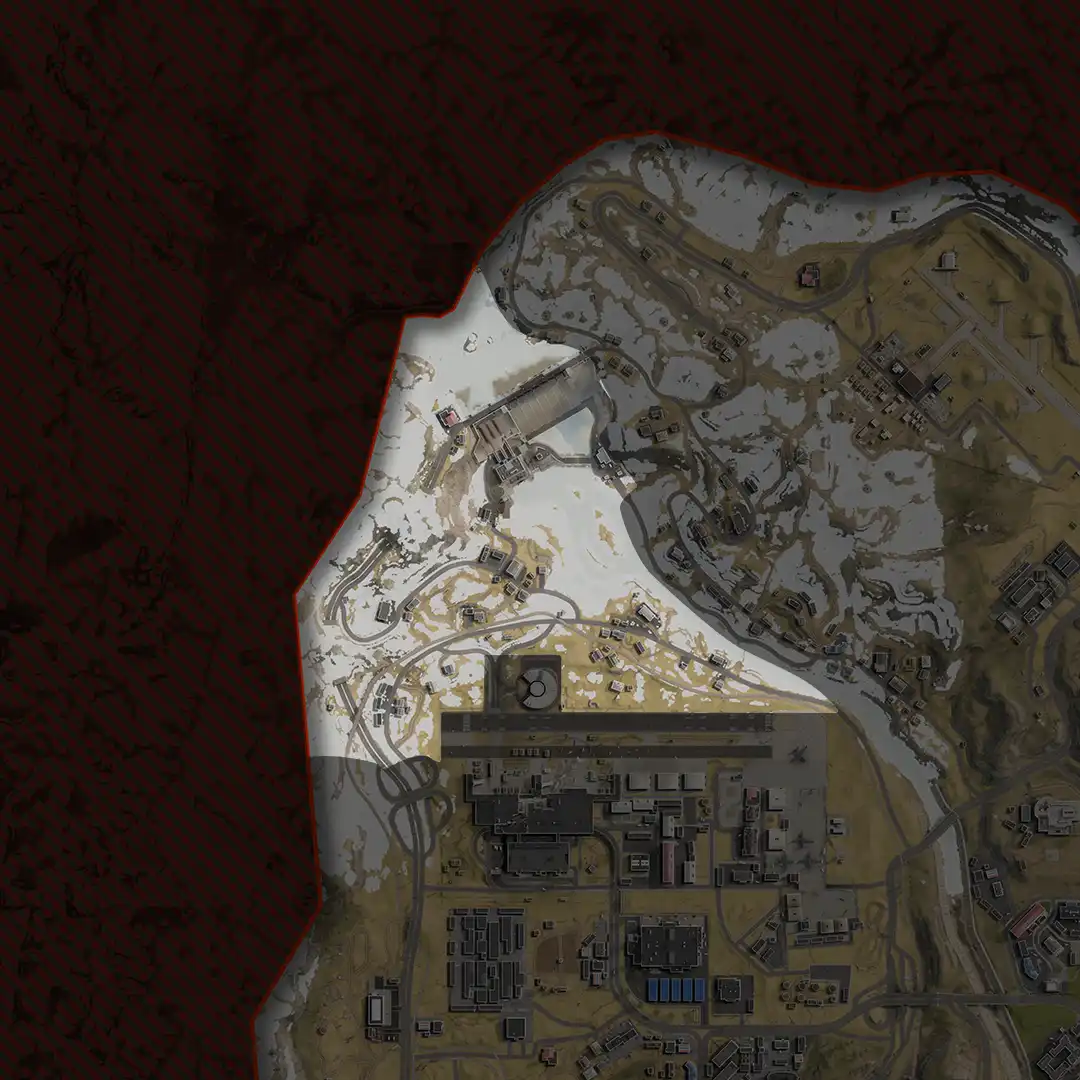
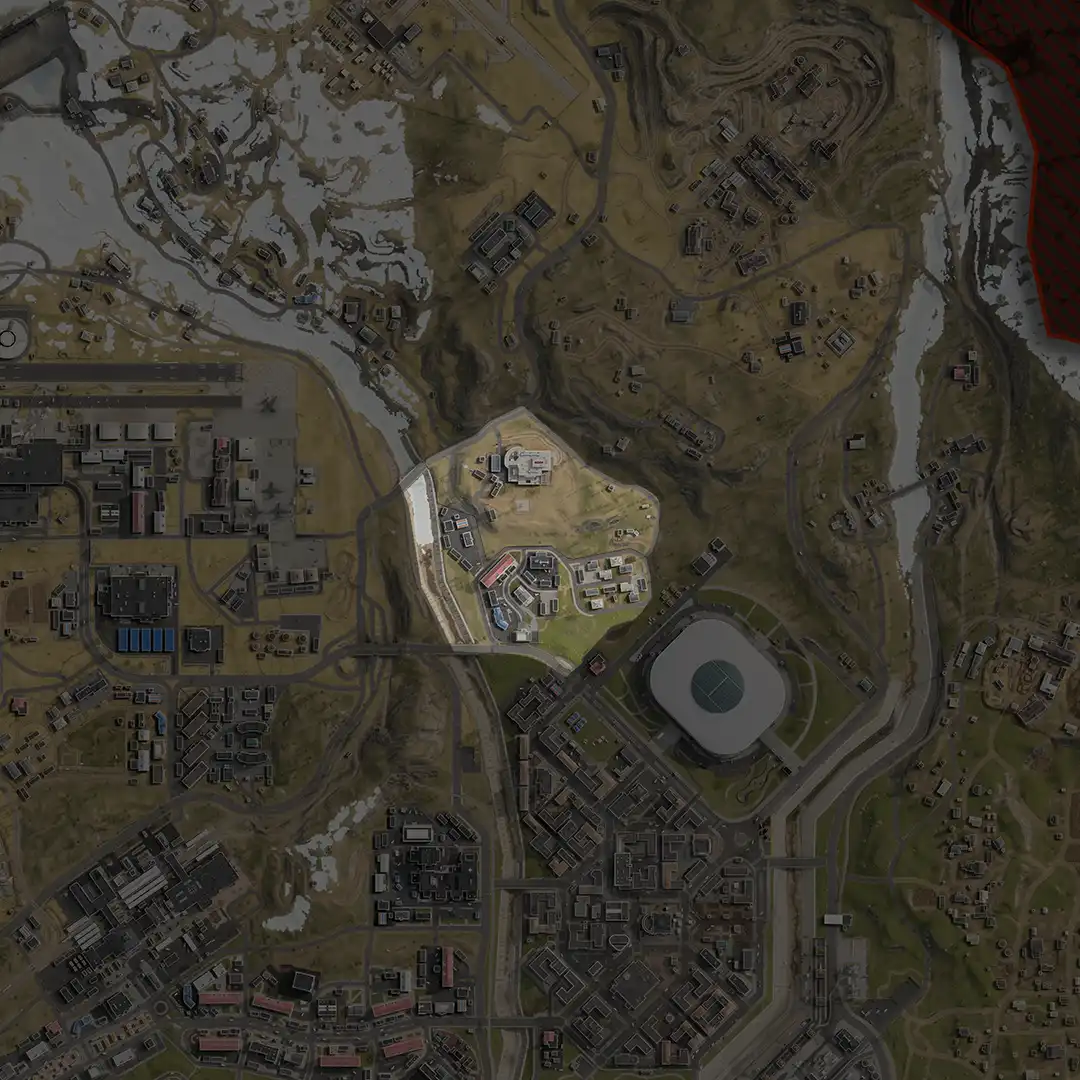
POI Overview

Expect a frosty reception as you explore the Dam, located high in the snow-covered mountains. Northwest of Verdansk, the Dam is home to large, dominant structures that provide elevational advantages and an incredible perspective over the rest of the map.
-
Dam: Upper Dam (Sluice Gates)

The top of Gora Dam is ideally accessed via the main highway. A road spans the Dam, leading into Bloc 23 (east). The Dam offers tremendous long-range views to the south, along with an escape route off its side. The Dam has eight sluice gate towers (watch for foes behind the gates or on the icy reservoir below), with a maintenance tower at each end allowing interior stairwell access down, then out onto a lower gantry.
-
Dam Main Generator Complex

The main Dam workings are located here in this tiered generator facility at the base of the Dam’s western side. From the ice floor of the Gora River, you can investigate a gantry and overview channel (east), or head around to two concrete walkways, each with a bank of eight electrical transformers, and riverside access to the power plant (east). These sit in front of the main generator building (interior) with a helipad and gantry stairs to the roof. The three massive red pipes behind the building have a control room and corridors underneath them and an overflow canal that spills to the east. Scaling the pipes to the top of the Dam is a precarious movement option.
-
Dam East Entrance

The riverside entrance is easily accessed from the road or frozen river or by dropping down from above. A sentry hut and a two small office sheds, along with concrete barriers and sand gabions, offer a degree of protection. Nearby are two giant cylinders with electrical transformers on the roof; access is available via ladder. There are two access roads — one offers a quick jaunt across to the Main Generator Complex, while the other (at the base of the Dam) leads to a dead end, though there’s a ladder up into the complex if you’re ditching a vehicle.
-
Dam West Entrance

Accessed via the river, the Dam, or the suburbs to the south, this Dam entrance comprises two main, single-level structures at the end of a curved road. Concrete and rock buttresses prevent a sentry hut, maintenance shed, and server room with office from slipping into the river. Note the defensive sandbags atop the office roof, and good road access into the Main Generator Complex. You can access the cliffs and narrow ledges northwest of the maintenance shed with the gabions if you’re after a spot of rock-climbing.
-
M100 Divided Highway (Gora Tunnel)

The main arterial route continues along the map’s western edge and has two tunnels — one leading northeast to the Dam, and one south to the airport outskirts. A small shed is at the road junction leading down to the Police Station, and the road continues to the lower Dam entrance. Explore the rugged hillside above the highway and both tunnels; this terrain is the highest point on the map and offers spectacular views of almost the entire map. Also note the ATV-sized ramp off the highway, allowing an impressive jump onto the Police Station roof.
-
Brick Shed and Road Tunnel

This section of the divided highway (M100) sweeps up to the first of the Gora Tunnels, after heading under a rickety railway bridge you can traverse, ideally using a smaller vehicle. Beware the surrounding rocky terrain and slopes, as this can serve as an ambush point for those so inclined. A small brick shed mainly contains detritus but can act as temporary cover. Climb atop the tunnel mouth for excellent views, especially south.
-
Bloc 17

Follow the road from the divided highway, or along the northern airport perimeter, to reach a small settlement on the undulating frozen slope south of the Dam. Here you’ll find around a dozen residential structures, with two small office buildings, a two-floor pub occupying the dominant location (with the red arched windows and a sign for Sergio’s Restaurant Bar and Grill). Bisected by a railway track (south) and the end of the river (north), most structures have interiors to investigate or hide in. Use this as a staging location when traversing to or from the Dam or airport, and optionally use upper floors or rooftops for better visibility of the map to the south and east.
-
Bloc 16

Farther east along the main east-west road located north of the airport perimeter is a small village, jammed in between the airport and the river (north). Being on the flatter river flood plain and bisected by the main road and rail line, there’s a modicum of cover to be had when dashing between the dozen or so scattered buildings. These range from a brick warehouse and tiny stone shed (north); a trio of sheds near a small, two-floor white house with a corrugated roof (center); a grey brick storage garage; two modest homes with upper floors; and a yellow apartment structure closest to the airport. Flitting from structure to structure is the safest way to navigate this flatter area.
-


-
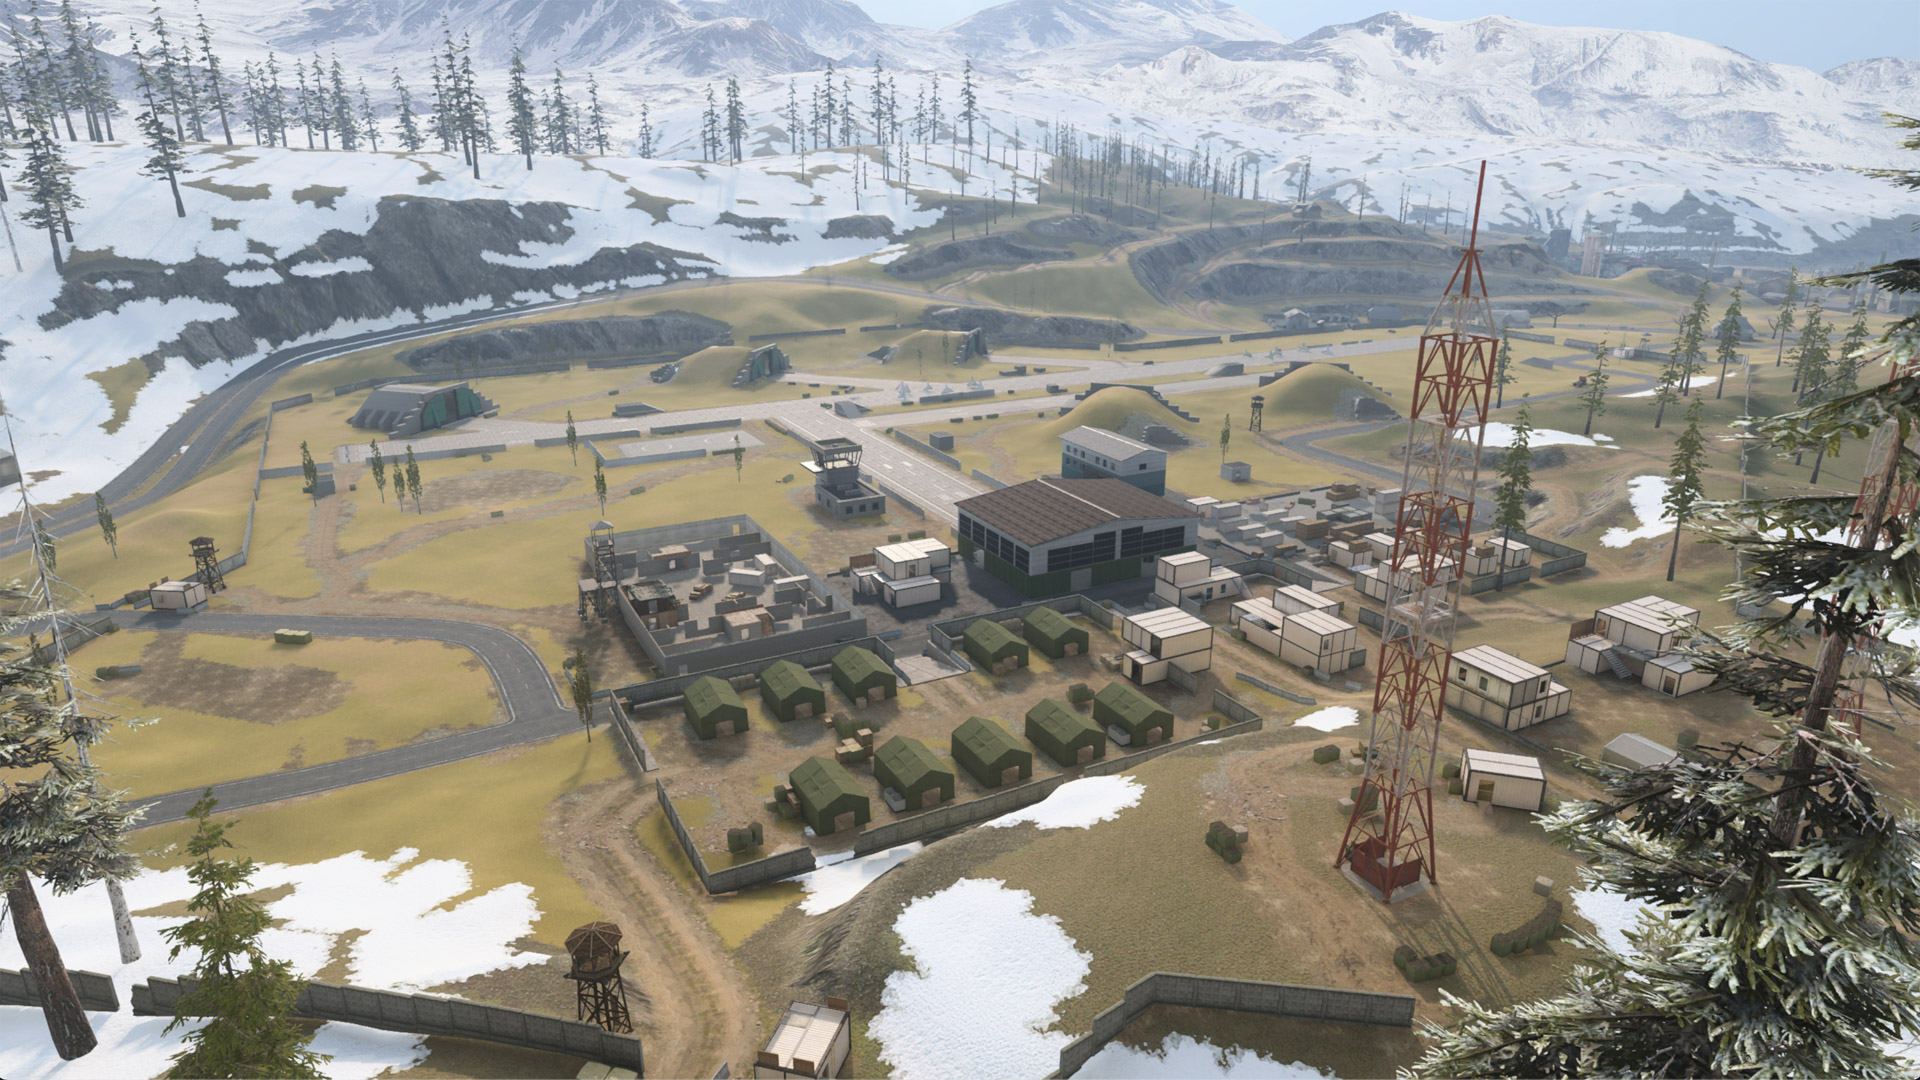
POI Overview

On the upper plateau below Arklov Peak sits a large Military Base that has seen recent action. Featuring a runway; numerous hangars; a maze of barracks, warehouses, and storage areas; and a Killhouse training yard, there’s much to discover (and loot) in these parts.
-
Airfield Northwest Entrance (Military Base)

This is one of two main entrances into and out of the Military Base. A watchtower, gabion defenses, and a small hut await those attempting to access the immediate vicinity. Mantle over the wall at certain locations around the perimeter or look for one of the missing wall sections. The watchtower offers exposed but impressive views across much of the base, as well as the north roads.
-
Airfield North Entrance (Military Base)

This is the second of the two main entrance points to the Military Base. This location is more exposed than the other entrance and features gabion blocks, a watchtower, and a small security hut to scavenge or hide in. The watchtower here offers more of a view of the runway than the adjacent tower at the northwest entrance. Expect long-range fire as you attempt to infiltrate this area; the surroundings are extremely open.
-
Hangar 11 (Military Base)

The northwestern end of the main runway has a large open hangar. The 11 displayed on the left green wall can help you pinpoint your location if you’re arriving here by vehicle or rendezvousing with a squadmate. Climb the roof and use the top of the front wall as cover and as a lookout point. Also investigate the interior; there’s a passage at the back to a rear entrance, which can aid in infiltrations.
-
Hangar 12 (Military Base)

Midway along the northeastern perimeter is a second large hangar. This one displays the number 12 on the left camo wall; again, this helpful if you’re using it as a rendezvous point or a marker. The roof of this hangar is grassy compared to Hangar 11, further differentiating it. Climb the roof for an elevated shooting position. Inside the hangar, there’s a rear passage leading to a metal access door, allowing you to flee or infiltrate, depending on the combat situation.
-
Hangar 13 (Military Base)

The third of the runway hangars offers the best infiltration possibilities, as it is close to a rock outcrop along the northeastern perimeter of the airfield. The outcrop provides great views across the airfield, as does the grass-topped hangar roof. Note the 13 displayed on the left camo door and the rear entrance; a metal door leads through a short passage into the hangar.
-
Control Tower and Taxiway (Military Base)

Northeast of the warehouses is the taxiway, which leads to the runway; this is open and offers little cover opportunities. On either side of the taxiway is “Warehouse 3” (southeast). This three-level storage warehouse has elevated interior views and the control tower (northwest). The tower has a ground-level interior, while the tower control room is accessible via external gantry stairs. Use this landmark as a marker while traversing the base. Also note the helipad in the vicinity, close to the main runway.
-
Runways 01 and 02 (Military Base)

Spanning the entirety of the facility is the main runway (01) and a smaller secondary runway (02), both running northwest to southeast. There are (inactive) missile carriers parked in the vicinity, and five main hangars. At each end of the runway and at two locations across the runway are several dolosse — tetrapod barriers designed to prevent takeoffs and landings. These also make good cover across otherwise open ground. Both runways are linked to the hangars and taxiway.
-
Hangar 21 (Military Base)

Adjacent to the taxiway and Runway 02 is a large hangar with “21” on the left green wall. There are impressive defenses in front of the hangar, but you can easily maneuver around them. Use them as cover, as well as the interior of the hangar, the grass roof, or the nearby watchtower. The interior also has a passageway to a rear door, allowing access to the Storage and a small, white brick hut that you can hide in.
-
Hangar 22 (Military Base)

Offering immediate access onto Runway 02, the last of the five main hangars has a similar footprint — a large curved grass roof to hide or snipe from or gain height for reconnaissance. The hangar itself has a “22” emblazed on the left camo wall and a sparse interior. There’s a short interior corridor to a rear entrance, which offers a quick escape into the hills. Note the concrete wall farther south in the wooded hills, revealing the perimeter of the facility.
-
Comms Tower A (Military Base)
On a rough rock plateau elevated above the rest of the facility is one of two adjacent comms towers. There are some minor defenses and a small metal hut to infiltrate, but the tower offers the most potential. If you can, climb to the top or drop in from above via helicopter or parachute, and use either of the tight upper platforms as a sniping point. If you want to spot foes across the airfield or the mountainous region all around you, this is an excellent, if exposed, option.
-
Comms Tower B and Storage Huts (Military Base)

Though this comms tower isn’t as elevated as Tower A, it has all the vertical benefits, enabling you to see 360 degrees and across the airfield if you climb one of the two ladders within the tower. Nearby are three metal buildings: a server room — which is where the Armistice had to infiltrate in order to confirm AQ weapons in Operation Kuvalda — and a pair of two-level container structures housing machinery, lockers, and other equipment. Continue northeast down the slight incline to two walled yards, each with a variety of prefabricated storage huts. The first yard has three structures (two with two-level interiors). The second yard to the east has six numbered storage sheds, all with interior access, and a two-floor office and munitions store. Use this area to hide from foes or lose them in this small maze of structures.
-
Barracks (Military Base)

Temporary military barracks and some light defenses have been erected above the central cluster of facility structures. This area has sandbags, crate and gabion stacks, an earthen ramp entrance (northeast side), 10 bunk tents, and a tall concrete perimeter wall (with intermittent gaps to pass through). The southeast perimeter has a small container stack structure (two level) leading to the prefabricated container storage huts. Head to the barracks to seek out loot and cover.
-
Training Course (Military Base)

Flanked by four large floodlights, which allows you to see the perimeter of this Killhouse training course, the compact training yard has cinder block walls, a roughly symmetrical layout (aside from the central area), and a tarp-covered, half-built wooden hut in the middle, along with containers and a wrecked car to hide behind. There are access doors at every corner but the north, as well as an elevated, two-platform watchtower on the northwest side, just outside the wall. Here you can look down on the course or around the entire Military Base if you’re happy to be exposed.
-
Main Warehouse (Military Base)

Working northwest to southeast from the Training Course, this selection of large structures encompasses much of the flat ground close to the runway. A series of metal containers have been constructed and placed together to provide a mechanical bay and munitions storage location across two levels, sitting on a cracked tarmac forecourt. Next is a huge, empty hangar with limited scenery to hide behind. On either side of the taxiway is “Warehouse 3” (southeast). This three-level storage warehouse has elevated interior views and the control tower (northwest).
-
Storage Yard (Military Base)

The southern part of the Military Base consists of a large open pad of containers, crates, and parked missile batteries, as well as stacked wall sections. A small, corrugated office hut (near the north corner floodlights) has a tiny interior you can maneuver into, and the yard offers a variety of cover opportunities within the mesh fence perimeter.
-
Airfield Southeast Entrance (Military Base)

The southeastern perimeter of the Military Base has a guard tower, a metal hut, and some barricades at its main entrance, close to the main airfield sign with the Verdansk crest on it. This offers a direct path into the base, though a more surreptitious plan is to enter via a break in the concrete perimeter wall. There’s easy (but open) access into the grounds and the main road that joins up with the northwest entrance. Use the roof of the hut or watchtower for an elevated defensive position, with 360-degree views across multiple zones.
-
Comms Tower (Bloc 23)

Accessible via dirt trails that meander across the top of this wooded mountainous area, the red comms tower and adjacent shack are good for using as landmark markers, especially when exploring the map’s northern quadrant. The tower has two platforms connected by a long ladder. If you can chance being exposed as you climb, you have two upper platforms to snipe from; the upper one provides views across the entirety of the map (you can even see the Gulag from here!). You can also drop atop the tower mast from a helicopter (or parachute) for an even better view, though your maneuverability is severely compromised.
-
Winged Memorial
Commemorating the lives lost locally in previous confrontations, this pair of giant wings, with an inscription block and vista, dominates the hillside just southwest of the Military Base. Trek here using the dirt trails, or better yet, drive here. Use the memorial as a landmark, or drop to the wing tips from a helicopter or parachute (the memorial isn’t easy to climb), granting you an impressive (but exposed) view of the airfield. Note the cliff ledge along the northeastern side can provide cover.
-
Broken Bridge (Riverside)

Use this as a marker to gauge your location as you explore the map’s north sector; it is just east of the blue and white corrugated warehouse (part of Airport Sheds) and close to the main road running through Riverside Village.
-
Storage Garages (Riverside)

Closer to the center of the village is a slightly raised area where the majority of the storage garages are, as well as a small, white brick, single-level office structure. Use the raised ground as a slight advantage if your foes are on the lower parts of the village, or climb the wooded bank for better visibility (for both you and foes looking for you).
-
Pharmacy (Riverside)
Arguably the easiest landmark to spot in this village is the blue-roofed A-frame pharmacy, located near a garage and a shed. Use the pharmacy as a marker and easily access the interior (including the upstairs). The roof is also straightforward to climb onto. Note the variety of roads and trails at this junction.
-
School and Public House (Riverside)

The village’s southwestern edge features two important structures: the salmon-colored school building, where more evidence of El Traficante’s shipment could be found in Operation Harbinger, and a public house (with red arched windows and a sign for Sergio’s Restaurant Bar and Grill). Both structures have two-floor interiors and ladders to reach their roofs. Close by are some residential houses; the three on the higher ground give you a slight height advantage, and all have two-floor interiors to scavenge or to breach and clear them. By the garage is a small allotment, a couple of half-built homes, and road access to the TV Station. This area of the village offers excellent trail access up into the mountains to the north, toward the Military Base and Quarry.
-
Decaying Jetties

The remains of an old, small wooden jetty offer another quick marker location when you’re traversing up or down the river or crossing between Airport Maintenance and the southeastern corner of Riverside Village. There are two jetties along this exposed section of riverbank.
-


-
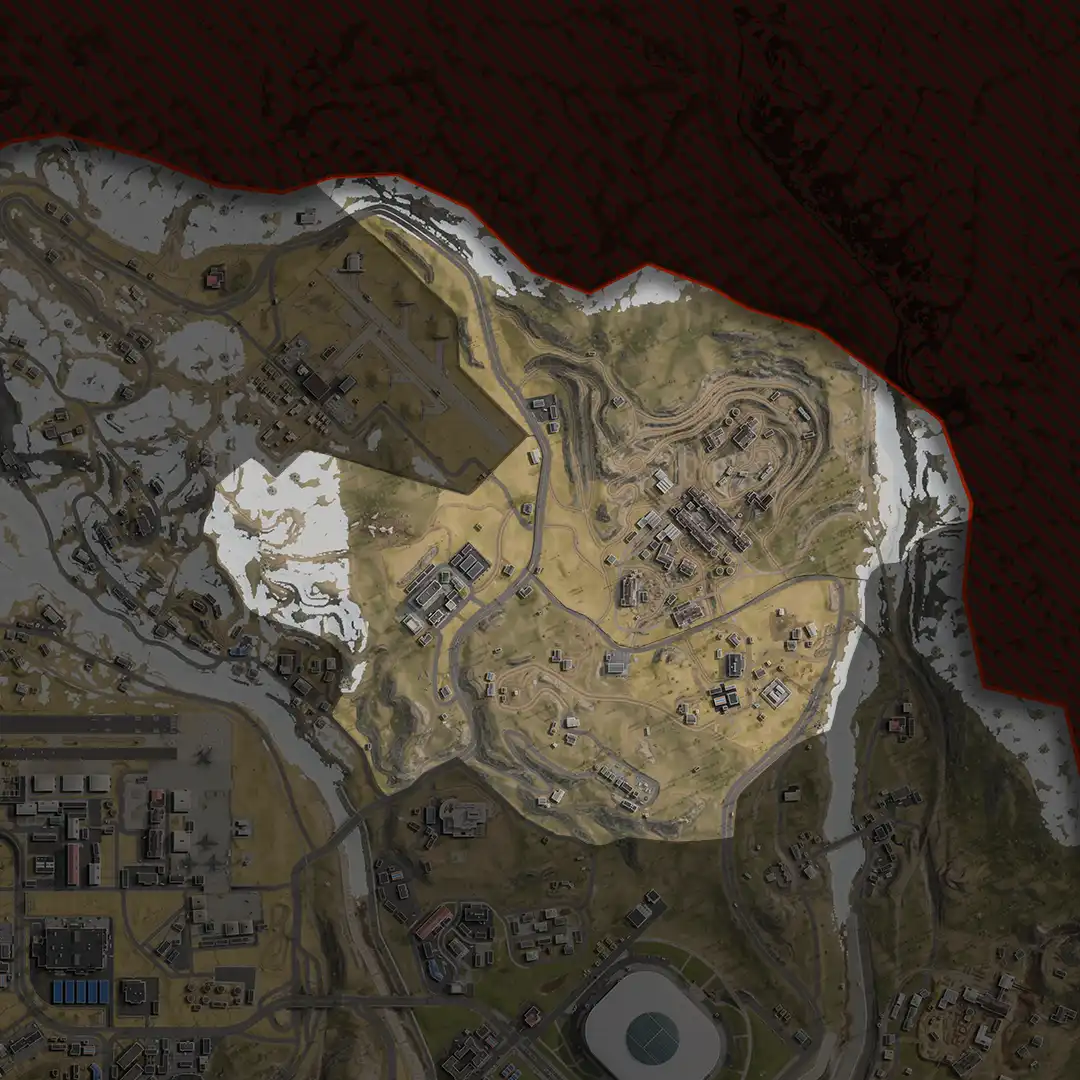
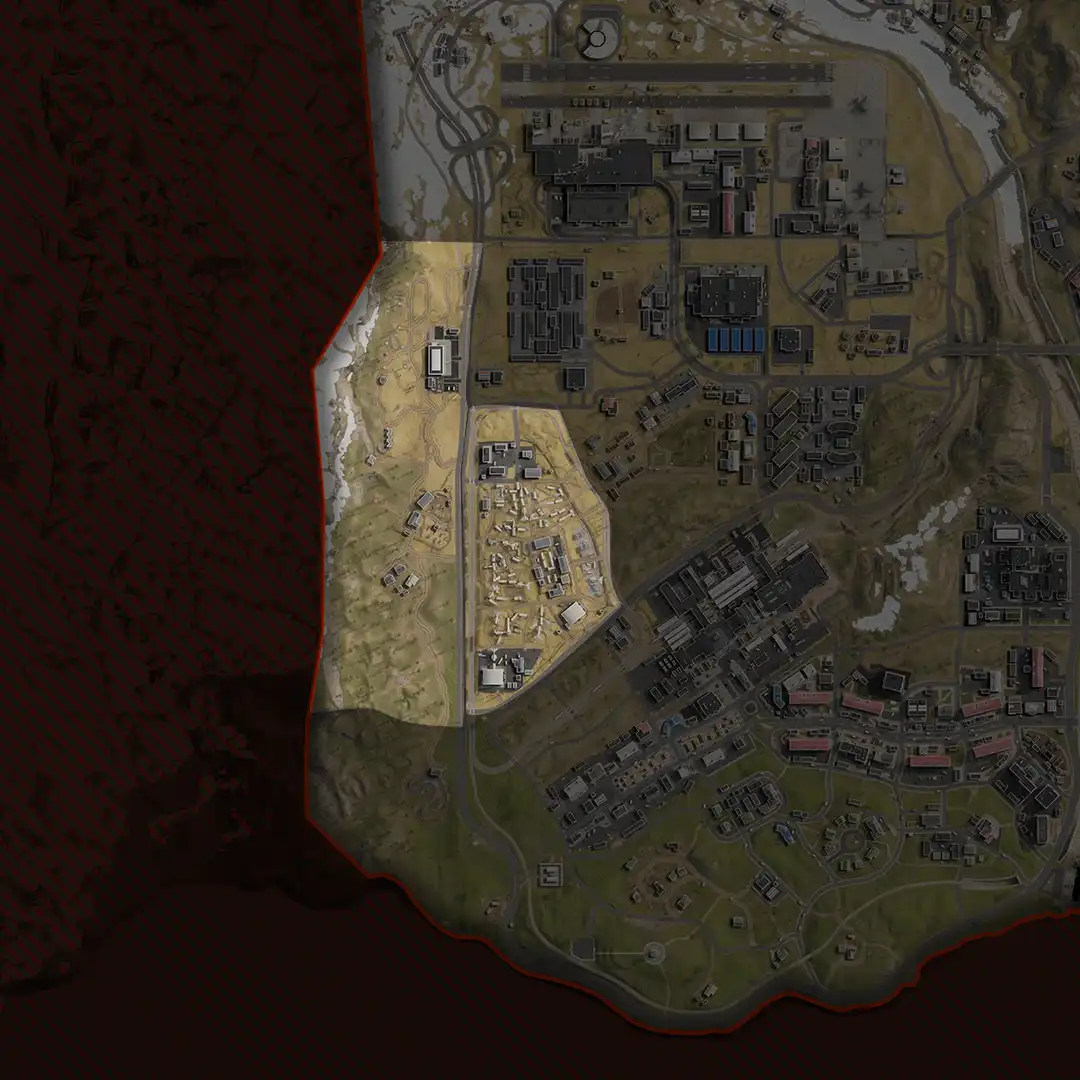
POI Overview

Mining the vast Arklov range for various rocks and minerals since 1961, the Karst River Quarry is a vast complex of interconnecting warehouses, refineries, dirt roads, rail lines, and . . . secrets.
-
North Cliff Roads

At the destroyed truck with barrels in the flatbed, you can head southeast, climbing the trails above the main divided highway. This gives you access to several rough roads that loop around and into the Quarry.
-
Lone Cabin and Party Hut

Offering little in the way of escape options if you’re caught, this cabin is an often-overlooked location to hide at. Use it to stay hidden and look out over the airfield and the roads to the Quarry.
-
Loading Yard

Northeast of the airfield is a walled concrete yard with a variety of pallets, burned-out vehicles, forklifts, and a grime-covered warehouse (with “4” painted on it) all next to the divided highway. The warehouse has a small workshop and a set of garages next to a small farm. The house has a garden (of foxgloves, daisies, and poppies) and an upstairs loft with a window at either end for viewing or shooting out of. Watch for foes coming in from the airfield or from the trails behind the yard.
-
Grandfather’s House

A ramshackle dwelling sits atop the cliffs to the Quarry’s northwest; this is accessible via hiking trails or the adjacent dirt road. The home has a variety of detritus at its base, including garbage bags, a wheelbarrow, and discarded bottles of diesel fuel. Its interior and its upstairs attic have multiple windows to peer through and check enemy locations. There’s also a nearby copse of trees and two benches allowing views south, all the way to the Gulag, making this an impressive vista and sniping position.
-
Military Comms Aerial (Quarry)

A couple of rock overlooks have been left after the cliff roads were carved out. These offer reasonable protection from foes below you, as well as impressive views across the Quarry and the woods to the west. One of the two nearby overlooks has a comms aerial and parked truck on it, offering a modicum of additional cover.
-
Huntsman’s Hide (North Cliff)

This vantage offers a commanding view of the northeastern end of the Quarry. It is one of the most remote locations in Verdansk, and not easily found even after you learn about it! Hike here through the woods or take an off-road vehicle to reach this remote hideaway.
-
Cliff Roads

Welcome to the Quarry! Prior to the recent conflict, quarry trucks removed copious amounts of rock from the main gravel pit to the south of these cliffside roads. The location is rough and set on three different tiers. Study the map to learn where a road junction is, as the paths mainly run parallel to each other. The large rock ledges and upper outcrops, as well as the woods above the Quarry, are excellent places to take a more defensive stance. Note that driving these paths can be dangerous, as there’s little room to take evasive maneuvers. Otherwise, use these snaking paths to reach the snaking paths to the northwest, east, or southeast to reach the Quarry.
-
Ruins

A large brick loading warehouse close to the main refinery building at the base of the cliff roads in Quarry, this medium-sized, L-shaped structure offers a basic level of protection once you step inside. This area was overgrown and abandoned before the conflict; you can access the roof access via a ladder on one of the walls or parachute to it from the cliff roads above. You will also find access to the exposed yard near the Storage location, as well as into the Refinery and down into the pit.
-
Refinery

This impressive structure has eight separate levels to investigate, including a pitched roof and a gantry platform atop the smoke-belching chimney.
Exterior: Access the refinery via the multiple doors and windows at ground level, or the large pipe attached to one of the two water tanks to the structure’s northwest. Also note the metal gantry steps (north side) and a lower basement entrance on the pit’s southeast side, allowing for a large variety of entry points.
-
Excavation Site

A stack of mobile structures (the administration offices and sleeping quarters) are positioned on the Quarry’s northeastern edge. Gantry steps offer access to the upper road, while block stacks, walls and the buildings offer cover opportunities. There are six containers to investigate and reasonable views of attackers across the gravel pit to the southwest.
-
Gravel Pit

The large Quarry pit is filled with a variety of machinery, all offering good traversing and defensive possibilities, as well as access into the refinery. North is a small container admin office. East are four more containers; these are stacked and contain beds for long-departed Quarry workers. Ten conveyors (attached to three separate bench grinders) that sifted the gravel stand motionless, and aside from being open platforms to dash across, you have upper access onto the Rail Yard complex.
The southeast side of the pit features a tall, rusting facility structure with a huge chute where gravel is dropped into rail carts. There are some ladders and gantry stairs and a lower roof you can leap to, but the main roof structure is only accessible from the air. Close by is a water tower, offering exceptional (but exposed) views across the Quarry, either from a platform or the top of the tower.
-
Storage

At the north end of the rail yard is a large storage warehouse with a distinctive sawtooth roof. You can’t enter the structure but you can access the roof via a ladder. The north rock wall up to the cliff roads is accessible via a road and a gantry staircase set into the rock. On either side is open ground and rail carriages. Note some are covered and open, so watch for possible ambushes.
-
Rail Yard

The sprawling rail yard comprises the central part of Quarry and runs northwest to southeast. This area has a number of important structures — learn their access points.
-
Crash Site

What lurks in the forests and pockets of residential housing to the south of the Military Base and Quarry? A downed airliner, dilapidated rural communities, and the unsettling atmosphere of a WHP Camp.
-
Crashed Airliner

In the woods just south of the Military Base Airfield and west of the Quarry are the remains of a crashed plane, split into three roughly equal sections. The parts of the fuselage can be entered and checked for items, and the entire wreckage can be climbed on and over.
-
Lozoff Pass Junction

The outer perimeter of the Quarry grounds and the edge of this zone features a junction in the divided highway. There is a small military checkpoint with a metal hut, flanked by a residential cottage on either side of the road, each with a two-floor interior. Farther southeast along the road is a watchtower on an embankment. Climb the tower for impressive and elevated views of your surroundings but watch your back!
-
Grandma’s House

A quaint cottage compound, this pair of structures and an adjacent pair of propane tanks is part of Lozoff Pass Village and was recently a tenement farm. Close by is a rusting tractor, cleared woodland, and a dirt road accessing the main part of the village. Both houses are similar in style, but with a different, two-level interior layout. Watch for fire from windows both from ground and attic levels.
-
Warehouse 3: Quarry Entrance (South)

Along the main road, close to a small, rocky woodland hillock with an antenna on it, is a medium-sized warehouse and tarmac yard close to a power tower. Warehouse 3 (notice the number on the large sliding door) is at the south edge of the Quarry, but technically in this zone. There’s a partial wall and an open interior offering three levels: the floor and two upper gantries accessible by stairs and ladders. Prowl the gantries to drop foes incoming from the Quarry; window sniping is possible from either of the upper levels.
-
Military Evac Post

On the cusp of the Bloc 18 zone, at the northwestern side of the road bridge, is a small military evac area with a sign, light defenses, and an immovable military truck. The bridge is part of the main artery through the map’s eastern zones.
-
Comms Tower and Electrical Transformers

A small compound with a low wall and an immobile truck outside, this transformer yard has two container structures housing electrical equipment, sparking transformers between the containers, and an adjacent tower you can use as a marker. Climb the tower via the ladders; two platforms offer increasingly distant (and exposed) views of the village and across the river to the east. The comms tower is close to two small, old outbuildings; you can check for loot and hide inside here and a yellow farmhouse with a two-level interior.
-
Military Checkpoint: Road

Close to the transition between here and Bloc 18 is the main A22 road leading south toward the stadium. Under the overhead sign is small military checkpoint, offering quick progress between the electrical transformers and the frozen river. Watch for hostile forces hiding in the olive-green container and use the concrete defenses and immobile truck for cover.
-
Switchbacks

A series of tight, narrow switchbacks leads you up the steep rocks from the BCH TV Station Zone to the WHP Humanitarian Camp. Note the scenery at each switchback; at the first turn is a small farm building with a tractor, a garage, and a water tower to climb and defend, offering sniping opportunities from the Stadium to the TV Station. At the next turn is an upturned car and a large antenna. Break off from your drive or hike to investigate the woods and trails around Lozoff Pass Village.
-
Lozoff Pass Village (Bloc 14)

The older part of the Quarry suburbs is the farming community of Lozoff Pass, a collection of run-down structures nestled between rock outcrops and thinning forest.
West side: A two-story white residential structure overlooks the divided highway to the west, along with a double garage and two small outbuildings across the dirt track. Nearby to the north is a small fuel silo.
North side: Inspect the woods here and the interior of the small hut. The trail from the main road comes in here.
Southeast side: Two residential dwellings (one yellow, one brick), each with two-floor interiors to hide in or search. Three outbuildings along with a fuel silo sit at the bend in the tarmac road leading to the WHP Humanitarian Camp.
-
Mechanic Bays and Offices (Bloc 15)

Old meets new as a modern gas station and newer warehouse structure sit surrounded by much older farm structures. The gas station has four pumps, a small hut that is easily overlooked, and a small market stripped of goods. Note the ladder to the roof at the rear of this structure. Across the dirt road is a large warehouse with attached garage and multiple entrances.
-
Karst Farm (Bloc 15)

This group of dilapidated farmhouses lies on the edge of town, which is also the edge of the Quarry and the edge of the zone. This compound consists of three residential structures, a brick shed, a fuel silo and fencing, and a patchy field with the remains of a barn (and a cow). The open area can be a sniper’s delight, so beware crossing the field. Two out of the three houses have interiors and attics — search them or shoot from them.
-
WHP Camp (Bloc 15)

At the top of the wooded hill is a medium-sized camp of white tents, high concrete walls, and numerous bodies in zipped bags festering in the breeze near a small collection of outbuildings. This abandoned triage camp also features a small container crate yard and two watchtowers at the fortified entrances to the camp. There’s plenty of close structures to maneuver between for cover, and on the road to the east you can use a parked WHP truck as a marker when locating this place. Climb or hide in the watchtowers, providing sniping opportunities across to the village and southern Quarry perimeter. Check inside the three outbuildings (a one- and two-level office and water silo building “3”) for loot.
-


-
POI Overview

The following is a thorough inspection of the Verdansk International Airport, from the long-range sniping opportunities at the Control Tower Complex, to the underground roadway, to the vast terminal buildings.
-
Highway Junction

West of the airport is a large highway junction (M100 highway) with off-ramps allowing you to head to the Airport, or farther north to the dam, or south toward Storage Town and the Boneyard. Set up ranged combat atop the overpass bridge, check the bridge supports (and on-ramp pillars) for enemies, or ambush foes as they pass under the bridge. Remember you can snipe from the hills to the west, too.
-
Runway Underpass (North)

The longest continuous subterranean structure in Verdansk is this runway underpass, enabling you to drive or sprint from north to south, all the way to the southern exit. Along the way, there are openings, mainly to the east.
-
Runway Underpass (South)

Linking to the Runway Underpass North exit close to the Airport Control Tower Complex is an underground road, with exits into the parking structure, terminal, and runway. Enter from the south by driving or running down the ramped main road at the Airport’s southeastern perimeter, turning north as you enter the underpass.
-
Control Tower Complex

One of the most prominent landmarks in Verdansk is on fire; the Airport control tower is ablaze, making it an easy location to spot. The flames seem to be contained to the lower part of the tower, allowing access to parts of the interior.
-
Main Runway (West)

This is one of two runways at the airport, and the largest stretch of tarmac in Verdansk. Don’t confuse this runway with the one at Military Base; the Airport runway is far larger and has a second, slightly narrower taxiway running parallel to it. The taxiway has yellow runway markings, while the main runway has white markings.
-
Main Runway (East)

The eastern end of the runway borders the same areas previously described (see Main Runway [West]) but is even more open. The end of the tarmac has sections of concrete walls laid out in a roughly circular shape, offering a modicum of cover. This is very open ground, and you may well be downed attempting to navigate the area.
East: At the eastern perimeter, on the runway safety area, there are 18 dolosse (tetrapod barriers designed to prevent takeoffs and landings). Close by is a crater, an open cargo plane you can hide in and shoot from (as well as drive smaller vehicles into), and some sandbags to the south, in the Airport maintenance zone.
-
Terminal: West Lounge and Coffee Shop

Located within the main terminal, to the west of the passenger check-in area, are ATMs. Enter the zigzagging corridor connected to a smashed vending machine, a coffee shop, a waiting area (with double doors to the outside), and a lounge. The security checkpoint is inaccessible.
-
Terminal: Gate Access

Along the north perimeter of the terminal’s upper floor are doors leading to Economy and Business Class. Enter either, or hop through the counter between the doors to a boarding hall and a connecting jet bridge into the front of the wrecked plane. Note the open window on the right side of the jet bridge; use this as cover if you’re fighting foes inside the terminal. Alternatively, you can open a metal door and head down to the exterior baggage hall and runway. Or climb a ladder to the roof above the boarding hall and run back into the terminal, or set up defenses on this lower section of the terminal’s roof.
-
Plane Wreckage

An Airlines passenger plane lies in two separate sections after taking what appears to be a direct mortar strike while sitting at the main terminal gate. The jet bridge is still attached to the cockpit door. Despite the rubble and haze, you can navigate in, out, and around the plane.
-
Main Terminal

Verdansk International Airport has recently received a barrage of shelling, and the aftermath of the attack is visible across the superstructure of the main terminal building. Support pillars have crumbled along the front of the structure, the roof has collapsed so much you can fly a helicopter through the gaps, and debris is scattered throughout. Learn the different entrances at different heights to fully explore these ruins.
-
Terminal: Parking Structure and Skybridges

The mazelike parking structure just south of the main Airport terminal is almost as large as the terminal, and arguably more complex to get around. To the east is a small military camp, a looping overpass to the Arrivals area of the terminal, the runway underpass exit, a small coach parking lot, the main parking structure, and a small park with a statue and restrooms.
-
Three Hangars

There are three identical hangars on the runway’s south side. They all have a similar layout: A main entrance, leading to an expansive interior with scattered crates and open exits in all three walls. The west hangar has a truck parked inside; use this pinpoint as a marker. Access the concave rooftops via helicopter or parachute. Access the apartments to the south via the rock buttress and concrete walls along the southern perimeter. Note the two stacked container crates (southeast corner outside of the east hangar) for cover purposes.
-
Apartments and Metro (Airport)

Just east of the terminal is an expanse of apartments. These are dominated by a large tenement block in the southern part of the area, with four smaller apartment blocks on the north and east sides. There’s pedestrian walkways and brick planters, a Metro entrance, parked buses, plant verges and grass, trees, and several green-doored garages in the center, northeast and east areas. Use any of these structures to hide in or take cover, or use the roof for advantageous sniping.
-
Vehicle Showroom (Airport)

Just east of the terminal arrivals on-ramp, by the apartments and Metro, is a modern, glass structure — a GRZ car dealership. A vehicle is parked inside the showroom. There’s a small tunnel (west) from the dealership to a park, and then to the Airport parking lot.
-
Vehicle Showroom Exterior (Airport)

Exterior: Southwest is a small office hut by the on-ramp entrance and a billboard. Access two narrow office areas via either door or the windows. The showroom has numerous entry points: There are four open entrances at the front forecourt; a ground-level entrance (metal door) on the west wall, near an adjacent ladder that allows access to a lower roof balcony and a wall of windows that allow access into the showroom; a second ladder that enables roof access; two windows along the north wall (you can fire but not move through). In the northeast corner is a metal door entrance. Finally, along the east wall are upper windows, accessible from the interior balcony.
-
Airport Maintenance

The structures to the Airport’s east include a taxiway, additional hangars, shipping warehouses, and a small water treatment facility.
-
Fire Station 28 and Helipad

Serving the airport and surrounding area, this fire station was constructed near the main runway, adjacent to the hangars, shipping warehouse, and a nearby helipad.
Fire Station 28: The interior has two main floors, including the garage, reception area, locker room, and crew quarters upstairs. There are ladders to the roof and the tower, where a commanding view of the Airport and the rest of the maintenance yard is available.
Helipad: This area includes a pair of landing platforms, a small administration office, and a security gate along the southern part of the perimeter wall, which has a few gaps you can drive through.
-
Shipping Warehouse (Maintenance)

An impressively long structure, this pair of warehouses is connected by a covered bridge and sits behind the hangars, adjacent to the fire station and helipads.
North Warehouse: Note the brick lower façade and white upper corrugated walls. This warehouse also has three distinct floors, the top one connecting to the adjacent south warehouse.
South Warehouse: The second of the brick and metal warehouses offers interior and roof access to the north warehouse and to the main bridge.
-
Police Station (Maintenance)

Law enforcement has abandoned this outpost. The station has green garages on either side, two run-down apartment buildings to the east, and a parked truck to hide behind.
Police Station: The structure has a ladder and roof trapdoor accessible from the interior; both allow roof access. The roof has a large police insignia visible, which is great for locating this building from the air. The station’s interior is set across two floors. The first floor has a reception, cells, and an interview room. Up the stairs are offices and a locker room, along with a roof ladder.
Low-Rise Apartment: This small two-level apartment structure has bright green paint stripes and a brick pathway outside. The main entrance is on the north side, with a rear entrance on the south exterior.
Tunnel-Adjacent Apartment: This cube-shaped apartment structure has entrances to the north and south, and a roof ladder on the south side. The first and second level each has a studio apartment with inaccessible windows.
-
Hangar 1 (Maintenance)

Close to the fire station and shipping warehouse, and adjacent to the almost identical Hangar 2, Hangar 1 has its number on the roof. There is a parked truck and some cargo containers within its immense interior. There are exits along all four walls. The taxiway has some military vehicles, sandbags, and concrete walls to use as cover while attempting a sprint across the open runway.
-
Hangar 2 (Maintenance)

Hangar 2 also has its number emblazoned on the roof. This is empty, save for some scattered crates. Note the multiple entrances along all walls. A small storage office sits adjacent to this structure, which is close to three large cargo planes.
-
Comms Tower and Electrical Transformers

Two electrical cabins set between a power transformer provide the nearby maintenance locations with power. Surrounded by a low wall, both cabins can be accessed, but the real fun comes from ascending the adjacent comms tower, near a small hut that you can hide in. Climb the mid or upper platform for a tremendous view with sniping potential and for locating major landmarks in all directions.
-
Covered Taxiway Tunnel

Attempt to drive onto the airport grounds from the divided highway to the east. Take a side road and find a gap in the perimeter concrete wall. The road dips down into a short tunnel under the taxiway. You come out the other side near the police station. Though the road is straight and provides little protection, being underground gives you an advantage of being hidden compared to most other adversaries at mid or long ranges.
-
Substation 3 and Apartment Block

A roughly triangular tarmac parking area has four green garages to inspect for loot, a small apartment complex, an administration hut, and a substation building marked “3.” Low walls run a rough perimeter around this area. There’s mostly open streets and scrubland around this area, making it dangerous to traverse.
Administration Hut: The hut at the north end has a single entrance and a single room inside. Access it via either set of windows.
Substation: This cube-shaped building, has a large water tank inside it and two levels to check for foes and loot.
Low-Rise Apartment: This small, two-level apartment structure has bright green paint stripes and a brick pathway outside. The main entrance is on the southeast side, with a rear entrance on the northwest wall.
-
Small Hangars and South Taxiway

The southern perimeter of the Airport maintenance zone features a main road to the west and south and a large open taxiway south of the covered tunnel (north). There are four smaller hangars, a couple of outbuildings, and a line of green-doored storage garages. To the east is a concrete wall, compromised in several places.
Hangars 3, 4, 5, 6: The two pairs of hangars are identifiable thanks to painted numbers on each roof. Each has a similar layout: a huge open hangar door, sparse storage crates dotted around the interior, and two exits at the back. There are double doors and an elevated door atop a gantry staircase on the interior and exterior.
Apartment: A cube-shaped apartment structure with entrances to the north and south. The first and second level each has a studio apartment with accessible windows, and roof access.
Administration Hut: The hut at the southeast corner by the sentry hut (where the main road ends) has a single entrance and a single room inside and is also accessed via either set of windows.
-
Off-Road Track

This figure-eight track is made of dirt and rock outcrops, with half-tires and banked gravel turns. A couple of ramps can really get you some air, though you can also head off the track and into the taxiway via the gaps in the perimeter fencing. Note the two flags, one at the north and south edges of the track.
-
Electronics Store

Next to the huge Superstore is a large electronics store with a glass and turquoise front façade and concrete outer walls. Surrounding the structure is a parking lot with a low wall.
There are five entrances: three openings at the front foyer, two at the rear, and one on the building’s west side. The rear of the building also has a ladder to a low roof; work your way around to reach a second ladder on the west side, enabling roof access.
-
Beechwood Grove and Water Treatment Works

Beech trees shroud the south and west side of a water treatment plant, which has a security gate leading into an L-shaped parking lot with a green garage structure and a mesh fence that’s easy to infiltrate.
Water Tanks: Close to the entrance are six large water tanks; climb the ladders on them to get a modicum of height and protection. (There are two ladders per tank, meaning you can’t cover both directions without use of a lethal explosive.) The tall building has a water tank and two floors to access.
Offices: The water treatment main offices have roof access via the ladders on the north wall. Enter the interior via any of the three ground-level doors. Inside is a tile-floored office, with stairs up to a second office and two doors to a small outside balcony, where the roof ladders are located. The numerous upper-floor windows and roof access makes this a notable building to hold down.
-
Road Interchange

A major arterial highway running from east to west from Verdansk Stadium to the International Airport meets rail tracks and a secondary highway running north to south. The resulting interchange offers two underpasses to hide under, access roads, and a lone train carriage (just south of the interchange) with possible equipment inside. Learn this location as a flat landmark as you maneuver around the map.
-


-
POI Overview

Welcome to Storage Town, a maze of over 30 garage structures where ambushes are a frequent occurrence. Venture east to visit the last remaining farmsteads in this zone.
Among this collection of self-storage garages are military tents and a few small brick or metal container offices. Every structure but one is a single level and has a roof you can climb on using nearby scenery.
Exterior: There are six alleyways running north to south and three alleys running east to west. A reconnoiter from a helicopter should help with situational awareness.
-
Old Farmstead

Urbanization has encroached on an old farmstead, with the surrounding fields now adjacent to the storage facility, roads, and gas station. Use the looping gravel path as the perimeter, and use the plowed field as a good anchor point when parachuting in from above. There are a few areas of cover here, aside from a small, inaccessible shed in the middle of the field. Southwest are hay bales and two red silos, the taller of which has a narrow platform halfway up you can parachute onto. North of the path is a small farm cottage and a trio of outbuildings in the hay bale field. The cottage has a small interior, no attic, and three entrances, as well as a window. Note the red military antenna to the northeast, close to the Superstore.
-
Swimming Pool

Just northwest of Fire Station 63 and southeast of the warehouse facility is a concrete swimming pool structure.
Exterior: The building is filled with windows, most of which have been blown out along the north side (with a particularly large hole in the northwest corner). Access the roof via the long ladder attached to the west side of the structure; there are good views to the Airport (north), fire station (southeast), Boneyard (southwest), and highway (west). With only one entrance, this is a great defensive position.
Interior: Enter from the south side to the reception, and head through either the left or right doorway into a locker room, each side bringing you out into the pool area. The pool is empty but you can go prone on the diving boards and snipe from them. Locate the door marked “Stairs” at the south side of the pool; this leads you to a mezzanine level overlooking the reception, with views south into Verdansk Graveyard.
-
Beechwood Park

This compact woodland area is bisected by a curving road leading into Verdansk Graveyard. The road has a sign for Storage Town (which is to the northwest) and a couple of burned-out vehicles. There’s reasonable cover here.
-
Fire Station 63

This fire station sits on marshland on this zone’s northwestern perimeter. The interior has two main floors, including the garage, reception area, locker room, and crew quarters upstairs, along with ladders to the roof and the tower, which provide a commanding view of the swimming pool, warehouses, and storages.
-
Apartment Complex (Graveyard)

The soggy ground just southwest of the Superstore zone has a large apartment complex and a small cluster of older residential properties to check.
Residential Cluster: A quartet of homes features a brick structure, a white house, and a yellow cottage. All have an upper floor to check, hide in, or shoot from. The yellow-walled quadplex has a single entrance (south side) leading to four identical apartments, two on each level. Across the muddy road is the cemetery.
Apartment Complex: The parking lot of this eight-level apartment block has a cracked tarmac parking lot with burned-out vehicles scattered about. There are main entrance doors on the structure’s north and south sides, along with windows to leap into or out from.
-
Warehouse and Storage (Graveyard)

Three metal warehouse structures, two with the number “3” painted on the walls and rooftop, are the largest buildings to investigate in this dirt ground with outbuildings, burned-out vehicles, and other detritus.
L-Shaped Warehouse: This structure has three entrances and broken windows (as well as roof skylights) to enter or exit from. There are two levels inside, with something resembling an office and a small storage room on the ground level and a balcony office and windows overlooking the other two warehouses on the second floor.
Warehouse 3: The two warehouses with “3” are mechanics’ garages: One has two vehicle lifts while the other sits empty. Both have a gantry platform and ladder access up to a third-level gantry balcony. Long-range combat across to the fire station or Boneyard is possible, depending on what you’re standing.
Outbuildings: A low office, five multi-garage storage areas, and a water silo (the square-shaped building “3”) are adjacent to woods, rail lines, and the cemetery. There’s a small brick hut near the Warehouse 3 buildings to enter, too.
-
Graveyard

The Graveyard of Verdansk features numerous long, low brick walls and tombstones. The large memorial monolith (northeast) is near a small wooden shack you can check for goods, or enemies. Aside from the burned-out vehicles, this slightly undulating grass is a thoroughfare to elsewhere.
-
Pharmacy, Bank, and Police Station

Pharmacy: Easy to spot, the blue A-frame-roofed pharmacy can be used as a marker. Easily access the interior (including the upstairs), as the roof is straightforward to climb onto.
Bank: The pale green bank building has two ATMs outside the main entrance. Enter in various ways: via a garage; the low garage roof and ladder to the main roof; or the ground-level door and windows.
Police Station: Close to the main highway, this police station has a ladder and roof trapdoor accessible from the interior, both allowing roof access. Also note the roof has a large police insignia visible, which is great for locating from the air. The interior of the station is set across two floors. The first floor has a reception, cells, and an interview room. Up the stairs are offices and a locker room, along with a roof ladder.
Office and Blue Shed: Access the roof via the ladders on the east wall, and access the interior via any of the three ground-level doors. Inside is an office, with stairs up to a second office and two doors to a small outside balcony, where the roof ladders are located. The numerous upper-floor windows and roof access makes this a notable building to hold down.
Pitched Roof Apartments and Garages: There is a single and a double version of the same architectural apartment structure, with a drab green façade and pitched roof. Enter via either the single or double doors atop the outside steps, or via a ground-floor apartment window.
Roof: A roof balcony is accessible via a ladder from the interior. The balcony offers reasonable protection near the air-conditioning units. You can scramble onto the roof if the situation requires it. The only difference between the single and double apartments is the access across the roof to the other balconies; the interior of the structure is separate.
-
Tenement Blocks

Close to the main highway is a quartet of large low-rise apartments. Venture farther into this residential area to reach several garages, a low-rise structure, and some military defenses.
Tarmac Courtyard: The tarmac area immediately east of the tenement blocks features a number of storage garages, as well as a green, low-rise apartment building. The north part of the yard features a makeshift morgue under the netting, WHP tents, a small office and water silo structure (“3”), a flower kiosk, and a crashed helicopter near three olive-green tents. The area has scattered obstacles and scenery to use as cover and some tight corridors to advance through.
Low-Rise Apartment: This small, two-level apartment structure has light green paint stripes and a small empty flowers kiosk outside in the northwest corner. The main entrance is on the north side, with a rear entrance on the south wall.
-
Twin Apartment Complex and Metro

The eastern half of the area comprising the tenements and apartment structures is dominated by twin structures: a landmark complex with a Metro station between each structure. North are low-rise and commercial buildings, while south is a parking lot. Let’s work from north to south:
Burger Town: A prominent fast-food franchise sits along the main road and has been fortified with the addition of box-shaped gabions. These allow easy access to the roof, as does a ladder at the southeast corner of the structure. Inside is a single floor interior to inspect for loot.
Guns and Ammo Store and Garages: Behind and southeast of the Burger Town is a Georgian-style building that houses a Guns and Ammo Store, near some military defenses. Access it via one of the two ground-level doors or smash a window on the south side. Check for loot on the ground floor, then enter the keycard door in the upper floor to reach a large office and gun closet. Need roof access? Use the ladder on the northeastern corner, at the edge of the woods.
Low-Rise Apartment: A small two-level apartment structure has garish green paint stripes and a military truck parked outside. The main entrance is on the east side, with a rear entrance on the west wall.
Parking Lot and Outbuildings: The parking lot features a sign for the Twin Apartment. There are a handful of outbuildings and temporary military structures and garages to inspect for loot.
-
Beech Tree Hill

Verdansk has a number of wooded areas, and this is no exception. On the edge of the woods north of Verdansk Hospital (to the west), this offers height and cover as you move between locations. The woodland thins out and becomes rockier the farther east you go, ending at a power tower and highway.
-


-
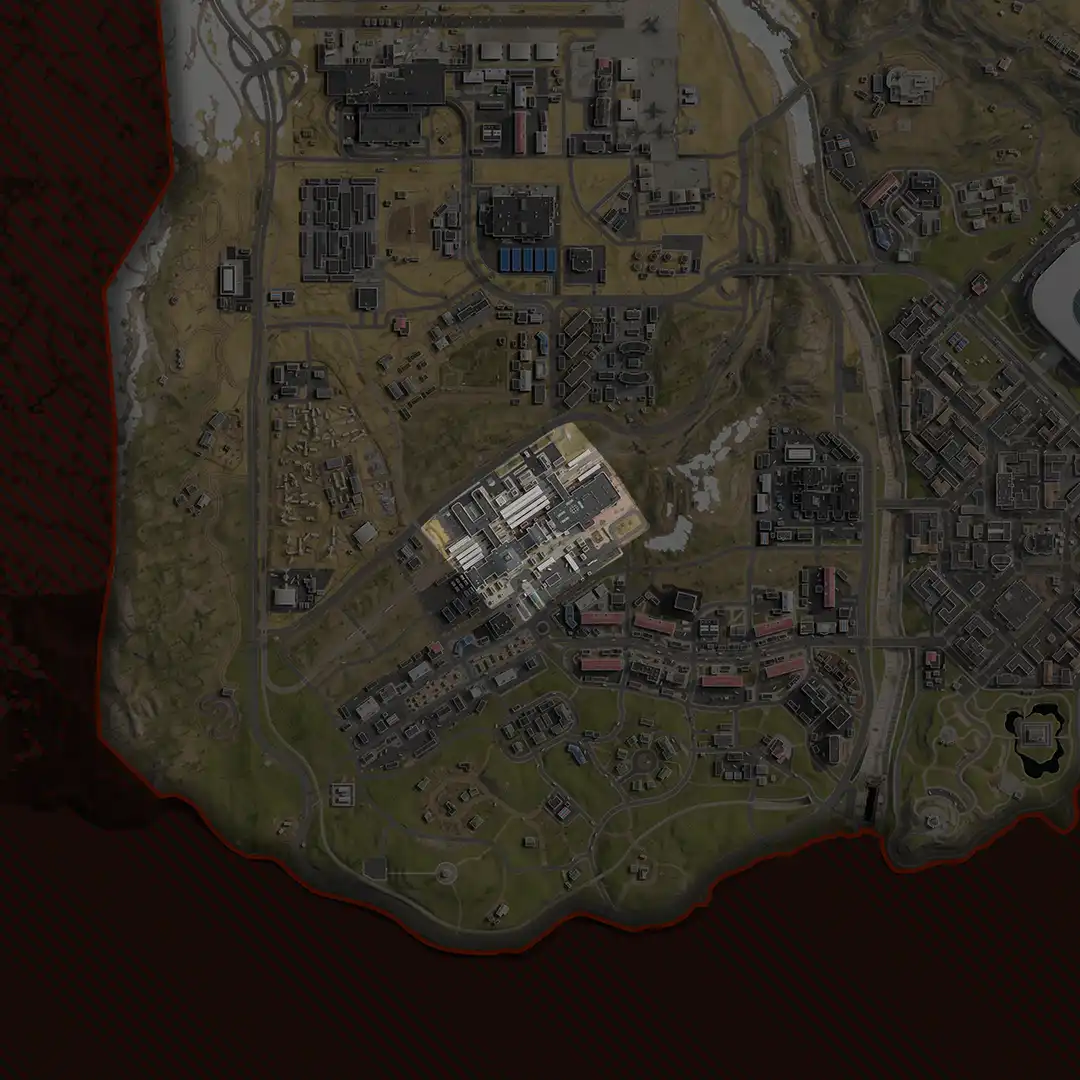
POI Overview

A vast commercial structure sits just south of the Airport. With a distinctive blue and yellow logo, two huge signs at each entrance, and a mazelike interior, this is an excellent place to commandeer, but not one you’d want to get lost in.
Exterior (South): The main entrance is on the south side, by the main parking lot. There are three double-door entrances under the massive store sign and another two double-door entrances to the southeast in a small enclosed unloading area leading to the cash registers.
Exterior (West): There’s a single entrance toward the rear parking lot by the covered carport, with debris everywhere. Note the dumpster against the wall allowing access through an open window, and a ladder to a low roof with three more entrances: one to a stairwell down to the first floor, one to a break room with a window, and one to the remains of an office.
Exterior (North): Containers, barriers, and detritus are scattered near a breached concrete perimeter wall. Enter the building via either of the open loading garage doors. Use the red containers by the loading garage to climb onto the pitched roof, allowing access through an upper window, or use the ladder to the main roof.
Exterior (East): This is the most complicated of the exterior walls. There’s an open unloading garage (“B”), a nearby door into a locker room, a small alcove and double doors, and a second alcove with a ground-level door (into a block-walled employee room). There are also gantry steps to an upper door in the southeast corner. Head north along the upper balcony to a secondary roof above the unloading garage and a ladder up to the main roof.
-

1F Main Interior: The rest of the initial floor has a variety of aisles. Use the graphics and images displayed at the head of each aisle to situate yourself. Toward the center of the interior is a stack of containers. Note some aisles are blocked.
2F: There are various parts of the building interior with an upper floor.
Roof: The roof is only accessible via ladders around the exterior of the building. The three ladder entry points are indicated by breaks in the yellow wall, so you know where to look for upcoming foes. Otherwise, the roof is mostly flat, except for two central pitched sections, several AC units, and huts to use as cover. You’ll have some excellent views all around you, with room to move, or exfil by helicopter.
-
Atlas Superstore Parking Lot
The front of the giant Atlas Superstore is a large and mainly covered parking lot, with a perimeter of grass, trees, rocks, and a low brick wall. There are five vehicle roof sections and various destroyed vehicles to use as cover, both from above and across the lot. Though the roof sections protect you from foes above you, this is a wide-open space, meaning you may be easily spotted.
-


-
POI Overview

Once serving the surrounding communities with quality programming and hard-hitting news, the BCH TV Station is in ruins, though it tends to attract Operators with its caches of loot.
-
BCH TV Station

Verdansk News Service provided “a dedicated trust team” to the locals before it was unceremoniously shut down and the news reporters “forcefully disbanded.” Now the place is a key strategic point to hold, with its multi-tiered roof, mazelike interior, and excellent defensive potential.
-
Comms Tower (TV Station)

Though the BCH4 TV Station building is a good landmark, the structure you can see most easily is a large red and white comms tower anchored in the flat grassy ground just south of the main TV Station building. Climb the structure via one of the ladders if you’re willing to risk being expose. The mid- or upper-level platforms reward you with a long-range defensive position and 360 degrees of view to ascertain enemy movement. The Stadium (southeast), Downtown (south), Airport (west), and Karst (north) are all visible.
-
Forward Observation Post

The grassy farmland and tiered rock outcrop southeast of TV Station has recently seen military activity. Parked trucks, containers, crates, and light gabion and concrete defenses are in this area, along with two green container huts with interiors to check. Note the small red and white antenna on the edge of the zone.
-
Building 3 and Electrical Maintenance

West of the main road leading to the TV Station parking lot is a small, cube-shaped building with a large water tank inside it and two levels to check for foes and loot. Nearby are sparking electrical poles, a huge electrical tower to use as a landmark, a propane tank, and a maintenance office with server racks and a desk. All of these structures are on higher rocky ground than the highway to the northwest.
-
Server, Office, and Outbuildings (TV Station)

There are three outbuildings adjacent to the TV Station, east of the main road leading to the TV Station parking lot. There is a small, cube-shaped brick structure with a “1” on the rear door, a two-floor office, and a single-level maintenance hut overlooking the main road and the Burger Town block.
-
Tenement Blocks (Bloc 6)

Once a suburb just outside the Stadium, this is now an abandoned collection of residential homes and various commercial structures.
The main residential housing on the western part of this zone is a small, green apartment and a larger red-roofed tenement block. The main road loops around most of the perimeter of these structures.
Green and White Apartments: The main entrance is a pair of double doors with a porch. A rear entrance is on the opposite side.
Tenement Block: The front of the structure faces northwest, onto the main road. There are two double doors you can use to enter the building, or you can smash a window to the left of either door. The rear and sides of the tenement block contain a play area, bus stop, and two small metal huts that are locked. There are two single doors allowing interior access. Or you can crash through a window to the right of either door.
-
Loading Warehouse and Storage

East of the main tenement block is an equally imposing blue warehouse structure, with a storage garage and two maintenance huts in the tarmac yard. During Operation Headhunter, two of the AQ Lieutenants defended this territory. Farther south are two more storage garages. The main structure is the blue and white warehouse with attached garage and multiple entrances.
-
Public House (Bloc 6)

A family restaurant sits in the middle of the suburbs, offering cover as you encroach on the main tenement block. Outside is scattered patio seating. During Operation Headhunter, this is where one AQ Lieutenant hid in plain sight.
-
Pharmacy (Bloc 6)

Between the bank and the smaller green apartment block is a pharmacy. Inside the pharmacy, expect a ransacked establishment. Use the blue A-frame-roofed structure as a marker, and easily access the interior (including the upstairs, via the skylights), as the roof is straightforward to climb onto.
-
Stadium Suburbia

The older residential buildings are positioned in a suburban cluster; an outer ring road circles the rows of homes, with a central road bisecting the buildings. Each “half” of the suburb features a variety of homes, outbuildings, and discarded detritus.
-
Grazna Bridge

This stone road bridge is a good marker to locate (as it’s close to the border near the TV Station, Airport Maintenance, Verdansk Hospital and Stadium). If you’re in a vehicle, the bridge allows you quick access to a variety of locations. Check the nearby signposts to situate yourself and investigate the watchtower for an elevated and covered position. Just be wary of foes on the higher ground to the east.
-


-
POI Overview

This is the place where planes go to die: A large cemetery of airline fuselage sections, hangars, and warehouses where Zhokov’s crew stripped and sold the parts to the highest bidder.
-
Offices and Repair Shop

The northern end of the Zhokov Boneyard is composed of a couple of worker apartment buildings, a dilapidated gas station, a warehouse (“3”), and a small office. The southern part of this area is segmented by a road.
Office — Entrance Signs: The two entrance arches which are useful to use to situate yourself to this area. Note the tiny brick huts adjacent to either sign; you can hide in these.
Office — Apartment Blocks: The two identical apartment blocks overlook a parking yard littered with containers, immobile vehicles, and debris. Enter via the double or single doors on opposite walls; both lead to a central stairwell.
Office — Yard Office: This small, single-level structure is on the yard’s north side. Enter via either of the doors or the breakable windows. Inside are two narrow offices and some defensive potential.
Repair Shop — Gas Station: The yard’s northeast corner features an old two-pump gas station with a corrugated metal roof and a small hut-like booth with two entrances and a window. There’s good hiding potential if your enemy ignores this place.
Repair Shop — Mechanic’s Warehouse 3: South of the gas station is a medium-sized warehouse. There are two doors, a window, and an open garage door to use as entry points. Inside are two vehicle lifts, burned-out pickups, gantry stairs to a 2F balcony, and a ladder (west wall) to a 3F balcony. The gantries and open windows offer defensive, offensive, and escape-based options.
Repair Shop — Watchtower: By the eastern perimeter wall is a rusty green watchtower you can climb and perch on. There are good views across to the east.
-
Turbine Shop, Stacks, Plane, Rebel Cache, and Midtown

Explore this massive airplane cemetery, using the numbered floodlight poles to situate yourself. The perimeter of this section of the Boneyard, for example, uses the road that runs from the Zhokov entrance sign (northwest) to the green tarp fuselage near floodlight #4 (northeast). On the south side, the dirt road goes from a side entrance (near floodlight #6), past floodlight #3, to a side entrance (near floodlight #2). Let’s explore the different quadrants, using dirt trails as borders:
Turbine Shop (West): A corrugated metal warehouse sits on a concrete pad along the west wall. There is a door and two open garage doors to use as entry points. Inside stands the remains of a plane engine, with two more in one of the corners. The upper windows aren’t accessible unless you’re parachuting through them in a surprise attack.
Midtown (Southwest): Between floodlights #6 and #3 is another collection of strewn sections of passenger jets, as well as an L-shaped wall of white Rothwynn containers. The three fuselage sections (one cockpit) are all accessible. The landmark here is a “shack” composed of two wing sections leaning vertically against a stripped-out engine casing, with a tarp attached. Use this as a marker, as well as a place to hide.
Midtown (Southeast): Between floodlights #3 and #2 in the southeastern corner of this area are nine fuselage sections, all with accessible interiors. At the top of the slope (by a beech tree) are four sections along with a leaning wing. The trio of fuselage sections, with one placed perpendicular atop another, allows unusual elevation, as well as a possible ATV ramp (if you’re driving west to east).
-
Center Plane and Pond

The perimeter of this section of the Boneyard uses the dirt road from a side entrance (near floodlight #6) to floodlight #7 (north side). Along the east side is the scrapyard wall. On the south perimeter dirt road from the side entrance (near floodlight #9) to the corner of the scrapyard (floodlight #8). Time to weave among the plane parts:
Center Plane — L-Shaped Engine Area and Tail: This area is segmented by the dirt trail that winds through this section of the Boneyard to the scrapyard west entrance. Discover a variety of engine parts here. There are three engines in casings by the red beam side entrance. Leaning near a stack of red and white containers is a huge tail section (enter the alcove within the section or use the containers to climb on top of it). Close to the Scrapyard west entrance is a fuselage (interior accessible), and four engines placed on the ground near a tree, just west of a gap in the scrapyard wall.
Center Plane — Military Tarp Clearing: The west-central part of this area, just north of the red plane sections, has a small clearing where military ground sheets have been laid, near a parked (and inaccessible) truck. Next to the truck is a fuselage, but most of the plane parts are to the northwest: four fuselage sections (all accessible), along with a stack of engines (one on a truck), and three containers for added defensive protection.
Center Plane and Pond — Kastovia Airline: The southern part of this area is dominated by an almost intact passenger plane in red livery — the remains of a Kastovia Airline jet. Note the vertical wing section propped by the tail; this is a good marker to find. There are nine fuselage pieces, including three cockpits and two tails (all accessible) slowly rusting close to a pond with a beech tree. Note the easy access through the interiors to the military tarp clearing. This is another area offering exceptional cover and ambush possibilities.
-
Scrapyard

The walled central area inside the Zhokov Boneyard is known colloquially as “Scrapyard,” as certain plane components are separated and loaded onto trucks inside the two of the warehouses. The entire perimeter wall has several gaps to memorize and use as insertion points.
-
Silos and Boulder Town

The perimeter of this section of the Boneyard runs north to south from floodlight #2, all the way to the southeast exit (near the floodlight without the number, across from the large hangar). Scrapyard is to the west, and the perimeter wall is to the east.
-
Vista Point, South Plane, Hangar 9, Hangar 13

The entire southern end of the Boneyard runs west to east along a dirt road and the southern perimeter of Scrapyard. Then it extends to the unnumbered floodlight and southeast entrance, close to the east hangar.
Vista Point and Blue Plane — Authentic Plant Parts Purgatory: The large muddy yard stretching from floodlights #9 to #13 consists mainly of blue-colored fuselage pieces from “Authentic” airlines. Moving west to east from the side entrance, there are 11 fuselage pieces to navigate, and all have interiors. You can drive an ATV through the two white sections of plane fuselage, using it as a ramp to land in the hangar yard.
Hangar 9 and Mechanics Yard: Flanked on the west and south by a concrete wall (with various gaps and a main entrance to the south), this tinkerer’s paradise features a huge hangar on the south wall. Outside are scattered containers to use as cover, two power transformers (southwest), and a secondary tarmac parking area with scattered pallets, burned vehicles, and dead trees.
Hangar 13 and Exits: The other large hangar (without a number on the building) is close to the southeast exit. From the dirt track to the north, there are two immobile military trucks, a pair of rusty propane tanks (west side), and an open interior via the main opening or a metal door in the south corner. Inside are the remains of what appears to be a military drone and other scattered military equipment.
-
Junkyard

Directly west of the Zhokov scrapyard (aka, Boneyard) is a small family-owned junkyard. There are five structures to check. There’s a large warehouse (“3”) and an L-shaped warehouse, as well as three much smaller outbuildings — a brick building, a blue building, and a stone shed. Vehicle wreckage lies about the otherwise open fields; use them as cover whenever possible.
-
Comms Tower (Junkyard)

Behind the junkyard is a comms tower. Woodland may allow for clandestine hiding, but if you’re here for the view, climb this tower. There’s a ladder to a midway platform and a second ladder up to a top platform. Both offer exposed but impressive 180 -degree views, from the Dam (north) to the Gulag (east southeast), to the coast (south).
-
Homestead (Junkyard)

Cross west from the middle of the Boneyard, past a copse of pine trees to a small compound homestead. Within the perimeter are five buildings: three dwellings and two outbuildings. All have interior access, and you can make moderate use of the exterior walls for cover. The yellow and the brick houses have two-floor interiors, with a place to hole up and devise your next plan of attack.
-


-
POI Overview

The Train Station features an extensive set of platforms that runs the entire length of the location.
-
West Platform (Train Station)

Station Platform: The western side of the station has three main platforms (one northwest, one southeast, and one between the two sets of tracks). A parked train has three carriages to explore, and there are long, covered platform structures with pillars to flit between. The bridge and covered stairs down to the platform are inaccessible, though you can climb (or land) on the roof. Pass under the bridge to reach the ticket hall and concourse and the main platform.
Fuel Tanks: The side of the Train Station building, southwest of the platform, is a group of fuel silos, fuel tanks, and a parked tanker truck. Use these as hiding spots and watch for rooftop snipers from the station.
Truck Parking: Northwest of the platform is an area of tarmac and abandoned trucks, offering a modicum of cover as you toward the U-shaped building north of the platform.
North Concourse and U-Shaped Building: Continue north-northwest from the ticket hall and concourse, across the tracks, to reach a U-shaped office and commercial building with a covered pedestrian area. Turn northeast at the perimeter, before you reach the main road, and enter the smashed glass windows. This small interior courtyard has a stairwell to climb, allowing roof access.
-
Ticket Hall and Concourse (Train Station)

The main concourse is imposing Greek Revival building with an impressive façade, domed roof, and ornate ticket hall. Breach this via the pavement steps close to the Metro entrance.
Exterior: A small scaffold with stacked drywall and some concrete barriers can be used as defenses. Farther southwest are seven metal huts and kiosks. The two D-shaped kiosks are inaccessible, but search and defend the interiors of the other five structures.
Ticket Hall and Concourse: Enter via the steps, and look immediately to the northeast for a stairwell, leading to the roof (6F). Continue into the ticket hall, an ornate concourse that has a small information booth and an exit out between the West and Main Platforms. If you have time, check out the upper wall art and ornate ceiling.
-
Main Platform (Train Station)

Between the two (inaccessible) skybridges and covered steps to the northeast and southwest is the main train platform.
Station Platform: The station platform consists of three main platforms and four covered platform structures. There are five open passenger carriages to check for loot and foes (three connected together to the northeast), parked train engines, and WHP cargo carriages. Stacked crates allow access across the platform and onto the tops of the carriages and platform roofs. On either side of the tracks are locked kiosks and a small open hut (one on each side). The platform’s south side has a small freestanding store with a faded red awning; hide inside this ransacked store or check for items.
-
West Concourse

Main Concourse: Southeast of the platform is a connecting concourse. This runs southeast into the bus terminal and military checkpoint, providing a good thoroughfare (and big enough for vehicles). Note the marble-lined stairs inside the concourse lead to a low balcony outside, with sandbags and scaffolding enabling you to reach an upper roof ledge. From here, you can reach a ladder (just right of the “Actibase” sign) to reach the main roof.
Transit Station Parking and Storage (Northwest): Beyond the concrete wall at the perimeter of the Main Platform is a large parking lot dotted with debris, destroyed vehicles, and a number of smaller office structures, making this an advantageous place to hide. A gap in the wall allows access from the main entrance all the way into the platform.
-
East Platform (Train Station)

The eastern part of the Train Station platform is a little less chaotic and a little more open compared to the Main Platform area. Pass under the skybridge and covered stairs (inaccessible), using the stacks of crates and pallets and the orange and white barriers as cover options. There are two covered platforms (north and south of the tracks) and open fields and forested areas to the east if you’re looking for an escape. Or head southeast to the East Concourse.
Parked Carriages and Cargo: Of particular interest is a stack of WHP cargo containers on the rails; two are open and make excellent hiding spots. Parallel to them is a parked train and three passenger carriages, which you can also hide in or loot.
Station Ladder: Don’t overlook the long ladder to the main station roof (skybridge on the area’s west side), located on the western corner of the skybridge building, close to a green garage above the Train Station parking and storage. This enables you to reach the entire Train Station rooftop area and maneuver well away from this immediate area.
-
East Concourse (Train Station)

The eastern corner of the station has a brick pedestrian walkway and an interior concourse to venture into.
Exterior: The walkway allows you to maneuver around the side of the building (where three locked kiosks are situated) and onto the rail tracks, close to the woodland to the east, with a dirt track to follow. There is a circular drop-off road in front of the pedestrian area and access to the East Platform.
Interior Concourse 1F: Moving south to north from the pedestrian area, there are concrete exterior steps into the concourse, which is wide enough to drive any wheeled vehicle through and allows access onto the East Platform. Don’t overlook the alcove on the west side of the concourse; there are stairs that provide access to six floors and the roof.
Note! There are three stairwells allowing roof access — one in the Main Concourse, one in the East Concourse, and one in the U-shaped building northwest of the Main Platform.
-
Bus Terminal and Military Checkpoint (Train Station)

This Train Station also had a bus terminus, which becomes apparent when you investigate the parking area.
Military Checkpoint: Working from east to west, there’s a couple of green dome signs, blue fencing, and a parking lot that has been transformed into a military checkpoint, though some of it is now on fire. There’s a small military hut by the main station building and covered benches between the checkpoint and the bus terminal.
Bus Terminal: Shells of parked buses and other vehicles sit at various terminal disembarking spots. You can hide in two small metal information huts, close to the main drop-off location and Metro entrance. There are four additional metal huts in the brick-paved pedestrian area by the front of the building.
-
Metro (Train Station)

Enter the grounds of the parking lot — which contains the entrance drop-off and pick-up point, where wrecked military vehicles and a bus sit on the tarmac — to access the pedestrian entrance to the Metro. You cannot currently enter the Metro, making this either a great place to disappear from view, or a location where you can become trapped.
-
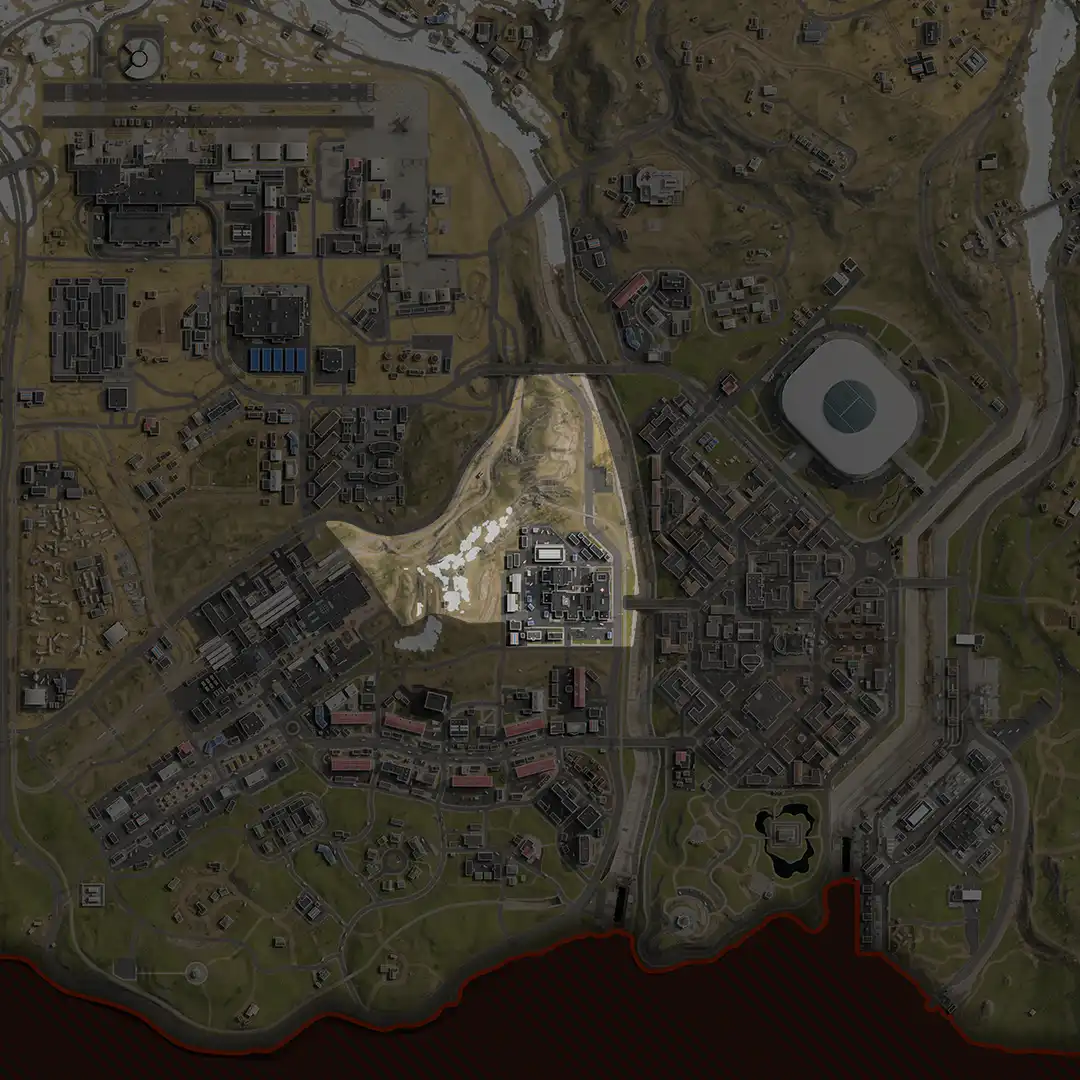


-
POI Overview

The Verdansk Hospital, and the forested area north and west of it, is a high-traffic area, due in large part to the many ambush opportunities this ransacked infirmary presents.
-
Comms Tower (Hospital)

If you’re trekking along the railroad or main road and need to gain some height without wandering into the wooded hillside area, seek out this landmark: a blue shed and comms tower between the two rail tracks. Climb to a mid or upper platform, which is exposed but offers great views and sniping opportunities. There are views across to the Train Station (southwest), Hospital (southeast), and the road below.
-
Gulley

If you’re driving along the highway on this zone’s eastern edge and need to make evasive maneuvers or take a shortcut, you can travel up the gulley between the rocky outcrops and into the forested area, heading for the highway on the zone’s western side.
-
Playground

Close to the zone’s eastern edge, on the footpath parallel to the concrete riverbank, is a children’s play area and sand pit. Traveling past this lets you know you’re just north of the Hospital.
-
Upper Woods, Cabin, and Aerial

There’s a wooded hillside available to explore, in between the train yard (west) and Hospital (east). This entire block is composed of steep hills, rough woodland, and a switchback pathway meandering east (to the Hospital) to west (to the train yard). Use the woods as cover and snipe from the ridgeline or check the lone cabin near the aerial midway along the path. Note you can parachute and balance atop the aerial.
-
Verdansk Processing Warehouse

Just northwest of the Hospital northwest tower is a large processing warehouse, a multilevel loading area with crates of every kind and office space on the upper floor. There are parked trucks, a WHP tent, and stacked containers by the loading bay. To the west is a small brick office and a cube-shaped water tank structure to inspect. Both have an interior to check.
Exterior: The main warehouse has doors and open garages on all four sides. The low-roofed garage on the structure’s west side has ladders and crate “steps” that enable roof access.
Roof: Accessible via the ladders, this has a walkway surrounding a concave central roof with windows; shoot through them into the cubicles or loading bay, or drop down to escape or ambush. Or leap from the roof to escape.
-
Apartment and Offices (Hospital)

The northeast corner of the Hospital block has several smaller buildings to dart between and inside: There’s a couple of small offices (each with two entrances and windows, along with two narrow office spaces), an apartment building, a cube-shaped building with a water tank inside, and a two-floor office.
Green and White Apartment: The main entrance to this green and white apartment building is a pair of double doors with a porch. A second entrance is on the opposite (southwest) side.
Offices: Access the roof via the ladders on the southwest wall, and access the interior via any of the three ground-level doors. Inside is an office with stairs up to a second office and two doors to a small outside balcony, where the roof ladders are located. The numerous upper-floor windows and roof access make this a notable building to hold down.
-
Hospital Barracks

Along the western perimeter of this Hospital block, close to the hill and forest, are two brick and plaster warehouses, near a pair of green garages. The barracks have mostly boarded-up windows and an awning and propane tank on one side. Overflow casualties from the recent hostilities were recently housed here. Each barracks structure has an identical layout:
Exterior and 1F Interior: Enter via the metal or double doors at the north or south end of each barracks building. Inside is one large barracks chamber with cots along each wall and windows to access.
2F Interior: At one end are restrooms and metal stairs to an upper floor with an identical layout.
-
Hospital Northwest Tower

Connected to the main hospital building by a skybridge on the southern side, this ten-level tower is the easiest landmark in the area to distinguish — partly because one of the upper floors is on fire; thick black smoke can be seen from the eastern side of the structure.
Exterior 1F: The building can be entered in the following ways:
North: There are double doors in the northwest corner (close to WHP barriers and a stack of blue barrels), leading into a hospital ward.
East: The emergency drop-off point and overhang has four pairs of double doors; all of them provide access into the main lobby, where you’ll find stairs and an elevator bank.
South: There are three doors you can utilize along this wall, including double doors connecting to the main lobby. Due south is a single door leading into a corridor (with a storage room on your left) that leads to the main lobby by the elevators. Southwest is a single door leading into a small storage room with low roof access via a ladder.
Skybridge: The bridge is to the southwest and allows access to 3F of the main hospital building (the reception area by the flickering exit sign). Note that the skybridge has windows you can smash or leap from. This is also the way to reach the ledge on the main Hospital structure (exterior) and a roof ladder to the helipad.
Roof: Reach the two-tiered roof via ascenders and the elevator cables, or by dropping in from above. If you reach the top of the elevators, step into the hallway and pick a door to burst through; you reach a balcony on either the east or west side of the roof. Note the narrow ledge lips you can balance on, under the red lettering (north and south walls), which allows you to reach the opposite balcony. Or you can use a ladder, climb onto the top section of roof, and drop to the other balcony. However, the best views (to Downtown, the Promenade, and the hills to the west) are from the top section, where the low perimeter wall and hospital letters can be used as cover.
-
Verdansk Hospital

The main hospital structure in Verdansk has recently seen conflict and chaos, and the aftermath is visible if you inspect the vicinity. This roughly L-shaped building has interiors to explore, a helipad on the roof, and a skybridge to the Northwest Tower.
Exterior 1F: To begin, let’s cover all the ways into the structure:
North: The north wall facing the tower has two sets of double doors (one under the skybridge and one by a trash can and WHP truck) leading to a corridor with flashing exit signs and a blue line on the floor tile. This connects to other entrances.
Northeast Inner Corner: Face southeast near the green and white fencing to spot ladders that lead to the lower and upper roofs. Close to the two white dumpsters and green fence are double doors; these lead to the main foyer and the kitchens.
West: There are two doors near the burning ambulance and bagged corpses in the parking area. A single door is half hidden behind a green and mesh fence: This leads to a kitchen pantry and the kitchens. The double doors on the corner lead into the large cafeteria (now a triage center and full of beds).
East: Double doors in the northeast corner lead into the cafeteria area with the high ceilings and broken skylights. There’s another set of double doors directly under the “Verdansk Hospital” roof sign. This leads to a corridor, stairwell, and connecting corridors.
South “Verdansk Hospital”: This is the main entrance to the hospital, and there are two overhangs. The one with “Verdansk Hospital” has two sets of double doors. Both lead into the main foyer and check-in booth.
South “Emergency”: In the southwest corner, under the “Emergency” sign and close to the portable toilets, are two pairs of double doors, both leading to the emergency room check-in desk.
Roof Exterior: The main Hospital roof has three distinct sections:
West Helipad: Accessed via an exterior ladder from the ledge outside the skybridge or via an interior stairwell by the skybridge entrance and west elevator bank. Expect a parked helicopter here, if it hasn’t been taken (also use this to pick up squad members, as it’s easy to spot from the air). There’s reasonable cover and views, as well as access to the central part of the roof.
Central Upper Roof and Storage Corridor: The middle of the Hospital roof is the highest point, accessed via an exterior ladder on either side. Note the metal doors on the lower roof (west and east sides); each one leads to a narrow storage corridor that enables quick access to and from the east and west sides of the roof. Up on the main roof section, there’s commanding views of Downtown (east), the outskirts of Promenade (south), and the immediate vicinity. You can fire or drop down into the interior foyer (or balcony) from here via the skylights, too.
East and North Roof: The area above the cafeteria also has a skylight to shoot down or drop in from, and a ladder and door to the central upper roof and storage corridor. There are views to the West Bridge and Downtown from here. Note the large white cross on the roof; this is a good marker when parachuting into this area.
-
Parking Lot and WHP Tents

Additional WHP equipment sits in the parking lot south of the main building; nothing is left here aside from possible loot that you’re after. The white fencing is a good place to lose foes and ambush them, though you’re visible from atop the trucks or Hospital roof. Otherwise, use the tents and scenery as cover points while operating in this area.
-
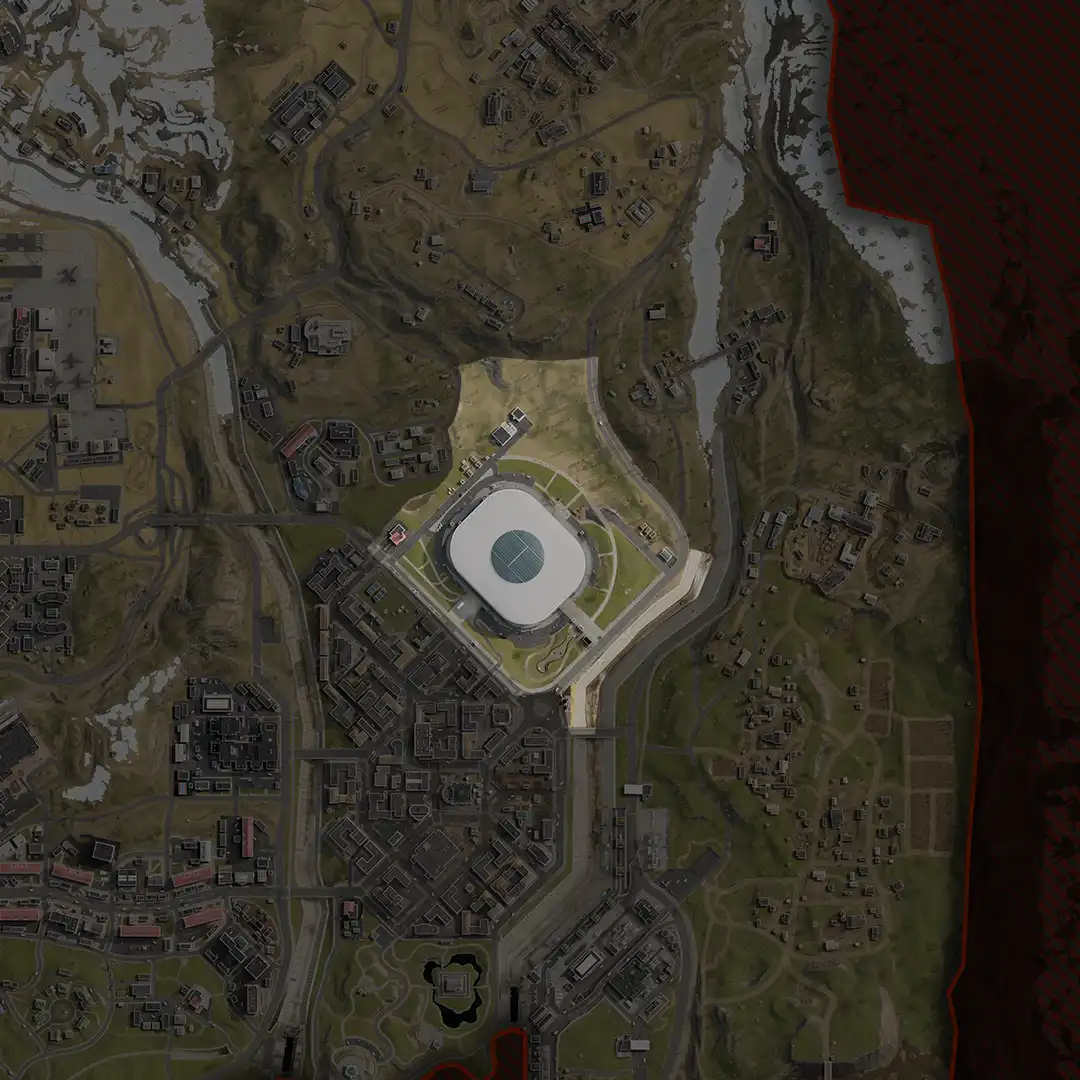


-
POI Overview

The Acropolis National Arena, known primarily as the Verdansk Stadium, was home to the local soccer team and was recently commandeered by the military.
-
Low Woodland

The far northeastern part of this zone encompasses the low woodland area between the upper hills of Karst and the flatter ground north of the Stadium. The pine forest has numerous trees and fallen boulders to use as cover, a foot trail to use as a marker, and the A22 highway along the eastern border.
-
Fumigation Warehouse (Stadium)

A small-scale chemical-removal plant, with fumigation vats inside the largest of the two warehouse structures, is situated close to the wooded foothills. Enter the fumigation warehouse via the rear door or the two front doors. The smaller warehouse is to the rear of a parking lot of strewn debris and damaged vehicles. Enter via a front ramp and door on the southwest side, or a side door on the southeast wall. Inside, the warehouse is mostly empty; use this area as a staging ground. Many teams tend to head for landmarks and bypass here. Plus, you can easily flee into the woods and lose (or hunt) pursuers.
-
Military Triage Center (Stadium)

The main road running along the northwestern perimeter of the Stadium has numerous barriers, containers, crates, and other obstacles to avoid. The military have set up a checkpoint and triage area, which has four tents (three are accessible), as well as some red containers, crates, and concrete gabions. There are some reasonable hiding spots here, though the area around the triage center is open, and you may be spotted.
-
Fire Station 20

The interior has two main floors, including the garage, reception area, locker room, and crew quarters upstairs, along with ladders to the roof and the tower where an impressive view of the Stadium, Bloc 6, and the northern tip of Downtown Verdansk, specifically Main Street, the soccer pitch, and the police station.
-
Acropolis National Stadium
The Stadium, known as the Acropolis National Arena, is arguably the largest single building in Verdansk. Though not every gate is listed in these location overviews, you can walk the concourse and view a map for more information. The Stadium interior is currently inaccessible. However, you can use a parachute or helicopter to land on the roof; this offers good views, but the curved layout and vast expanse mean there’s not a 360-degree field of view, and you’re easily seen, especially from above.
-
North Gate and Plaza A (Stadium)

The North Gate (on the Stadium’s northwestern exterior) is sealed, with steps up from a pedestrian area and an adjacent parking lot by the main road. During Operation Headhunter, this was one of the few gates that the AQ hid their communications scramblers. Under the North Gate is a lower walkway by the base of the Stadium that runs around the perimeter of the building. Farther west is a plaza and steps up to Gate A (also inaccessible). The entire area is mostly open, with low cover opportunities.
-
Parking and Plaza D (Stadium)

The northern curved corner of the stadium is where Gate D and the adjacent steps down to Plaza D are located. Note the lower walkway under these stairs, as well as the low barriers, gates, and turnstiles, which are easy to navigate.
-
East Gate and Plaza C (Stadium)

The East Gate is far wider than most of the others, with individual turnstiles and locked doors preventing you from entering the Stadium interior. There are vent chimneys (from the inaccessible underground Parking Plaza B area) and a footpath down from the pedestrian bridge to the east. Plaza C is wider, with fewer parking spaces, but is still dangerous and wide open. The eastern part features a pedestrian plaza and Gate C, as well as a couple of entrance alcoves, one of which may be on fire.
-
Overpass Parking Plaza B (Stadium)

The road from the military checkpoint turns left and heads under a pedestrian overpass. It stops at the entrance to the Plaza B underground parking. The subterranean entrance is currently sealed. There are concrete steps up to ground level, and the overpass pillars and entrance alcove can be used to hide near.
-
Military Checkpoint (Stadium)

The main road toward Plaza B and the underground parking facility were recently blocked by the military. Evidence of this includes concrete barriers, gabions, various containers, and three tents (one of which is open) to explore or hide in as you maneuver across the open ground surrounding this area.
-
Parking Plaza C (Stadium)

There are tiered pedestrian plaza areas, steps up to shuttered entrances, and a curved parking lot for Gate C ticket holders. Now the area has numerous low scenic objects to use as cover, a banked grass area leading to the eastern corner of the Stadium grounds, and a copse of pine trees.
-
West and Media Gates (Stadium)

The main road across from the Downtown Police Station has a large pedestrian walkway leading to the west, or “B,” gates. There are a few footpaths, a grassy park, and a road that goes to two underground parking entrances; both of them are sealed, but you can use the alcoves and security hut as cover.
-
Plaza B and Park (Stadium)

The corner of the Stadium closest to Downtown has a park perimeter with a drained lake, open-air parking, and sets of steps between a tiered B Plaza to shuttered B Gates, which are in alcoves you can search or hide in. The parking lot continues around to the west.
-
South Gate (Stadium)

A paved bridge leads from the main ticket office (adjacent to the river) across the park on either side of the main Stadium entrance. A large silver “Verdansk Center” sign marks the entrance, which is sealed. There are turnstiles on either side of the entrance, as well as steps, tiered planters, and a ramp down to a parking lot to the southwest.
-
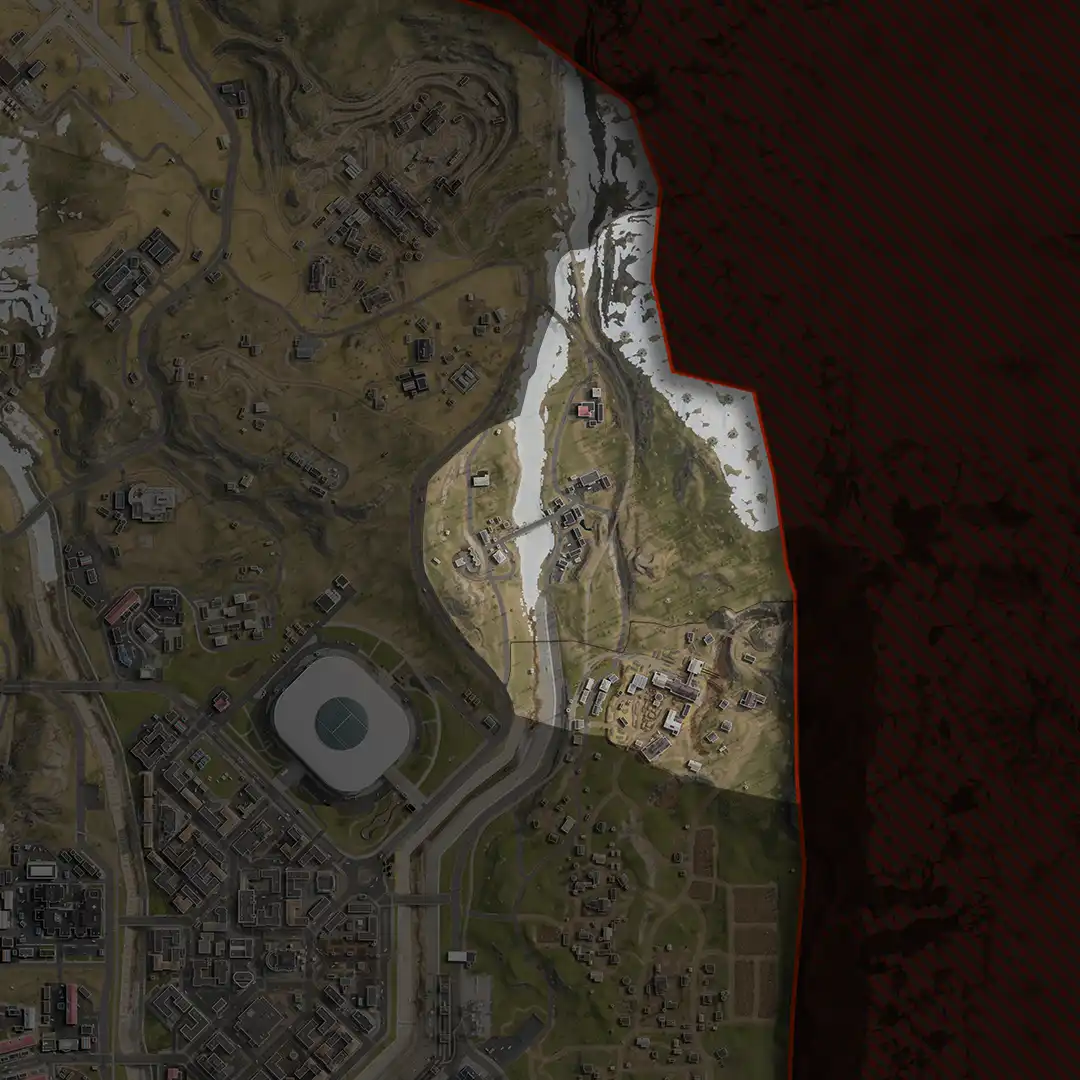


-
POI Overview

There’s much to discover in this out-of-the-way lumberyard complex on the edge of forests and farmland. Explore the warehouse looting opportunities throughout this zone.
-
Rock Promontory (Lumber)

The forest to the north and east of the main Lumber Yard complex has numerous hiding spots and vantage points. This combines the two: A rock promontory is above the dry river and metal trail bridge, which offers cover and provides great views across the northern part of the Lumber Yard. It can also help you spot foes lurking in the forests below and beyond you.
-
Iron Bridge

The forest northeast of the Lumber Yard has several trails and dirt roads to navigate. The river gorge splits the forest up and is at the unmarked perimeter of this zone. Here you’ll find a rusty iron bridge, one of two that span the rocky gap. The other is just below the Rock Promontory. There are some light barricades on either side of the bridge. Use this route when flanking along the perimeter of this map. Note the large drainage pipe is out of bounds.
-
Upper Trails and Maintenance Hut

It’s worth driving or hiking this steep and scenic woodland north of the Lumber Yard, as there are logging routes that wind through the area. This splits into two, with one road taking you across the iron bridge and the other leading down to the Terminus Building. In the middle of these trails is a small, white brick maintenance hut; enter via two doors or one of the four windows. Inside are two offices and storage rooms.
-
Fishing Hut (Karst River)

An old fishing hut set at the lowest part of the old river provides a modicum of cover. Both the hut and marking are good location markers.
-
Hut and Water Tower

Perched on the rocky cliff above the main highway to the Port and above the river spillway is a brick water tower. Below and by the rail tracks is a locked hut. Climb the tower via the ladder to an upper gantry platform. A second ladder enables you to reach the very top, where there’s more room to snipe and hide. The views from here are exceptional, including of Lumber (east), the windmills (south), the Stadium (west), and the Karst River Bridge (north).
-
Train Station (Lumber)

Just west of the Lumber Yard perimeter wall is a main road and multiple rail lines. These arteries are excellent to follow around the map to learn the layout of every zone. But here, the carriages, station platform, and a number of buildings are all great places to lose enemies, hunt them down, or hide. Inspect the following locations, from west to east:
Tracks and Carriages: Seven cargo carriages have stopped outside the station. Check for foes and loot in any of the carriages. Use the crate on the flatbed carriage to reach the carriage roofs, and maneuver between or into the couplings between carriages for another hiding place.
Station: Across from the two fuel silos and carriages is a brick station platform and building. Enter via one of three doors. Inside is a blue-tiled waiting room that’s seen better days. Outside are some corrugated overhangs and scattered debris on the concrete platform.
Yellow Cottage: South of the station is a cottage on the edge of Farmland, jammed between the road and rail lines. Enter it via either entrance or a window. Inside is an upstairs attic with views of the station.
Roadside Dwellings: On the east side of the road are three residences, with backyards backing onto a gulley and the Lumber Yard perimeter wall:
Yellow Apartment: This yellow apartment building has a front entrance and windows to access. Inside is a hallway and a one-bedroom apartment on either side. Up the stairs is the second-level landing, and two more one-bedroom apartments, all with accessible windows. Outside and adjacent is an open two-car garage.
White House (Middle): Next to the apartment is a white house. Enter it via the window or either door. Note the upper level with accessible windows to fire or escape from.
White House (South): A white house with a corrugated roof and red window frames is accessible via either the door or any window. An interior staircase leads to an attic with windows to shoot or maneuver through.
-
Gorengard Lumber Yard

The expansive central yard within the concrete walls has many more areas of cover compared to many other yards you’ll encounter. This is flanked by the main Lumber warehouses to the north and east, a bridge and shallow gulley to the south, and a main entrance and gulley close to the train station to the west.
Southwest Entrance: The main yard entrance is under the red sign, which is located on the perimeter concrete wall in the southwest corner of the complex. Access it from the Train Station nearby, and use the gulley and perimeter wall as cover if you’re wishing to move with more stealth.
South Bridge Entrance: A small metal and concrete bridge allows you to drive across into the yard from the south (with the trail leading away into Farmland). The bridge can be booby-trapped or hidden under, and you can use the gulley to maneuver around the edge of the complex before making a more clandestine infiltration of the yard or warehouses.
West Yard Structures: The western side of the yard is a little less cluttered, with four small buildings to hide near, as well as a cage (inaccessible), a small brick hut (inaccessible), a shed (accessible), and an administration booth (accessed via the door or the windows). There’s always a place to hide.
Freight Terminus: Sheets of plywood have been tied down to three flatbed rail carriages at the end of the line, close to the green fencing bisecting the yard. The narrow area between the rail line and fencing is a place to lurk, and you can follow the rail lines into the freight warehouse.
Freight Warehouse: This structure is a medium-sized building adjacent to the West Mill with a brick façade.
Exterior: There is a metal door on three of the four main exterior walls you can use to enter the warehouse. The north and south walls have a roll-up loading garage entrance. Only one is open (to the south), effectively keeping foes from driving along the rail lines.
Annex: There are two more doors on the brick-walled, low-roofed extension attached to the warehouse. This lower-roofed annex has two ladders, both allowing access to the annex’s flat roof.
Stakes and Plywood Stacks: Down the center of the yard are dozens of piles of stakes and plywood, creating an impressive and climbable maze. This offers you a multitude of cover options, especially as you cross the yard. Use the parked trucks and forklifts as additional cover opportunities.
Water Tank: Sitting at the dirt road junction by the Main Mill bridge is a large water tank, with attached ladders on the northeast and southwest sides. Climbing atop here gives you good views over the yard and the ability to shoot into the surrounding warehouses. However, you are exposed, so use the base of the tank and the parked (immobile) truck as cover.
-
Gorengard Lumber Warehouses

On the eastern side of the yard are two immense lumber warehouses where various types of wood are cut and stored.
Factory Warehouse: The whitewashed brick structure has two orange lumber trucks parked outside and has the Gorengard company logo emblazoned on the roof.
Exterior: Enter the building via the open garage doors at the building’s north end or via the covered doorway (northeast) under the metal porch. There are two more doors on the structure’s southern side, as well as an open loading dock. Roof access is possible, but not easy; you’d need to climb on the metal porch from the top of a vehicle or leap across from the cabin of the parked truck. Across the yard to the northeast are four garages, one of which is accessible.
Inspection Warehouse: The larger of the two warehouses on the yard’s southeast side has multiple entrances.
Exterior: Enter the warehouse in various ways: via the loading bay door marked “Inspection”; the ladder to the upper balcony; the metal door marked “Warehouse”; steps to an upper door on the northeast wall; through double doors marked “Loading/Unloading Area”; or a ladder to an upper entrance. There are stairs to an upper door in the eastern corner. There’s a covered entrance near the concrete wall, under a metal awning. You can also jump through a window in the southern corner, leaping in from atop the concrete wall. Finally, along the southwest side by the gulley, there are double doors and a metal door marked “Warehouse” with an awning you can climb on. You can also use the awning to jump through an upper window.
-
Rail Tunnel (Bloc 18)

Close to the rail and road bridges is a tunnel carved into the eastern mountains. The tunnel is blocked, but the threshold of the entrance is accessible, and the bushes and concrete barriers provide excellent protection. Also think about hiking above the tunnel entrance and using the undergrowth as cover.
-
Road Bridge (Bloc 18)

The main road bridge across the river is a distinct yellow and provides direct access to the more remote parts of eastern Verdansk. Aside from lurking under the bridge, you can also hop onto the bridge fence and drop down onto the tiny ledge atop one of the four support pillars if you need to hide.
-
Brick Warehouse

Close to a red and white antenna you can use as a marker is a medium-sized brick warehouse built by the road. The structure has easy interior access and sniping views from an upper walkway if you’re aiming south toward the antenna.
-
Police Station (Bloc 18)

Small Brick Warehouse: Located close to a pair of propane tanks and the Karst River Bridge, this small two-floor warehouse has a road junction east of it and a small parking area in front. There are three metal door entrances (ground floor) and steps up to a wooden deck and upper entrance. Or, climb the ladder on the east wall to a low roof, and enter another metal door to the upper floor. Use the long ladder to reach the main upper roof. Finally, if you’re on the wooden deck, there’s a ladder to the main upper roof, just left of the door.
-
Hunter’s Hideaway (Bloc 18)

Almost due east of the rail bridge, in the pine forests along the eastern edge of Verdansk, you can find some winding trails and rocky embankments and outcrops. A few paces off the beaten path is a small hunter’s vantage and an elevated hill. For long-range combat, try moving to the rock bluff south-southwest, above the rail tracks.
-
Military Checkpoint (Bloc 18)

A military checkpoint has been set up in the residential area on the west side of the Karst River Bridge. The area has many cover opportunities, especially among the two homes and numerous outbuildings on the road’s north side.
White House: Northwest of the sentry posts is a white house and blue shed. Enter via any of the three ground-floor doors or the window. The upstairs interior has windows you can use as an escape point.
Outbuildings: Adjacent to the netting defense are two small sheds (both with accessible interiors and a window) and a small brick shed on the riverside promontory with a pitched, rickety roof. Enter via the window or two doors; the window offers a line of sight across the bridge.
Yellow Apartment: South of the sentry posts is a yellow apartment building with a small yard and two fuel silos, with a front entrance and windows to access. Inside is a hallway and a one-bedroom apartment on either side. Up the stairs is the second-level landing and two more one-bedroom apartments, all with accessible windows. The road below (east) has some excellent vehicle and gabion defenses to use.
-
Karst Bridge

Spanning the Karst River is a concrete and metal bridge painted a distinctive yellow. As well as enabling vehicles to pass from east to west, there’s a low wall for a modicum of defense and three concrete stairs down to the riverbank. The graffiti-covered walls underneath the bridge provide a good spot to hide.
-
Road Ravine and Rail Bridge

If you’re following the north-south road along the river’s eastern side, from the Road Bridge you must pass through a relatively shallow gorge. Above is a rail bridge, with parked cargo carriages sitting on the yellow metal structure. This is a good ambush point, as is the elevated, wooded terrain on either side of the Road Ravine.
-
Camping Overlook

At the top of the tallest rocky outcrop in the vicinity of Karst River is a flat camping spot. There’s a rough trail up through the surrounding woods. If you can find it, it provides excellent height and view advantages and allows you to spot (and shoot at) foes from as far away as the Stadium (southwest) and across the Karst River Bridge (northeast): A great hiding place.
-
River Bank

Journey along the main road running above and along the Karst River, and you’ll come across ditch that appears like something had crashed there once. Now the damaged ground is useful as cover, or as a marker.
-
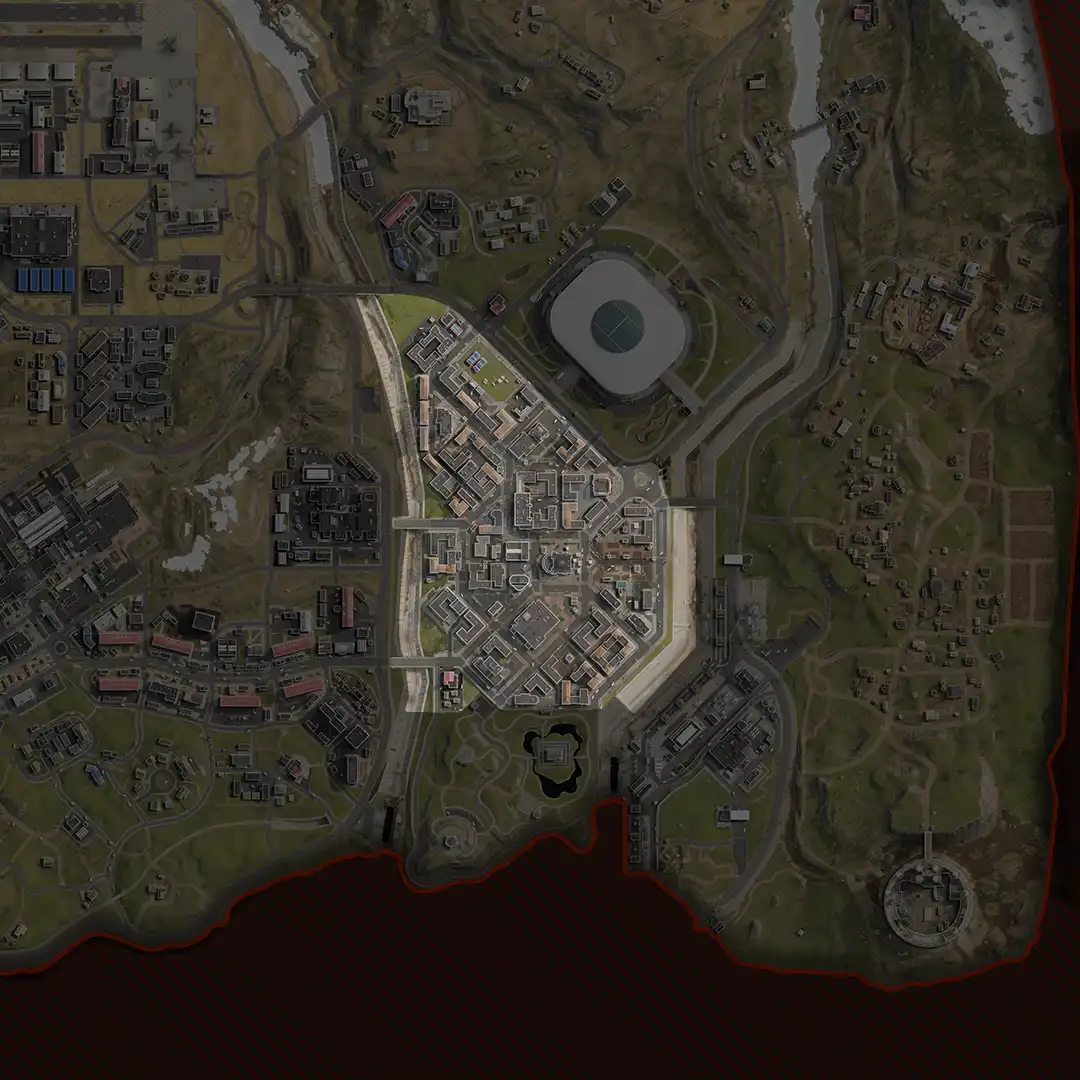


-
POI Overview

The main financial, parliamentary, design, arts, and entertainment districts combine into a once-thriving Downtown. The architecture is as rich as the loot you’ll be picking up.
-
Northern Apartments (Downtown)

At the beginning of Main Street near Fire Station 20, a collection of apartments makes up the north side of town near the Stadium. The following buildings are a part of this complex:
Renovated Apartments: Next to the gas station is an apartment building that has plenty of vacancy following its renovation. In both sections of this U-shaped complex, only part of the first floor is accessible, with the eastern half earmarked by vending machines and the other half by an open, non-functioning elevator car. The roof is accessible, with its highest point being relatively equal to the fire station tower and provides roughly the same vista. Behind this building is a small green security shack nestled in the corner of a large parking lot.
Bar and Grill Apartments: Adjacent to the renovated apartments is another U-shaped building that features a small bar and grill on the ground floor. The roof is accessible by jumping from the renovated apartment roof. Your reward for reaching this is a view straight down the road to the monstrous art museum and a good way down the Gora River.
Courtyard: Both the renovated apartments and Bar and Grill apartments share a courtyard, which features two large trees in bloom. This is also where you’ll find the ladder up to the renovated apartments roof.
Electronic Store Apartment: South of the two main apartment buildings is another one that technically is part of the tenement apartments. This area contains an electronics store, which has a back door that leads to the rear of the other tenements.
-
Soccer Pitch (Bloc)

A community soccer pitch marked by the lone soccer ball sculpture in Verdansk has been commandeered by the WHP for their emergency services, placing down their tents and storage containers from endline to endline. The tents have plenty of potential for loot, while the containers can act as makeshift cover. Three concrete stands, including one with a covered top, provide a decent view over the entire pitch. Southeast of the main field, a partially broken out wall leads Operators from the soccer pitch to the main Bloc area.
-
Bloc

The Bloc takes up a massive section of Downtown’s northwest area and contains the following buildings, starting from those adjacent to the soccer pitch all the way to the Arts District:
Technology and Liquor Stores: A white brick building with purple awnings has two interior areas: the one in the north is a technology shop, and the one in the south is a liquor store. Both have small counters and back door exit areas to the Bloc’s courtyard adjacent to the soccer pitch. This building’s roof can be accessed only via parachute or helicopter.
24-Hour Internet Café and Restaurant: Next to the liquor store in the white building is a redbrick building with a 24-Hour Internet Café and, adjacent to that in the same complex, a restaurant. Both buildings have two entrances from the main street and a back door that leads to a parking lot with two abandoned trucks. This building’s roof can be accessed only via parachute or helicopter.
National Acropolis and Liquor Store: This long, tan building contains a travel agency — National Acropolis — and another liquor store. The liquor store is similar to the other one down the road, while the travel agency has a few desks and a back entrance that leads to a small courtyard area. This building’s roof can be accessed only via parachute or helicopter.
24-Hour Internet Café and Dance Studio: The L-shaped tan building comprises two single-floor locations: another internet café and a petite dance studio, complete with wood floors and a solid stereo system. Between the dance studio, police station, and rental apartments is a broken-down truck and a small covered military area that has a small crate, gabions, and concrete walls.
Rental Apartments: This is the largest building in the Bloc. A children’s playground marks the front entrance of this apartment complex. There is also a parking lot that faces the Stadium, and another small makeshift military tent with a closed green shack.
Arch Rental Apartments and Liquor Store: Along with another liquor store, which connects the Loop around Downtown to a small courtyard, this area is defined by an apartment complex with a massive arch. The building is currently under renovation, as marked by the wooden scaffolding, part of which is accessible from street level. This building’s roof can be accessed only via parachute or helicopter.
-
Riverside Tenements

Despite its name, the Riverside Tenements are quite swanky, with two clothing stores, an internet café, and the massive hotel within its jurisdiction.
Streets: Unlike most streets in downtown, the Riverside Tenements’ streets are littered with makeshift military cover pieces. There is also a small green comms shack outside the 24-Hour Internet Café tenement and hotel, each of which has a small interior with only a TV, a chair, and not much else.
Clothing Stores Tenement: This clothing store looks like it was ransacked before being abandoned for good. There are two front-facing entrances into here, along with a back door that leads to the Riverside Courtyard. There is also another, smaller clothing store with a small counter at the south end of this building facing the street. This building’s roof can be accessed only via parachute or helicopter.
Green 24-Hour Internet Café Tenement: Outside a small, open garage, the only other accessible part of this tenement building is a small internet café, which has a back door entrance to the Riverside Courtyard. To the south of the café, a tiny park-like area has two benches to sit upon, along with a brick wall that can be climbed over to reach the courtyard. This building’s roof can be accessed only via parachute or helicopter.
Riverside Courtyard: Behind the tenements is a long courtyard broken up by patches of grass and concrete platforms, making it difficult to drive an ATV through. Hopping over the brick fence will lead you directly to the Gora River.
Hotel: This upscale hotel in northern Downtown Verdansk is just steps away from the Entertainment District, as well as the Bloc leading to the Stadium.
-
Entertainment District

Earmarked by BCH4’s Downtown Studio, the Entertainment District is where you’ll find multiple law offices, along with a drugstore, liquor store, and the downtown studio for Verdansk’s No. 1 news station: BCH4.
Tan and Blue Apartments: While this does not have an accessible interior, the main feature of this building is a ladder on the blue apartment facing the street. This leads to a roof with a solid view of the Verdansk Hospital and Government Plaza. Another ladder leads to a different roof area with an even clearer view of both areas plus the Riverside Tenements. The billboard on this section of the roof can also serve as a cover piece against fire from the BCH4 or Broadcast towers.
Corner Drugstore, Corner Café: A small drugstore that has been looted sits on the corner of the Entertainment District facing the Corner Café area. The countertops and cluttered interior make this drugstore cramped, although its rear exit is relatively roomy. There is also a small commercial property building for sale to the northeast. The roofs of both buildings can be accessed only via parachute or helicopter.
Lawyer’s Office, Tower: This law office – which may be for personal injury, given state of affairs in the Warzone – is across the street from the nearby Hotel and has only one floor: its main office. The desks can be used as cover, which may be necessary given the two front and one rear entrance to this building. The roof of this building can only be accessed via parachute or helicopter.
Commercial Property Building: South of the law office is a commercial property building for rent. Inside the lone floor is a small room with chairs in a semicircle with terrorist faction Al-Qatala’s flag on one of the walls, indicating that this abandoned building is serving as a meeting area. There is also a small garage area facing the main street, and a back door from the meeting area that leads to a courtyard. The roof of this building can only be accessed via parachute or helicopter.
White Tent Courtyard: Between the lawyer’s office and the commercial property building is a small courtyard containing two white tents. A wide staircase leads up to the main parking lot behind the BCH4 Downtown Studio, the corner drugstore and liquor store, and alleyways to other Entertainment District buildings.
Liquor Store: This building has two front entrances, a small counter, and a back door entrance to the BCH4 loading area. This building’s roof can be accessed only via parachute or helicopter.
Public Restroom: Outside the corner drugstore, there is a restroom with two entrances and two separate halves for men and women. Think about hiding here as a reasonable option.
Lawyer’s Office, Corner Café: This law office encroaches on the Corner Café’s territory and has only one floor: its main office. The desks can be used as cover, which may be necessary given the building’s two front entrances and one rear entrance. This building’s roof can be accessed only via parachute or helicopter.
Clothing Shop and Outlet Store: This outlet store, whose entrances are flanked by either gabions or concrete barriers, is mostly barren outside of a shelf, a few boxes, and a makeshift counter made from plastic folding tables. The back exit leads to the alleys and, eventually, the BCH4 loading area. There is also another, smaller clothing store with a small counter that is a part of this building that faces the southeast. This building’s roof can be accessed only via parachute or helicopter.
BCH4 Loading Area and Alleys: This massive loading area outside the BCH4 Downtown Studio includes the back entrance to the studio and a torched Atlas Supermarket truck. To the south of the loading area are multiple alleys that lead to back door entrances of the corner drugstore, a lawyer’s office, and the outlet store. These alleys are small and cluttered enough to force close-quarters combat and create a bottleneck, leaving you vulnerable to being run over by a small vehicle or being sniped from the BCH4 roof.
BCH4 Downtown Studio: This massive studio is the main landmark of the Entertainment District, with an antenna on its roof that nobody can miss as they drop into Downtown Tavorsk. In Operation Just Reward, the BCH4 Downtown Studio was used as a distributed crypto server by AQ forces, with its close proximity to the National Acropolis Bank being a plus when they conducted this nefarious scheme.
-
Art Museum

This monstrous concrete building defines this area of Downtown and includes a pharmacy and some apartment buildings.
Streets: Multiple empty busses, trucks, and WHP containers litter the streets around this city block. While the last place you want to be in Downtown is on the streets, these obstacles, as well as concrete barriers and a stack of crates near the Art Museum Apartments, act as great cover for those looking to scurry into any building from the outside.
Art Museum Apartments: These two buildings have only one floor accessible. The one toward the south has an entrance facing the Bloc and another entrance in the back leads to the courtyard. The other building has a front entrance facing the Arts District, has a garbage can on top of the dirty couches, tables, chairs, TV, and boxes. It, too, has a door leading into the courtyard. Access the roof of these buildings by hopping from the upper courtyard. The roof provides a strong view over the Bloc, Art Museum Courtyard, and down the streets to Parliament and the Stadium.
Pharmacy: Of all the pharmacies, this one is the most cramped. Two Operators standing side by side can basically touch the walls of the main waiting and shop room. The shelves here act as cover pieces, but other than those, this room does not offer much in terms of defensive positions. An employee entrance in the back leads to the Art Museum parking lot. This building’s roof can be accessed only via parachute or helicopter.
Museum Courtyard and Parking Lot: The middle of the Art Museum block is composed of a multi-level courtyard and a parking lot — both of which lead to every building in this area.
Lower Courtyard: Between the Verdansk Museum and Museum Apartments lies a grassy courtyard. A massive concrete staircase acts as both the main route up to the upper courtyard and as a piece of cover for firefights that break out here.
Courtyard Stairwell: From the Bloc and past the security checkpoint, make a hard right into a set of double doors that lead to the courtyard stairwell, which leads up to the upper courtyard. There are two windows — one on the ground floor and the other at the top — with the latter allowing for obstructed views over the lower courtyard and part of the Bloc.
Upper Courtyard: Accessible via the courtyard stairwell, main staircase, or a ladder at the front of the museum, this courtyard features planters and benches that are nice cover pieces. This area offers solid views down multiple main roads, as well as the Bloc, Art District, and Stadium.
Parking Lot: The other half of the museum’s backyard is a large parking lot featuring a few burnt out trucks and a narrow alley that leads to the main street between Parliament and Broadcasting. This is also where you can sneak into the museum’s main stairwell via an open second-floor window.
Verdansk Museum of Contemporary Art: This complex building has multiple areas where fighting can break out:
Front-Facing Stair Network: Toward the south side of the main entrance are multiple staircases that lead to alternative routes in, around, or on top of the museum. The one closest to the main entrance has a ladder to the upper courtyard, and the other is closer to the elevator shaft that leads up to the 14th floor.
Parking Garage: A tiny parking garage on the museum’s south side may be big enough to find exactly what you need, or use to access the stair network, back stairwell, and a balcony.
Balcony: This balcony overlooking the Downtown streets between Broadcasting and Parliament can act as a sniper perch for those who have the weaponry to take the long-range shot. This area is normally accessible through the back stairwell via the parking garage, or with a bit of parkour, one can hop from the upper courtyard across the stair network and onto this massive platform.
Main Entrance Lobby and Gallery: A blue bus blocks the street in front of the museum’s main entrance, which features a U-shaped reception desk and a massive concrete pillar to be used as cover. Past this lobby is the main gallery. There are two emergency exits here that lead to the parking lot and courtyard, along with a stairwell that leads to the building’s roof.
Clothing and Outlet Store: This outlet store, whose entrances are raised and have steps leading to them, is mostly barren outside of a shelf, a few boxes, and a makeshift counter made from plastic folding tables. The back exit leads to a parking lot between it, the hotel, and a clothing store, which shares the same building as the outlet store. The clothing store has a large set of double doors, followed by another door that leads to the bathroom area. A small cashier area, a few pedestals, and shoe racks are the items of note in the lone showroom, with two doors to the south leading to the garbage area — which goes to the parking lot — and the mannequin area where all the windows are breakable. This building’s roof can be accessed only via parachute or helicopter.
Art District School: Across the street from the clothing store lies the main school building of the Art District with a black bus parked out front. From the main entrance, there is a mudroom, which juts back to the east; the main classroom area with a few desks to use as cover; a small hallway; and the nap room that is mostly empty. The back door leads out into the playground area, which is in the same courtyard as the self-storage building. This building’s roof can be accessed only via parachute or helicopter.
Self-Storage Building: Two heavy double doors facing the museum lead into a large room with crates strewn about, which could act as cover pieces. The back door leads into the courtyard, which this building shares with the Art District School. This building’s roof can be accessed only via parachute or helicopter.
Art District Hotel: Those visiting Downtown for the art museum may want to check into the Art District Hotel, a 15-floor tower with a small café, a business center, and valet parking.
Liquor and Outlet Stores: The liquor store, which faces the Market Gardens area, has two front entrances, a small counter, and a back door entrance to the central courtyard. Next to it is an outlet store, which has two raised front entrances and a back entrance. Its interior is mostly barren outside of a shelf, a few boxes, and a makeshift counter made from plastic folding tables. This building’s roof can be accessed only via parachute or helicopter.
Courier Electric Apartments: Guns and Ammo and Outlet Stores: With a back entrance in the courtyard and a double-door entrance facing Parliament, this guns and ammo store is where you could find some solid loot. A few gun lockers and a large counter define this smaller version of the typical guns and ammo shops around Verdansk, with a small back area having a boarded-up apartment on the way to the back entrance.
The other interior space here is an outlet store that lies next to the massive arch that adds a bit of flair to this complex. This outlet store, whose entrances are raised and have steps leading to them, is mostly barren outside of a shelf, a few boxes, and a makeshift counter made from plastic folding tables. The back exit spills you out into the main courtyard. A small ladder near the archway leads to the roof, which provides decent views of the surrounding area.
-
Monument Roundabout

An old monument sits at the center of a roundabout, which connects Downtown District to the Stadium and connects the Port and Farmland areas via the Tavorsk Bridge. The three planters surrounding the monument, along with the monument itself, are your main pieces of cover here. Surrounding the monument in and around the roundabout are a few trucks and barriers that you can use to take refuge from firefights.
-
Great Bridge

The Tavorsk Bridge allows quick access from the main eastern roundabout in Downtown (just west of the bridge), across into the Farms zone (east). Of course, the empty river can be driven across almost as easily. Use the bridge as a landmark and the roads to learn the topography of the zones. Or hide under the bridge and snipe; this is the only good place to hide in this otherwise open area.
-
Government Plaza

This massive district within Downtown encompasses a large apartment complex and two government buildings. The streets around here are fairly open with little obstacles that can jam up traffic.
Rothwynn — Donna Complex: The northernmost complex has two buildings — the white Donna building and the tan and green apartments topped with a Rothwynn Donna sign — with a small courtyard shared between the two. This courtyard has a small flower kiosk where an Operator can duck into for shelter; there are also a few small trees in planters to use as cover.
The white Donna building is the less complex of the two; there is only a mailroom to explore in terms of interior space. Meanwhile, the other building has a restaurant and an electronics store, along with a ladder near the restaurant’s back entrance in the courtyard. The roof of this building, along with the Donna shop, which you can hop over to, gives solid views over to Promenade East and Verdansk Hospital, as well as to the rest of the government plaza, Corner Café/construction site, broadcasting, and the Design District areas within Downtown. Outside the complex are two small metal kiosks that are big enough to fit a whole trio or some loot.
Post Office/Government Building West: As defined by a Post logo at its front-facing marquee, the western government building doubles as the main post office within the city of Tavorsk. Other than a public post office, this building also has a few rooftop sniping positions and offices to explore.
Government Building East and Courtyard: A white-brick courtyard bridges the two government buildings together into a plaza, with a few Operator-high brick walls breaking up the otherwise open space. The other government building has only two interior areas: a lobby that features a reception desk and a central pillar, and a square room in the rear. While you cannot access this building’s roof from the inside, you can jump from the other government building onto this roof, which can allow for a change of pace should you decide to snipe here.
Along the Gora River: The government plaza sits on the bank of the Gora River, with a few trees and rocks strewn throughout to act as natural cover. From these greener areas are steps that lead up to the plaza proper and the Rothwynn-Donna Complex, along with brick walkways with minimal cover.
-
Corner Café/Construction Site

Right near the art museum and massive skyscrapers is an abandoned construction site. A collection of buildings, including a mini art gallery and the famed Corner Café, sit just north of the site on the same block.
Art Gallery: Any instillations that just didn’t cut it for the Verdansk Museum of Contemporary Art usually find themselves in this small red building with double doors at the front and rear. The room itself is bright red with a few paintings hung and a massive column in the middle. At the back of this building in the courtyard, a ladder extends to the top of this building and the Corner Café, where there’s a commanding view of the construction site, along with a decent 360-degree view of the surrounding Downtown area. You can even shimmy off the side of the roof in front of a billboard onto the lip of a giant arch, which gives you an angle that passersby may not expect.
Corner Café: Complete with an outdoor patio and courtyard, the Corner Café is like an upscale pub complete with a bar and a few tables to be used as cover. This building connects to the art gallery, meaning the two buildings share a roof. A small brick powerhouse and a metal shack are just outside the café’s east entrance, with the latter having decent sightlines over to the Verdansk Hospital and the Verdansk Museum.
Construction Site: This location includes two concrete building frames — one with a ramp leading directly to its top floor and another with more scaffolding — and plenty of materials strewn throughout. With no lighting on the ground floor of these structures, it’s easier to lose something in a dark corner. Meanwhile, the top “floor” of these structures is exposed to the elements, and some of the walls can even be jumped on to create some interesting routes, such as over to the Corner Café roof.
-
Broadcast and Burger Town

The SKN Broadcast Tower and its surrounding area is a can’t-miss spot in Downtown.
Fruit Market and Sports Bar: Just outside the construction site, you can either get your groceries at the market or catch a game in the sports bar in this space that includes an open-air promenade. The market has shelves and counters to use as cover pieces, while bar patrons can duck behind the bar itself or the billiard tables if matchday gets a bit too rowdy. The roof of this building is accessible if you jump off the SKN Broadcast Tower and parachute down to safety.
Espresso Café: The Espresso Café takes up the southwest corner of this point of interest. This café, which also has a small kiosk outlet near the broadcast tower, has two main rooms: the main storefront, which features a counter to use as cover, a back-door employee area that leads to a parking lot and courtyard, and the lounge, which is mainly open due to all the tables and chairs being pushed up against the walls.
Teal Building and Courtyard: Next to the SKN Broadcast Tower is a shuttered building painted in horrid teal. Although there is no interior space here, you can climb onto its roof by using the storage lockers in the courtyard area. One of these lockers is open and could contain loot . . . or an enemy player in hiding.
SKN Broadcast Tower: This notorious tower is one of the tallest buildings in Verdansk, offering picturesque views of the entire Downtown area and then some for those who climb to the top. Even if you don’t, this tower has plenty of great sightlines and interior combat spaces.
Streets: Around these buildings are a few obstacles in the way of an otherwise clear street. This includes a bus between the teal building and Burger Town, a bus and a broken truck outside the SKN Broadcast Tower, and a military tent with multiple bunk beds that sits just outside the Espresso Café.
-


-
POI Overview

A vast swathe of arable land has been farmed for centuries but has been left abandoned due to the recent conflagration. Dotted barns, cottages, orchards and fallow fields await, along with swift violence.
-
Windmills

Three old wooden windmills are the unofficial landmark of Farmland, sticking out among the smaller houses and barns like a sore and rotting thumb.
Windmills: Normally, these would just be great cover pieces. However, with a helicopter and parachute, you can land on top of these windmills and get yourself a phenomenal view of the Farmland and even across the Karst River.
Brick Warehouse: A large brick warehouse acts as the largest building within this area, providing solace for snipers who will take to the catwalk to snipe. Within the warehouse, a few stacked pallets and crates can act as cover for close-quarters combat. Another ladder and a stack of hay bales on the outside allow for roof access, which gives a better, but riskier, high-ground spot for sniping.
The red shack is deceptively larger than the blue one, as it contains a mudroom, master bedroom, bathroom, office, and closet along with a large living room/kitchen area. Given their obscurity compared to the other structures in the area, they could be used to flank those at the windmills or warehouse.
-
Pastures (Fetid Pond)

The northern zone border of Farmland continues with a rocky cliff, below which is a small pond and trees to use as cover. The ground is quite hilly and leads down to the crossroads. West of the pond on the upper grassy area is a red and white antenna you can use as a location marker.
-
Orchard

Beyond the windmills, dozens of trees sit on a hilly terrain with a road cutting through the otherwise picturesque landscape. Larger vehicles can use the road to flank the opposition, while ATVs and foot soldiers may want to take to the trees for cover. The natural inclines can also allow for long-range weapon users to aim down toward the silos, the central barn, or other areas to the south. However, despite the canopy that the trees provide, traveling for too long may expose you to enemies with more cover from adjacent areas.
-
Silos

A few green silos, along with a six-pack of white ones, mark this collection of homes that lie beside dusty trails.
Two-Bedroom Home and Shed: At the northern end of this locale is a reasonably sized wooden home, complete with two bedrooms, a bathroom, and a kitchen area. While the staircase up to the attic has decent sightlines, the first-floor rooms are spacious enough for combat and could contain decent loot. Access the roof by jumping on the fences outside. Near this home is a small white shed that can also hold some loot.
White Silos: This smaller stack of white silos can’t be climbed upon but break up the otherwise open rolling hills. A ridge nearby gives great sightlines to points east.
Robin Egg Abode: A pale blue home complete with two bedrooms and an attic lies north of the main green silos and west of the white silos. Check every room to see if there is any loot or head up to the attic for 270-degree angles of the surrounding farmland area. Behind the home, a haystack could be used as a small, yet unique, sniping perch.
Brick Family Home: Northeast of the red silos is a massive brick and concrete home featuring a wider living room, an attic, and two bedrooms. The roof of the building can be accessible via fences and gives a fantastic view of the silos, Central Barn, and even to some Downtown buildings across the Karst River.
Green Silos: Both the green silos and hay bales can act as solid cover in this otherwise open hill. With the help of a helicopter, the tops of these silos can also be parachuted onto, providing great views of the surrounding farmland.
Tin Homes: Around the green silos are two homes accented by tin roofs, along with a tin overhang that acts as additional cover from the elements. The two-floor home includes a single bedroom with a window that leads to the top of the tin roofs, which allows for decent sniping sightlines around the area. The smaller of the two homes, which has red exterior walls, contains two bedrooms, a bathroom, and a mudroom that could all contain loot.
Yellow Home and Brick Storage: South of the white silos is a two-story yellow home and a brick storage hut, with the latter having a small interior and an accessible roof via a nearby fence. The yellow home’s second-floor attic is accessible, allowing for great views of the surrounding area. Its first floor has a few rooms that could contain loot and a green-walled bedroom that looks out to the south right onto a nearby shed.
-
Central Barn

Known for being one of the most chaotic points of interest of this area, the Central Barn includes the massive wooden structure and a small supply shed outside.
Supply Shed: Although its interior is inaccessible, the roof of this shed can be a decent countersniping position for those in the Central Barn, and it can provide access to the barn or give a solid view of points east, west, and north.
Central Barn: Marked by the symbol of Farmland — two roosters looking at a crop — this barn has multiple walkable roofs and a two-story interior that could be filled with loot. Its wide entrance faces north and is big enough to fit an SUV through, so charging into here with a vehicle could be a smart decision. The barn can be used as a haven for sharpshooters, as the second floor and most of the roof is accessible and gives decent sightlines of the surrounding area. Then there is the ground floor; here, close-quarters builds can find plenty of cover to face off against like-minded enemies or squash pesky snipers.
-
Crossroads

Two dirt crossroads mark this small area, which has a two-story wooden home and a brick storage shed.
Wooden Home and Brick Shed: A reasonably sized wooden home, complete with two bedrooms, a bathroom, and an accessible attic, is the only major interior space within this area. The attic doesn’t look out over much, given that the crossroads are on low-lying land with only hills and fields to the east. The roof, which gives even better sightlines, can be accessed by climbing out of the attic windows. Near this home is a brick shed that might also contain some loot.
-
Crops

Much like the orchard, the crops area is best used for flanking, given that there aren’t any buildings or many loot opportunities here. The western road cuts through here from the orchard and might be used by large vehicles looking to cross the map with less resistance compared to a straight shot through the center. Those with snipers may take a position up on the hill overlooking the barren crop field, which gives a visual of the Central Barn, the launchers, down the road to the hills, and even part of the silos. This hill isn’t without risk, though; much like the entire crops area, there is little room to hide. Below the road, the crop field has a long wooden storage shed that you can either mantle onto for better sightlines out of the area, or use for cover through a small garage area that could contain loot.
-
Farmhouses

The smallest area within Farmland includes two homes to the north and south of it.
North House: A two-floor home with an accessible tin room includes a spacious attic, two bedrooms, and a kitchen area, all of which could have some decent loot opportunities.
South House: This two-floor home has roof access via the second floor, along with a spacious basement. Other than those unique features, expect a few bedrooms with solid sightlines and a decently sized first-floor living room and kitchen area.
-
Homesteads

This collection of homes includes numerous loot and sniping opportunities with their expansive interiors and roof and/or second-floor access in multiple buildings.
Grey Shed: Near the Central Barn, this could either be a good countersniping position against those in the barn or could contain useful loot. Its roof is accessible via a tin overhang through the adjacent brick home.
Brickhouse: A two-story home has an accessible roof, two bedrooms, a spacious living room and kitchen area, and two nearby small sheds that can contain additional loot.
Rotted Wood Home and Garage: A single-story home has an accessible roof, which can lead to the roof of the nearby wood garage, along with another small garage and a bathroom. The separate garage nearby has only one interior space, which is large enough to fit a Supply Box or a small vehicle.
-
Plowed Fields (East)
The huge flat ground to the east of the farm structures has been segmented into three large fields of corn and poppies. Haystacks have been recently rolled, and these provide the only real cover if you venture out to these open areas. Better to prowl around the perimeter woods or use a vehicle, though the bushes by the borders between the three fields are an interesting choice to hide and snipe from.
-
Hills

A few rolling hills outside of the launchers and hay storage areas allow for natural high ground and cover with some cliff sides and mature trees. The taller hills overlook parts of the Port and the silos area. An experienced driver could navigate their way through the trees and back down onto the road below.
-
Hay Storage

With how much grass is grown on the farms, the villagers needed a place to store it. So, in this small area, there are two large holding tanks and multiple stacked bales outside of a yellow home.
Holding Tanks: These two massive silver tanks have a ladder that can be used to climb on top of them. Once you are on top, there is little cover, but the sightlines from here are solid enough to be worth the effort.
Hay Bales: A collection of fences and hay bales makes up the backyard of the yellow home. Here, you could hop on top of the bales to gain some high ground, or weave through them to catch an enemy with a CQB weapon.
Home: The lone house in this area has a mudroom, a bedroom, a window that allows for direct access to the hay bales, and an attic with decent sightlines over to the cattle farms and southern farms.
-
Cattle Farms

Outside of the main buildings of the cattle farm, a few pens have the remains of whatever cows weren’t completely decomposed or slaughtered when the invasion took place.
Dark Blue Home: Flanked by two cattle pens is a two-story home with an accessible attic that has multiple windows for sniping, along with two first-floor bedrooms that could contain decent loot.
Cattle Barn: This massive barn has a spacious cobweb-filled interior with two distinct floors: a ground floor with multiple palpation cages and a relatively roomy second floor. Outside, hay bales allow for roof and second-floor access.
Water Tower Home: This two-story home includes multiple bedrooms, which provide loot and sniping opportunities, along with a large first-floor living/kitchen area and an unfinished basement. Next to this home is a tall water tower, which you can get up to its top via ladder, provides an incredible 360-degree view of the surrounding farmland, and even the Port and Prison areas.
Brick Storage Building and White Shed: These two small buildings at the south end of the cattle farms have minimal interiors that could still hold a piece or two of loot. The blue shed has a stack of hay bales and two rusted tanks, which can be used to get on top of the shed.
-
Southwest Farms

This small collection of homes is the last stop before the end of the farmland, as down the road from here is the City of Verdansk Port.
Yellow Home and Brick Storage: The final buildings before the road leads to the two-story yellow home and a brick storage hut, with the latter having a small interior and an accessible roof via a nearby fence. The yellow home’s second-floor attic is accessible, allowing for great views of the surrounding area. Its first floor has a few rooms that could contain loot and a bedroom that looks out onto the road leading to the port.
Blue Shed, Yellow Home: This small shack near the yellow home has a small opportunity for loot, or just decent cover.
Dark Blue Home: The other large building in this fenced-in area is a two-story home with an accessible attic that has multiple windows for sniping, along with two first-floor bedrooms that could contain decent loot.
-
Southern Farms (and Crops)

This massive collection of homes makes up the final portion of civilization before the road to the Prison. It also includes a water tower that provides one of the best vistas in the entire area. Starting from east to west, the following can be found in this point of interest:
White Brick Home: This home’s second-floor attic is accessible, allowing for great views of the surrounding area. Its first floor has a few rooms that could contain loot and a bedroom that allows an alternative exit into one of the large livestock holding areas.
Rotted Wood Home: Within the same general area as the white brick home is a decrepit wooden single-story home that has an accessible roof, a small garage, and a bathroom.
White Shed, Basement Home: Farther south of the rotted wood home is another blue shed that has a small opportunity for loot, or just decent cover. Two large rusted tanks nearby provide decent cover. There’s a small gap between it and the concrete platforms that hold the tanks, which can be used to see enemies on the other side.
Basement Home: The southeast corner of this area has a two-story home complete with two bedrooms on the top floor, which can provide opportunities for sniping; a large living and kitchen area on the ground floor; and an unfinished basement with a separate outside staircase entrance. All three floors have the potential for loot and close-range encounters.
Blue Shed and Wood Storage: Within the large livestock field are these two buildings. The blue shed is fairly small, with two entrances and a large window looking toward the back barn, while the wood storage building has a small supply room and can be climbed upon by using a nearby fence.
Back Barn: This massive barn south of this area has a spacious interior with two distinct floors: a ground floor with multiple palpation cages, and relatively roomy second floor. Outside, hay bales allow for roof and second-floor access.
Decrepit Silos: Just outside the barn are two silos that can be used for cover. Alternatively, you can parachute to the top of these to get an impressive view toward the Prison.
Brick Shed: Adjacent to the decrepit silos, this single-story supply shed is small, yet has the potential for loot drops.
Crops: This crop field has next to no cover, making it great to drive through, but not the best place to hide when an opposing squad is chasing you.
Crops Home: A two-floor home with an inaccessible tin room — but with a roof you can parachute onto — that includes a spacious attic, two bedrooms and a kitchen area, all of which could have some decent loot opportunities.
Crops Water Tower: The tallest structure within Southern Farms, the water tower offers incredible views of the Farmland to the north, Port to the west, and the Prison to the south. However, there is little cover up here, making this sniping perch a risky one.
Brick Family Home and Wood Shed: South of the water tower is a massive brick and concrete home featuring a wider living room, an attic, and two bedrooms. The roof of the building can be accessible via fences and gives a fantastic view of the hay storage and cattle farms area. Within the same plot of land is an accessible small wood shed whose roof can be climbed upon.
-
Southwest Orchard

A mixture of topographical features here: This woodland orchard has been planted on rock and grass, with the terrain rising steeply to the south and east. The area is bordered by the main dirt road on all three sides and has a trail running roughly north to south, passing a small lake (with an abandoned truck), which you can use as a scenic marker. The trees grant you reasonable cover, though you’ll need to maneuver around the rock outcrops to the south if you’re heading up hill.
-
Pasture Hut

A tiny hut sits within the orchard and pastures along the eastern side of the fields. Use it as a marker or as a place to temporarily rest. There’s little else here except the rusty roof of the hut to climb on.
-
Pasture Hatch

In the shadow of a tree, among some rocky ground and pasture, is a small set of stone foundation blocks, a small generator, and a locked trapdoor. The hatch leads to [[REDACTED]].
-
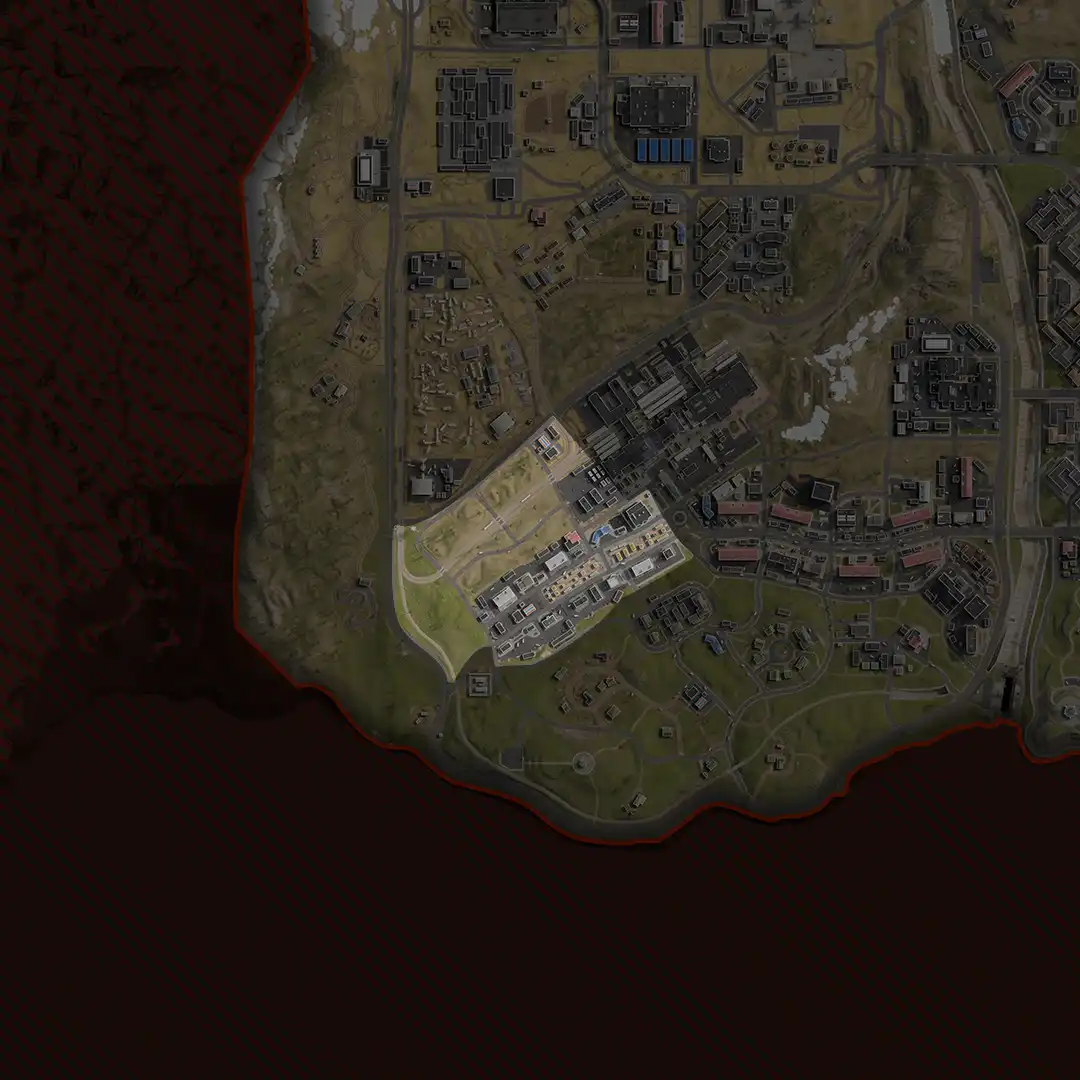


-
POI Overview

The outer Promenade has fewer tall structures and is a gateway to the more rural areas of Verdansk, compared to the eastern part of this avenue of stores and office structures.
-
Woodland and Railroad Tracks

If you enjoy lurking or rushing across low-traffic areas, think about the forested areas bisected by roads and the rail tracks in the northwestern part of this zone. The undulating ground, trees, train carriages, and burned-out vehicles are all possible cover opportunities. Just ensure you’re using your compass and don’t get lost in the woods.
-
Gas Station and Garages (Promenade West)

Just southeast of the Zhokov Scrapyard (Boneyard), across the highway and surrounded by road and railroads, is a gas station, along with a four-door garage structure. This location is on the northwestern edge of Verdansk train yard as well. The gas station has four pumps, a small concrete store hut that is easily overlooked, and a small store building stripped of goods. Note the ladder to the roof at the rear of this structure. The roof of the store is worth accessing, as it provides moderate cover and views down to foes in the vicinity.
-
Apartments and Maintenance Yard (Promenade West)

The edge of the train yard is actually part of this zone and features a pair of green and white apartments and a perimeter wall around a tarmac yard. Both apartment structures share the following footprint: The main entrance of each apartment is on the west side, with a rear entrance on the east wall.
-
Public House and Apartments (Promenade West)

The far southwestern part of the Promenade is mainly residential, with two large, drab-green apartment buildings flanking a public house. Along the northwest perimeter are garages to check for loot and foes, and there are two small maintenance sheds (one to the southwest and one adjacent to the public house) that are inaccessible.
Public House: A two-floor pub occupying the central location between either apartment building (with the red arched windows and a sign for Sergio’s Restaurant Bar and Grill). Enter via the pub door (east), or the metal door to the kitchens (west). The ground-floor bar has seating and stairs up to more booths and two exterior exits, one to each balcony, with the western corner of one of the balconies having roof access via a ladder. From here there are excellent sightlines northeast along the Promenade and market areas.
Pitched-Roof Apartments: Both of the apartment structures on either side of the public house have a drab green façade and pitched roof. Enter via either the single or double doors atop the outside steps, or via a ground-floor apartment window next to the single door.
-
Fire Station 57

Close to the woods and the train yard is the familiar yellow tower and red roof of a fire station. This one is #57. Adjacent is an inaccessible metal hut. The interior of the fire station has two main floors, including the garage, reception area, locker room, and crew quarters upstairs, along with ladders to the roof and the tower, which provide a commanding view across the train yard (northeast) and the market (south).
-
Pharmacy Block (Promenade West)

Across from the fire station, and just north of the main covered market, is a pharmacy, a small corner kiosk (with an electronic sign), and an inaccessible metal hut on the border of the train yard. Inside the pharmacy has been ransacked. Use the building’s blue A-frame roof as a marker and access the interior (including the upstairs, via the skylights) easily as the roof is straightforward to climb onto.
-
Electronics Store (Promenade West)

South of the Police Station is a large electronics store. This building is sizable, with a glass and turquoise front façade and concrete outer walls. Surrounding the structure is a parking lot and a pedestrian forecourt with two metal kiosks with interiors to search.
Exterior: There are five entrances: three openings are at the front foyer, two are at the rear, and one is on the building’s west side. The rear of the building also has a ladder to a low roof; work your way around to reach a second ladder on the west side, enabling roof access.
Interior: The main showroom has been mostly stripped of flat-screen TVs and speakers. There are two exits; one behind the cash registers and loading corridor (west), and another toward the back of the store (northeast).
Roof: Note the gantry walkway and the roof, which is flat enough to land a helicopter and has a long turquoise sign that you can spot from a distance. The AC units and height enables defensive shooting.
-
Gas Station (South) and Burger Town Block (Promenade West)

Between the western edge of the market and the comms tower is around four blocks of buildings. Along the southwestern perimeter are storage garages, as well as a variety of immovable vehicle wreckage. Two small brick offices (with interiors) and two dumpsters filled with rocks are positioned close to the main road. On adjacent roads is the gas station and Burger Town.
-
Market (Promenade West)

The western end of the Shopping District has an impressively long covered market, stretching over four blocks running roughly east to west from the roundabout outside the train yard, towards the Kart Racing Track. Look for the Bapakett sign flanked by two low concrete steps and a host of yellow- and blue-roofed stalls. All are closed. Use the walls, trash cans, barrels, or other scenery to ascend to the stall rooftops if you’re looking for dominance and height.
-
Bank and Apartments Block (Promenade West)

White Brick Apartment: This old apartment structure has boarded-up windows, an entrance by the roadside, and a second entrance at the rear, along with a ladder to the roof.
Pitched-Roof Apartments and Garages: This apartment structure has a drab green façade and pitched roof. Enter via either the single or double doors atop the outside steps, or via a ground-floor apartment window next to the single door.
Bank: The pale green bank building has two ATMs outside of the main entrance, and additional thresholds to enter via a garage or the low garage roof and ladder to the main roof, and a ground-level door and windows. Inside the structure, you’ll find the following:
Green and White Apartments: The last structures are a pair of green and white apartments, close to the main road, with piles of dirt, dumpsters filled with rocks, and immobile vehicles to use as cover. Both apartment structures have a similar footprint:
The main entrance of each apartment has double doors with a porch, with a rear entrance on the opposite side.
1F: A two-bedroom apartment is to one side of the stairwell. Note the numerous windows to enter or exit from, making this a possible place to hide or ambush.
2F and Roof: Head up the interior stairwell to a door on 2F to a studio apartment with windows to shoot from. Continue along the landing to an L-shaped staircase up to a roof exit door. This offers reasonable views and protection.
-
Kart Racing Track

The outer edge of the Southwest Sector features a variety of terrain, lower-density housing, scattered dwellings, and a memorial. An entertaining diversion from the mercenary tasks at hand, take a Tactical Rover or ATV out for a spin around this go-kart course. Or, if engaging in battle, use the red and white barriers as cover, retreat to the adjacent woodland, or into the warehouse (marked “4”), which has little in the way of cover options. You’re also adjacent to the divided highway, allowing for a swift getaway.
-
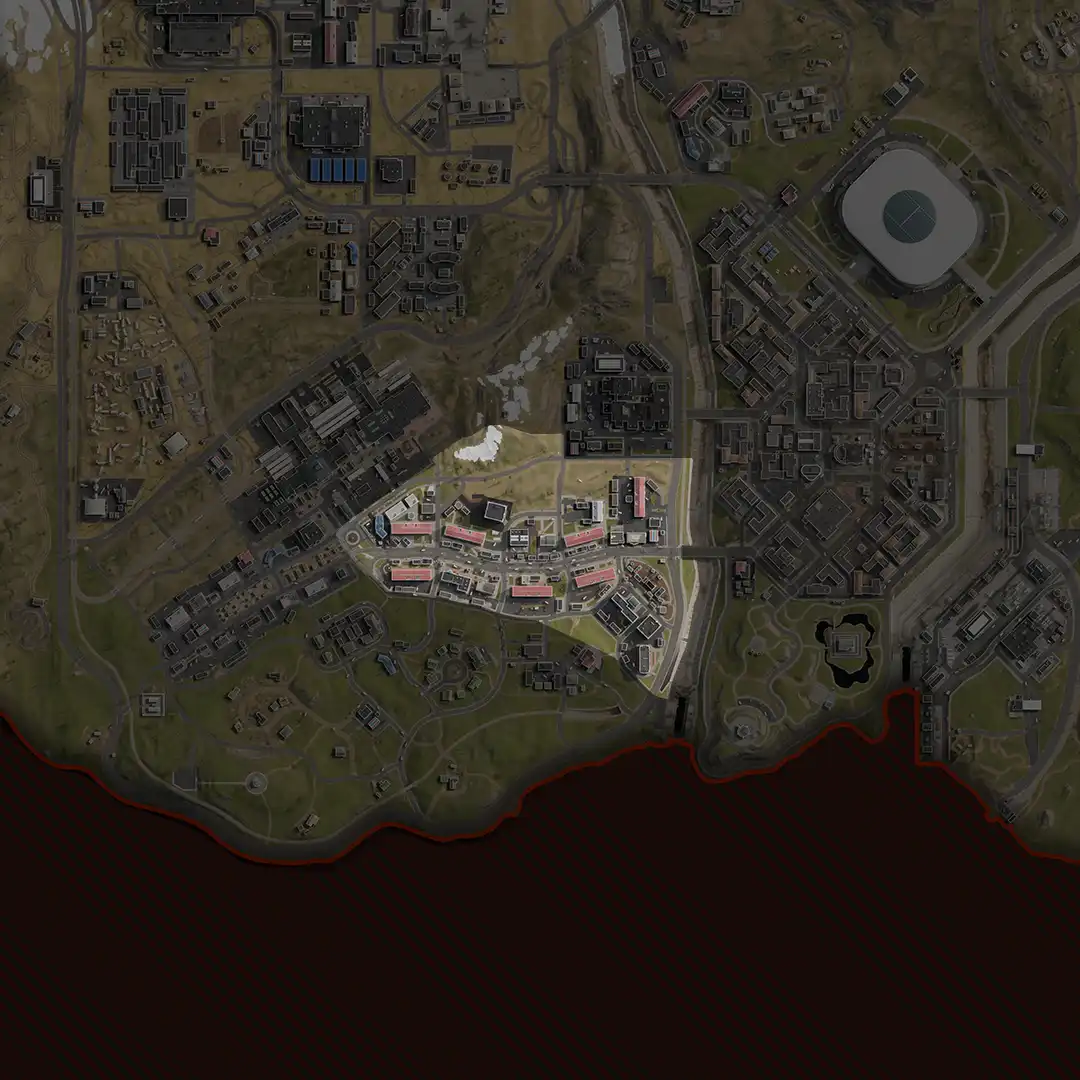


-
POI Overview

Situated on either side of the main divided highway that offers a straight shot from the western wilds to Downtown, the Promenade was a bustling hive of commerce. Now the stores, tenement blocks, and Ferris wheel sit empty.
-
The Roundabout

A central stone column flanked by six conifer bushes and a circular outer wall is a good landmark to spot if you’re wanting to find the market, or head south from the train yard. Continue south to head slightly uphill, into the residential suburbs.
-
Pharmacy and Apartments Block (Northwest; Promenade East)

East of the roundabout is one of the eight large residential apartment structures that dominate the skyline. The actual Promenade market stalls are in front of these tenement blocks, and the northwest block is close to a pharmacy. This particular block has a large military presence, with abandoned trucks, a sentry hut, and crates dotted about. Behind the main tenement block is a green and white apartment building, restrooms, and two sets of garages.
Pharmacy: Inside the pharmacy has been ransacked. Use the building’s blue A-frame roof as a marker and access the interior (including the upstairs, via the skylights) easily as the roof is straightforward to climb onto.
Sidewalk: Along the side of the main road are two kiosks (with interiors): an electronics booth and a clothing store. Farther east is a bus stop.
Tenement Block: The front of this massive gray block of apartments faces south, onto the forecourt and road. There are two double doors you can use to enter the building, or a window to smash to the left of either double door. The rear and sides of the tenement block contain two single doors allowing interior access. Or you can crash through a window to the right of either door.
Green and White Apartments: There is a single and a double apartment structure side by side: The double has two main entrances, while the single apartment structure has only one: a pair of double doors with a porch and a rear entrance on the opposite side.
1F: A two-bedroom apartment is to one side of the stairwell. Note the numerous windows to enter or exit from, making this a possible place to hide or ambush.
2F and Roof: Head up the interior stairwell to a door on 2F to a one-bedroom apartment with blocked out windows. Continue along the landing to an L-shaped staircase up to a roof exit door. This offers good, elevated views of the Train Station.
-
Apartments Block (North; Promenade East)

The northern section of Promenade East features another giant tenement structure and a larger co-op block behind it. Down on the ground is a parking lot and two small stores flanking a restroom, a notary, and a liquor store (both with two entrances).
Sidewalk: Close to the side of the road near numerous burned cars are four kiosks (with interiors), starting with a small market and a lawyer’s office. Farther east is a notary and a liquor store, each with two doors.
Tenement Block: The front of this massive gray block of apartments faces south, onto the forecourt and road. There are two double doors you can use to enter the building or a window to smash to the left of either double door. The rear and sides of the tenement block contain two single doors allowing interior access. Or you can crash through a window to the right of either door.
Co-op Block: A giant, cube-shaped apartment complex on the northern edge of the Promenade has several entrances to choose from. The west, south, and east sides (ground floor) all have doors you can enter, and there are windows left of the west door and right of the south door. There’s also a window to smash on the north side.
-
Car Showroom and Public House Block (Promenade East)

The north-center of the Promenade has two main structures, a car showroom and a public house. Behind the showroom is a small garage and woods.
Sidewalk: In front of the two structures is a WHP Tent, a small lawyer hut, and a liquor store. To the southeast in the middle of the road is a concrete roundabout you can hide near.
Car Showroom: Dominating this part of the Promenade is a modern glass structure, a GRZ car dealership. A vehicle is parked inside the showroom.
Exterior: The showroom has numerous entry points: There are four open entrances at the front forecourt. There is a ground-level entrance (metal door) on the west wall, near an adjacent ladder that allows access to a lower roof balcony and wall of windows, enabling access into the showroom. A second ladder enables roof access. Along the north wall are two windows, which you can fire from but not move through. In the northeast corner is a metal door entrance. Finally, along the east wall are upper windows, accessible from the interior balcony.
-
Apartments Block (Northeast; Promenade East)

The last tenement block on the north side of the Promenade is adjacent to the library. Behind the block is a literal dumpster fire. In addition, there’s a smaller (but still sizable) apartment structure and two kiosks at either end of the apartments.
Sidewalk: In front of the tenement block are three small market stalls, each around the same size, with two entries. East of that, near the remains of a burned vehicle, is a bus stop.
Tenement Block: The front of this massive gray block of apartments faces south, onto a pedestrian area and the market kiosks. There are two double doors you can use to enter the building or a window to smash to the left of either double door. The rear and sides of the tenement block contains two single doors allowing interior access. Or you can crash through a window to the right of either door.
Green and White Apartment: There is a double apartment structure here: The double has two main entrances — a pair of double doors with a porch and a rear entrance on the opposite side.
-
Verdansk Library (Promenade East)

The yellow and blue edifice on the north side of the main thoroughfare is the city library.
Enter via the steps and porch with the green glass or shoot the glass and enter any way you want; the windows either side of the door are breakable too. A second entrance is available at the rear of the premises — double doors to the rear extension. There’s a roof ladder next to these doors.
-
Gas Station, Bank, and Apartments Block (Promenade East)

The pale green bank building has two ATMs outside of the main, south-facing entrance and additional entrances to enter via a garage or the low garage roof and ladder to the main roof and a ground-level door and windows (west, facing the library).
-
Apartments Block (Southwest; Promenade East)

Flanked by a road around a large tenement block, this section of the Promenade features a small playground, rear garages, and a tall buttress wall and connecting stairs to the elevated road; these are good places to hide. To the front are sidewalks and three kiosks.
Tenement Block: The front of this massive gray block of apartments faces north, behind a footpath and grass verge and three kiosks. There are two double doors you can use to enter the building, or a window to smash to the left of either double door. The rear and sides of the tenement block contains two single doors allowing interior access. Or you can crash through a window to the right of either door.
-
School and Supermarket Block (South; Promenade East)

Toward the center of the East Promenade are two unique structures, a school and a market building; use both as markers to gauge where you are. Behind both buildings is the elevated road, parked trucks, dumpsters, a garage, and pedestrian steps to the elevated road.
Orange Market: This supermarket has been stripped of goods and is mostly boarded up:
Exterior: The market has a bright blue architectural overhang, making it visible a few blocks away. The building has a main entrance along the north wall (steps and double doors), as well as a main exit (from the checkout) under the blue overhang. In the southwest corner, by a dumpster fire and ramped road, is another entrance (leading to restrooms). There are two ladders at the loading bay, leading to the roof, and double doors to the upper floor. One of the roll-up garage bay doors is also open. Finally, there’s a door open to the northeast.
School: The salmon-pink plasterwork of the school building makes it stand out among the other structures in the vicinity. Now mostly looted and vacant, the school is still a place worth checking for enemies and ambushing opportunities:
Exterior: The main black stone porch and entrance is toward the northwest corner of the building. The north wall is extremely porous; there are windows along the exterior to hop in and out of. Along the east wall is another window and a roof ladder. A secondary porch entrance is in the southeast corner, as well as more windows (south exterior) and two final windows on the east wall.
-
Gun Store and Apartments Block (South; Promenade East)

Sidewalk: In front of the tenement block is a gun store, notary, and electronics booth. Various wrecked vehicles, low barriers, and billboard sign bases make reasonable cover options when you’re not inside the nearby structures. Behind and southeast of the tenement block is another small notary office, at the edge of the parking lot the WHP took control of.
Tenement Block: The front of this huge gray apartment structure faces north, toward the sidewalk. There are two double doors you can use to enter the building, or a window to smash to the left of either double door. The rear and sides of the tenement block contain two single doors allowing interior access. Or you can crash through a window to the right of either door.
Guns and Ammo Store: In front of the tenement block is a Georgian-style building that houses a guns and ammo store. Access via one of the two ground-level doors or smash a window on the west side in the narrow corridor by the notary. Check for loot on the ground floor, then enter the keycard door in the upper floor to reach a large office and gun closet. Need roof access? Use the ladder on the southeast corner.
-
Apartments Block (Southeast; Promenade East)

The last of the eight main blocks that make up the main Promenade East thoroughfare and market consists of another imposing tenement structure, along with a sidewalk to the north and a parking lot to the south (rear).
Sidewalk: This is located behind two much smaller market stalls, along with scattered crates, barrels, two large trees, and a pedestrian sidewalk across from the library. Follow the curve of the road behind the tenement to visit a small office structure and a sizable parking lot with access to the nearby co-op buildings (south).
Tenement Block: The front of this huge gray apartment structure faces north, toward the sidewalk. There are two double doors you can use to enter the building, or a window to smash to the left of either double door. The rear and sides of the tenement block contain two single doors allowing interior access. Or you can crash through a window to the right of either door.
Rear Offices (southeast): Access the roof via the ladder attached to the northwest wall, and the interior via any of the three ground-level doors. Inside is a tile-floored office with stairs up to a second office. There is no roof access. The numerous upper-floor windows and roof access make this a notable building to hold down.
-
Ferris Wheel (Promenade East)

The Ferris wheel is an impressive steel construction and is one of a number of fairground structures erected in the last 50 years. This one has seized up completely, meaning you can only take advantage of the views if you land on a gondola from the skies. Up here you’re reasonably difficult to hit and have advantageous views all around you.
Below is the Ferris wheel ticket office, a maze of beer tents, kiosks, and a small apparel store with two entrances. A second, two-entrance store is also accessible, as well as restrooms to the south. The number of hiding locations here is impressive, so watch your six.
-
Apartment Complex Trio and Metro (Promenade East)

Three large residential housing blocks make up the complex adjacent to the Ferris wheel. It is here you can explore a trio of main structures, along with a Metro entrance, adjacent store, and two separated rear parking lots with garages (three on one side and two on the other). Aside from a small play park, stacked boxes, wrecked vehicles, and trash-filled dumpsters, explore and learn the following building footprints:
Northeast Co-op: The parking lot of this eight-level apartment block has a small play park, three garages, and some stacked crates to use as cover. There are main entrance doors on the northwest and southeast sides of the structure, along with windows to leap into or out from.
Central Co-op: A large, cube-shaped apartment structure in the middle of the three co-ops has a number of entrances to choose from. The northeast, southeast, and southwest sides (ground floor) all have doors you can enter, and there are windows right of the northeast door and right of the southwest door. There’s also a window to smash on the southeast side.
Southeast Co-op: With horizontal stripes, gray-blue and white plaster, and brick facades at the base and ends, a large block of apartments overlooks the floodgates and Port. Outside to the rear is a curved sunken parking lot with two garage buildings. Enter the tenement block via one of the four unlocked entrances.
Metro Station: There is pedestrian access to the Metro, adjacent to the Ferris wheel. The Metro is currently sealed and cannot be entered, making this either a great place to disappear from view or a location where you can become trapped.
-
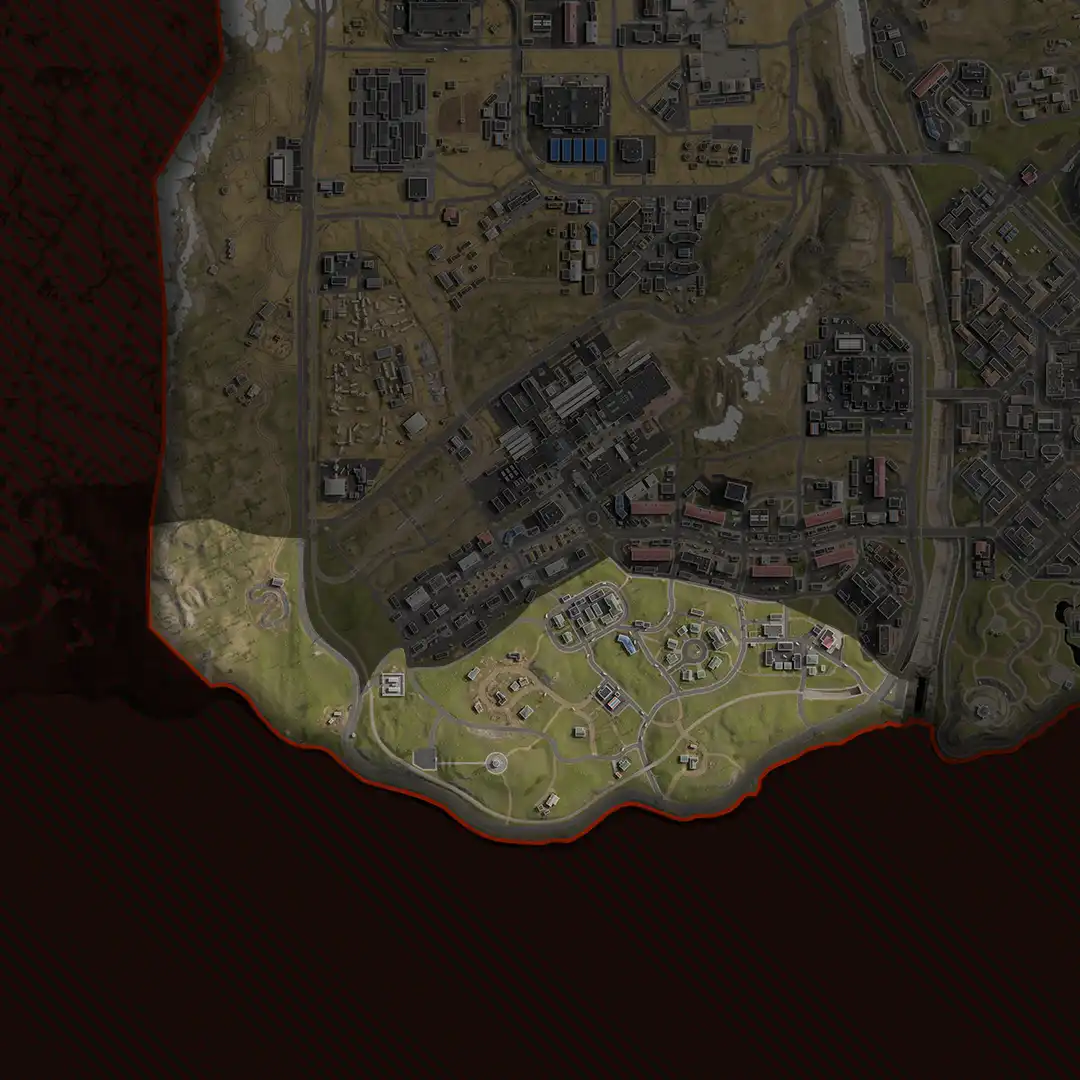


-
POI Overview

Two electrical huts sit between a power transformer. Surrounded by a low wall, both cabins can be accessed (note you can crawl under them to hide), but the real fun comes from ascending the adjacent comms tower, anchored in the scrubland nearby. Climb the mid or upper platform for a tremendous view with sniping potential, as well as for locating major landmarks to the north and east.
-
Parking Lot

This small tarmac parking lot has steps up to the memorial, a bus stop, and road access. The many trees and the grassy hillside allow for reasonable cover.
-
Apartment Block (Hills)

A cluster of residential buildings sits on the low hills south of Promenade, consisting of three small apartments and an older mansion that’s been segmented into flats. The three apartments surround a small parking lot, with two garages and open fields to the south.
Apartments Exterior: Each apartment has a covered entrance (double doors) on one side and a single door on the opposite wall. There are windows to infiltrate (or shoot out of) along each wall.
“Mansion” Apartments: An imposing structure with double doors (front), a single door (rear), and numerous windows to access. Adjacent is a small, open two-car garage and low brick walls. You’re only a quick sprint to the fire station or the coast.
-
Fire Station 19

Adjacent to the Hills police station, this fire station offers slightly elevated views of the co-op apartments and Ferris wheel (northeast) and easy access down to the Promenade.
Fire Station 19: The interior has two main floors, including the garage, reception area, locker room, and crew quarters upstairs, along with ladders to the roof and the tower where a commanding view is available.
-
Coastal Memorial

Atop the tallest hill to the southwest is an imposing memorial, a cluster of vertical mandibles pointing skyward. This memorial sits on a circular concrete pad, with benches around the edge. Trails lead down to the northeast and southeast, and there’s a path to the parking lot (west). The height allows you to check north across the Hills for incoming threats, with an option to retreat into the woods or to the coast.
-
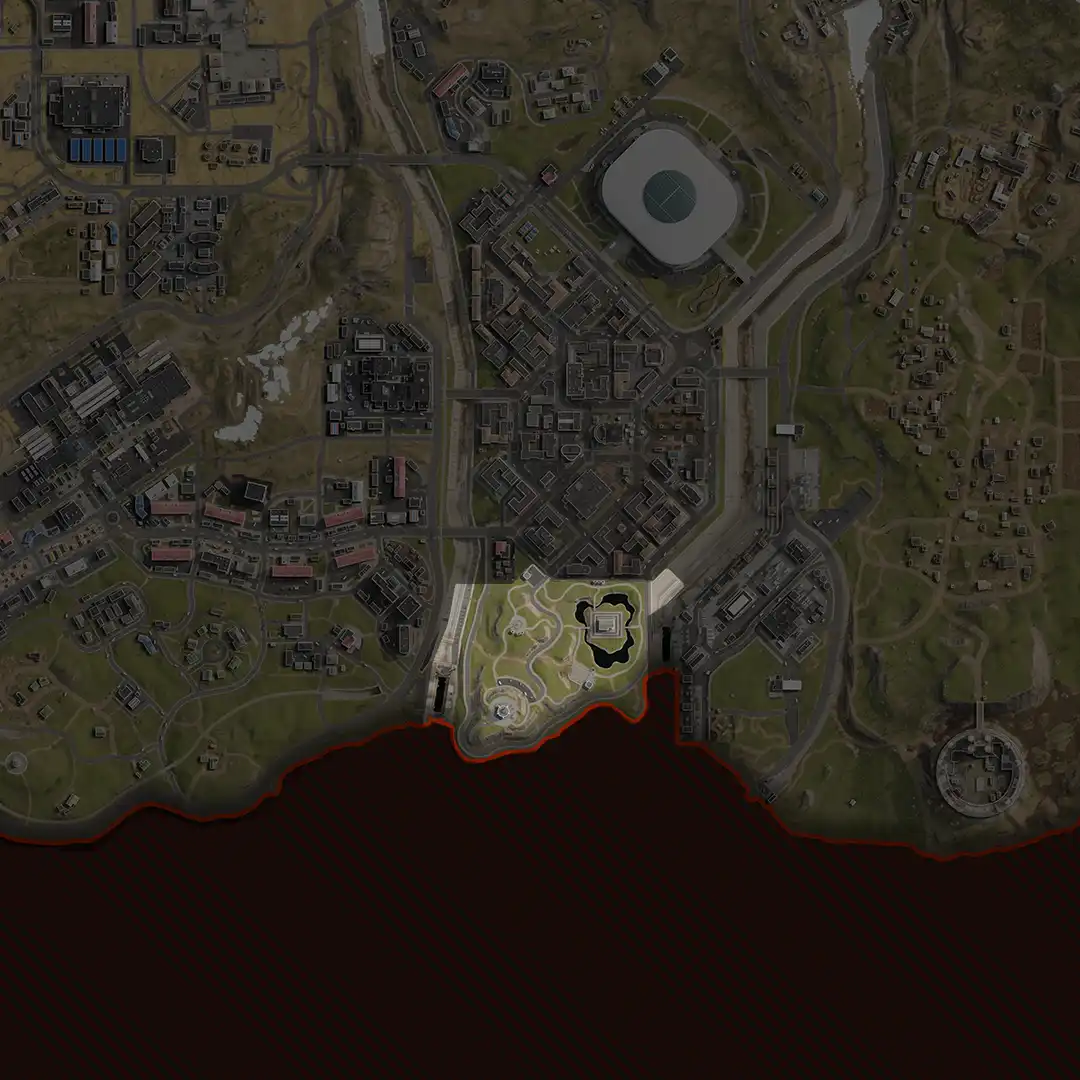


-
POI Overview

A small coastal recreational area now sits abandoned, with closed kiosks and drained fountains. A concrete monolithic memorial silently watches over this once-vibrant park.
-
Restrooms (Park)

Once you pass under the ornate park entrance arch, you can stop at the restrooms, located in a small parking lot. These have two entrances and two separate halves for men and women. Think about hiding here as a reasonable option.
-
Fountain and Kiosks (Park)

The mostly drained circular fountain with a central obelisk was a popular attraction before the conflict. Now the benches, footpaths, and the three small kiosks are empty, and the kiosks inaccessible. Use this as a marker or take this higher ground when engaging foes.
Public House (Park): This two-level bar and restaurant is located close to a drained lake circling the building, with shallow brick stepped terraces and three arched bridges connecting the rest of the park to the small island the restaurant sits on.
-
Flood Gates (Gora River)

At the very southern end of this zone are two pairs of huge metal floodgates (numbered 15, 16, 17, and 18). The docks (numbered 01, 02, 03, and 04) between the gates have been drained, which allows you to drop in or climb down via a ladder in any of the four corners. Once on the lower ground, there are four large alcoves you can check for loot or foes. This is a possible hiding spot, though you’re exposed if you try to climb the ladders to escape; better to call in a squadmate with a helicopter for an exfil from here.
Play Park and Restrooms (Park): On the southwestern part of the Park is a children’s play area, a low wall, a closed kiosk, and restrooms. The restroom has two entrances and two separate halves for men and women. Think about hiding here as a reasonable option, though the rock outcrops west of the Play Park are worth considering, too.
-
Memorial (Park)

This concrete hexagonal structure commemorates those lost in past conflict and has been commandeered by the local military, who have tarp netting and a small comms hut erected at the base of this memorial. Access the circular plateau the memorial stands on by navigating the rock outcrops, the trails, or the road. As this is on the highest ground in the park (aside from the comms tower), it offers good views and protection, especially as the memorial has a central spiral staircase you can climb to an upper viewing balcony circle.
-
Comms Tower (Park)

Anchored to a rocky promontory on a southeastern spit is a tall comms tower. The water here is inaccessible, so use the higher ground to hide behind rocks or trees or climb the tower. There are two ladders, each leading to a higher platform. The 200-degree views of Verdansk from the top are worth the climb, as is the height advantage and long-range sniping opportunities. However, you are extremely exposed.
-
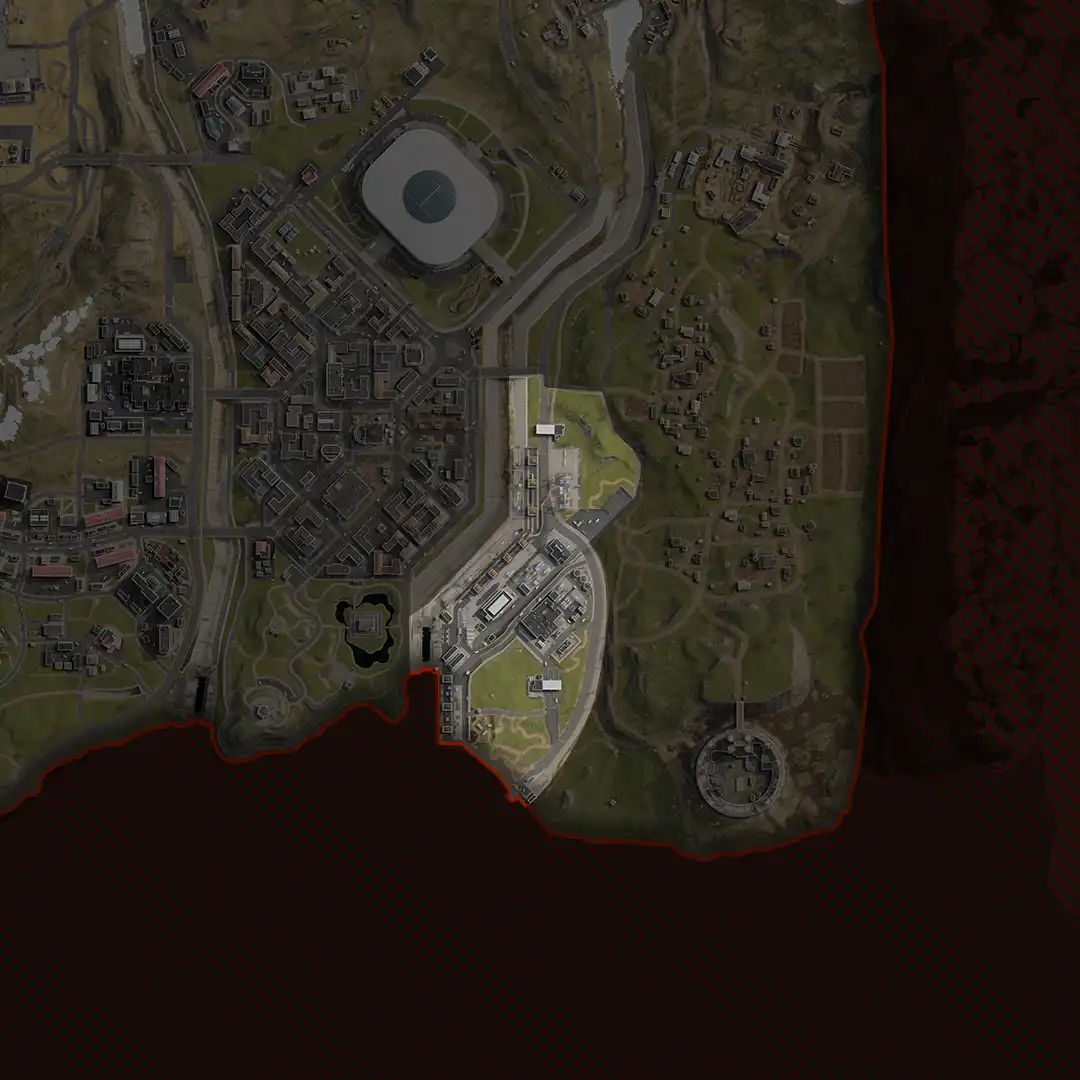


-
POI Overview

The main cargo dock for the city of Verdansk is now a collection of warehouses, container stacks, cranes, and checkpoints ready to house Tier One Operators in a vicious fight for survival.
-
Checkpoint (North)

The Port of Verdansk’s northern security checkpoint includes several security booths — both for the railroad tracks that run through here and the roads — along with the following buildings:
Entry Building: The larger of the two buildings has a large reception area, an interrogation room, and roof access in the rear.
Reception Area: A large archway invites those attempting to enter the Port into a reception area, where they will have to state their case to one of the security officers who sit behind the desk. The reception desk and waiting area chairs can all be used as cover.
Interrogation Room: Suspicious folk will be taken into this back room for questioning. Not much is in here outside of a long table and metal shelving.
Roof Access: In the back of this building is a ladder you can use to access the building’s roof. From here, you can get a solid sightline due south and can hop on the checkpoint overhang using an air-conditioning unit. This long roof has little cover yet is a far superior sniping perch that allows you to see across the Karst River into the Downtown District and the Stadium.
Security Shack: Next to the entry building is a small security room with a small desk and metal shelving. Access the roof of this building by hopping from the entry building.
-
North Cranes

A set of cranes that sit along the Karst River offer incredible sightlines over the Port, Stadium, Farms, Downtown, and Prison. These cranes have multiple levels: an initial ladder with a reasonably sized catwalk, a second ladder leading to a stairwell and the crane operator cab, and the top of the crane, which is accessible only via parachute. These various levels offer better sightlines as you go up at the cost of less cover and area to move around. At the foot of these cranes are multiple shipping containers, which act as decent cover pieces.
-
Lumber

Stacks of shipping containers and piles of freshly cut wood mark this area of the Port. Within these containers are potential loot spawns and a Buy Station. Both the containers and wood stacks break up the otherwise open concrete lot, allowing for natural close-quarters combat. With the help of some crates, you can access the tops of some of these containers, allowing you to get a unique high-ground spot over those within this area. A helicopter can also help you get farther to the top of this area, which offers solid views across the Port and over the nearby river and Farms.
-
Parking Lot

This area is between the Lumber and body shop, with multiple burned out trucks and green shipping containers providing a bit of cover. Check the insides of these open trucks for potential loot opportunities.
-
Body Shop

A massive rectangular building is where all vehicles get fixed within the Port of Verdansk. It also includes an intricate network of offices upstairs and an accessible roof.
Exterior: In front of the massive garage doors is a stack of crates and a burned-out truck — use the crates to hop atop the truck. There is also a forklift. Going clockwise onto the road will lead you to a side entrance into the office. Once you reach the other side, you’ll find a tin addition with two open gates and a proper door into the garage. The other side of the building has a staircase leading directly up to the second-floor offices.
-
Center Cranes

A set of cranes along the Karst River offer incredible sightlines over the Port — specifically over to Vacant and Processing Center areas, Stadium, Farms, Downtown, and Prison. These cranes have multiple levels: an initial ladder with a reasonably sized catwalk, a second ladder leading to a stairwell and the crane operator cab, and the top of the crane, which is accessible via parachute. These various levels offer better sightlines as you go up at the cost of less cover and area to move around. At the foot of these cranes are multiple shipping containers, which act as decent cover pieces.
-
Cargo Processing

Between the body shop and processing center is another intricate network of shipping containers along with a rectangular beige office and storage building. The shipping containers have one dead end that could have a surprise. You can also parachute from the top of the body shop, from the nearby Bridge highway, or from the cranes to reach the top of the cargo containers, which offer a unique high-ground point against those in and around this area. As for the tan office, it is a single-floor structure with multiple large windows, a door at the front and rear, and a separate office area that can contain loot.
-
Fuel Depot

Three rusty silver circular fuel containers define this small area just outside Vacant, along with a few shipping containers and a burned-out truck. All containers can be climbed on using a ladder and offer decent views over to the Parking Lot and Vacant, as well as the Prison.
-
Processing Center

Torched vehicles are found in this otherwise relatively pristine warehouse, owned by the Gardar Shipment Company. There are parked trucks and neatly stacked lumber in the forecourt.
Exterior: The main warehouse has doors and open garages on all four sides. The low-roofed garage on the north side has ladders enabling roof access (near the painted “1” on the wall near the northwest corner).
-
North and South Bridge

A long highway that runs adjacent to Vacant provides a quick, yet slightly cluttered, route across the Port of Verdansk. From here, you can hop off the highway and onto the roof of Vacant. Alternatively, use the bridge as cover, with multiple burned-out trucks and concrete barriers to weave around below.
-
Vacant

An iconic locale within Call of Duty®: Modern Warfare® Multiplayer, Vacant is as advertised: a vacant office building, and an extensive one at that. All these areas are both interior and exterior portions of the building:
Shipping Containers: Multiple shipping containers sit along the concrete. Action will take place among these shipping containers, which create opportunities for short-range engagements in this otherwise open space. While traveling through here, be careful of the two partially open containers, as they could be popular spots for a player to reload with some protection. If you want, you can mantle onto the top of these six containers, giving you decent sightlines over multiple areas, including those outside Vacant. However, there is little cover up here, leaving you exposed to snipers.
Electric Substation: Next to the shipping containers is Vacant’s main source of power. Along with the generators are two small buildings that can be used as cover. The building closer to the loading dock can also be used as a unique place to take longshots against enemies in the storage warehouse, as a sniper can peek through the door or hop on a windowsill to take a shot around the building. Alternatively, snipers can use cover around the actual substation to snipe past the loading dock and into storage.
Alley: A narrow alleyway separates the cargo containers area from the parking lot, which also contains a route into the building’s hallways. You can mantle onto a dumpster and onto the windowsill, which could also serve as a mounting point for sniping down the hallway. Other than those strategies, the alley is mostly a place to get through and onto more contested spots within Vacant.
Back Entrance: This transitional area is key to accessing Vacant’s interior. It has a pair of double doors and a concrete landing where stragglers could hide.
Parking Lot: A few overgrown patches of grass offer the only color within parking lot, which spills out into the streets over to the processing areas. While in the lot, the raised garden could be used to peer into the offices or as cover against those sniping from the locker room. Grenades can also be thrown into the windows, allowing you to stun or damage enemies inside.
The bridge over this area serves as partial protection from aerial attacks.
Loading Dock: Right outside the main storage is the loading dock. Here you’ll find an entrance into storage, as well as one to the hallway system in the main warehouse. While running through here, you may need to watch out for snipers inside the storage or over at the electric substation. To avoid an untimely death, take cover behind the contraband container, the truck, or the various boxes and barrels. Furthermore, note the ladder near the three barrels; this allows for direct roof access.
Maintenance: This more discreet location could be great for dealing with tough enemies inside storage. A well-placed C4 or other equipment piece could be lobbed up or into storage by way of its open roof. We suggest using the lone blue barrel and stack of boxes as markers of where equipment can be lobbed through. A small dumpster or potable water barrels in the back can be used to mantle up and over a fence that leads to the south checkpoint.
Offices: Overlooking the parking lot are the offices, two ordinary-looking workspaces that have been ransacked by Al-Qatala forces. This makes up the eastern interior part of Vacant; open or close the doors into and between the offices with a simple button press. Watch out for grenades and fire coming into the parking lot. Also, multiple interior windows lead to several hallways within the facility, with one toward the north looking partially out on the cargo containers.
Locker Room: This transition area between the main facility and the parking lot can be a place where players fight dirty. Its design leads to close-quarters engagements inside of it, while sightlines down the parking lot and offices can be great for sniping enemies coming from the north. When entering the locker room, it would be wise to check corners for enemy equipment placements or hostile forces. Furthermore, when exiting the locker room into the hallway, look to your right in case someone is mounted on a stack of crates in the middle of the facility.
Hallway: Technically, any area that is not a room in Vacant is considered the hallway. These are routes through the facility that have plenty of purpose outside of getting you to and from main rooms. Namely, there are many cover pieces around here to mount on or use as protection in mid- to long-range gunfights. Against snipers, especially those coming from the outside looking in, try using the remains of what was an office to your advantage. As another good rule of thumb, be especially careful when approaching exits from the hallway into named areas. If possible, try peeking through doors out of the hallway to potentially catch rushing hostile forces off guard.
Atrium: Surprisingly, a lone tree stands healthy amid the desolate and chemical-filled warehouse. There are five main entry points into the atrium — two to the north and south and one in the eastern hallway — which should all be noted when traveling through here. Also, given that it is an actual atrium, it is exposed to the elements, leaving it open to those on the roof.
Bathroom: This bathroom needs a cleanup, as it is mostly bombed out from an explosive charge that has left a gaping hole in its eastern wall. Within the bathroom, close-quarters engagements can be common, as players will want to rush in and out through here to access the south corridor or storage. If the door to storage is open, the bathroom could be a good place to hit enemies inside at an angle. Like other bathrooms in Verdansk, it would be wise to double-check the stalls for anyone who may be there.
Storage: One of the most notable places in Vacant holds plenty of radioactive materials. As gas leaks in from the ceiling, fighting will take place in and around the boxes and barrels strewn about the large open-air room. Storage tends to be a highly contested area, whether it is in the crossfire for snipers from the north or south, an exit route for those in the hallways, or featured in several objective game modes where this locale serves a purpose.
Quarantine: Because of the chemical material overflow in Storage, the back half of this warehouse serves as a headquarters for the cleanup crew that’s placed this area under quarantine. Those who immediately jump into here may want to look through a hole in the plywood that looks out past storage and the loading dock all the way over to the electric substation.
South Corridor: A long, wide hallway separates the intricate hallway system and the Shipping & Receiving area. Because of it the corridor’s length, mid-range duels can take place here, but typically it’s a transition space between other, more highly trafficked areas. One feature of note in here is a metal partially see-through gate located in the western part of the corridor. Aim through here and attack those sitting in Shipping & Receiving.
Shipping & Receiving: The southernmost portion of Vacant is almost entirely taken up by Shipping & Receiving, the front-facing docking area for materials. Amid the open space is a customs clearance desk that offers solid cover outside of the brick columns. A skylight allows those on the roof to aim down into the complex, while the wide double doors due northwest and southwest leave those inside exposed to the elements.
Roof: This roof has two distinct levels: one that sits around the atrium and the other over the Shipping & Receiving area. Both can be accessed via the bridge highway, with the former also having that ladder on the loading dock as a point of entry. Coming up here gives your squad fantastic sightlines over the surrounding area, although it is partially blocked by the highway.
-
Floodgates (Karst River)

At the southern end of this zone, below the eight fuel silos at the Port, are two pairs of huge metal floodgates (numbered 15, 16, 17, and 18). The docks (numbered 01, 02, 03, and 04) between the gates have been drained, which allows you to drop in or climb down via a ladder in any of the four corners. Once on the lower ground, there are four large alcoves you can check for loot or foes. This is a possible hiding spot, though you’re exposed if you try to climb the ladders to escape; better to call in a squadmate with a helicopter for an exfil from here.
-
Storage

This small collection of storage sheds sits next to the large floodgates of the Karst River. Here, you can explore any open shed to see if there is any loot inside or hop on top of either roof with a bit of parkour.
-
South Cranes

A set of cranes that sit along the Karst River offer incredible sightlines over the Port — specifically over the storage, south fields and pine forest areas — as well as over Karst River to the Verdansk Park and to the east over where Prison is located. These cranes have multiple levels: an initial ladder with a reasonably sized catwalk, a second ladder leading to a stairwell and the crane operator cab, and the top of the crane, which is accessible via parachute. These various levels offer better sightlines as you go up at the cost of less cover and area to move around. At the foot of these cranes are multiple shipping containers, which act as decent cover pieces.
-
Pine Forest

A few dozen pine trees are the last of their kind directly next to the Port, as most of them were cut down and turned into the lumber you see around this area. While the pine trees offer minimal cover, a small trench network could be a saving grace for those caught in this natural environment. These trenches lead from the south checkpoint to the south fields and south cranes.
-
Checkpoint (South)

The Port of Verdansk’s southern security checkpoint includes several security booths — both for the railroad tracks that run through here and the roads — along with an entry building and a security shack. North of here, an abandoned office sits southeast of Vacant.
Entry Building: The larger of the two buildings has a large reception area, an interrogation room, and roof access in the rear.
Abandoned Office: This two-story office is located on a side road across from Vacant and has a multi-level roof.
Exterior: From the street, you can either climb up a set of ladders to reach the second floor and roof, or enter the office through its front door. There are also two side entrances and a small alley in the back.
-
South Fields

Near the south cranes is a makeshift setup for the forces that rolled into Verdansk to protect against the AQ attack. They came with gabions and concrete cinderblocks on trucks, which can be used as cover, along with a few portable offices in shipping containers that could contain some of their leftover supplies.
-
Rail Terminus

The southern end of the railroad stops here, by the rugged shoreline and antenna mast. The road takes you to the Port, while the rail tracks will take you to Quarry. The actual terminus is composed of an administration hut (with one entrance, and two sets of windows to enter from), a small parking lot, a sentry hut by the road, a small water tower (that you can land on but not climb), and a couple of cargo carriages.
-
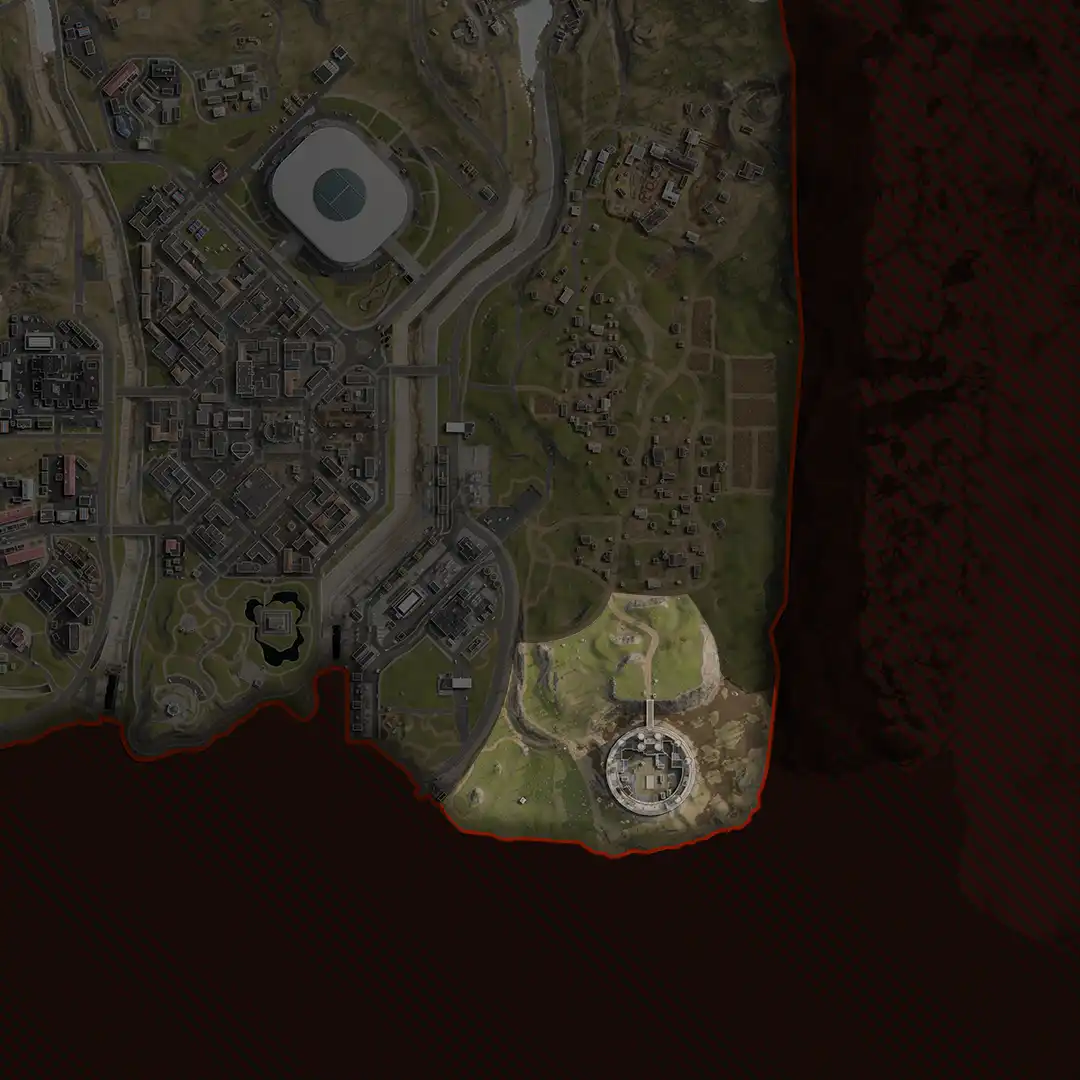


-
POI Overview

Constructed in medieval times. Perfected as a place of torture and lament: The Prison is a maze of cells, yards, and gulag showers where the majority of blood is spilled.
-
Hillside Hut

The undulating fields and rockier ground located south of the orchards is the place to find a small shack you can use for cover or as a marker to situate yourself, as the structure is close to a rock promontory with views northwest toward the Port, and northeast along the main dirt road into the southern farms.
-
Camping Promontory: Hill

Out on the hillside are the remains of a recent campsite (chairs, a fire, and a tent bundle). The area may be under observation by enemies at the Prison, so watch your step and use the nearby trees or rock bluffs as cover.
-
Military Post: Prison Entrance

The imposing gulag has a main access to foot traffic via a bridge, and there’s a small military post on the northern side. Two immobile military trucks, a sentry hut, and other light defenses provide a modicum of cover, though foes inside the Prison have the upper hand. Use this route to drive ground vehicles if you’re heading into or out of the Prison.
-
Prison Promontory: Cliff

The upper rock plateau on the Prison’s northeast side has a small vista point (two rudimentary wood benches and a fire barrel), with excellent views of the fields below. Head here if you want to drop down from above, or if you’re planning a Prison assault by an indirect route.
-
Swampland

Close to the shore, and with the Prison looming in the distance (to the east), the marshy ground just east of the rail terminus is another area to navigate, using the large or small rock bluffs to gain height or cover as you reach the more dense forest and remote areas to the northeast.
-
Swamp Hut

A small cabin on a raised deck is nestled in the low, sloping ground close to the boundary with the Port area. Part of the marshes, this cabin is surrounded by dying trees and soggy ground. Head here for an out-of-the-way hiding spot.
-
Pipe Tunnel

Close to the western walls of the Prison is a large concrete pipe buried under the dirt road, allowing stream water to flow down into the rocky tributaries just southeast of the Port. The streams are dry, and the pipe tunnel is accessible. Use it to hide in or as a marker on your way to the showers exit to and from the Prison.
-
Gulag Battlements and Prison

Prison Exterior: This place of pain and suffering began as a medieval castle; a series of crenellations and battlements repel attackers and seal prisoners to their fate. Constructed to withstand marauders of the past, it was retrofitted during the early 20th century with the addition of a vertical gulag tower, most recently holding both political prisoners and the worst scourges of humanity.
Entrance and Foundations (Exterior): There’s much to discover and access as you make a thorough reconnoiter of the Prison grounds and inner keep:
Bridge: Drive or run across this stone bridge that spans a plummet to the base of the Prison. Access is from the military post (Prison entrance) or the Prison.
Foundation: The base of the Prison complex is far below the bridge. Skulk around these massive wall buttresses, gathering loot, or drive about to quickly reach higher ground. Also explore the southern perimeter between the gulag and the coast; there’s a small shed (southwest), a log and sleeping bag near an upturned boat (south), and some digging to uncover an old pipe (southeast). What can it all mean?
Exterior Barbican: The fortified gatehouse is the only way to enter this complex, outside of the showers exit or dropping in from above.
Barbican: The massive stone tunnel has two entrances to the left and one to the right. The ones with the sign lead down to an interior staircase that merges at a stone corridor — the main entrance to the interior. The second eastern entrance leads to the fortified barmkin (yard and defensive wall) in the northeastern part of the exterior.
Barbican Battlements: As you enter the massive bailey (interior courtyard), turn around and look up. The ominous barbican has large and scalable battlements to ascend. Climb the building marked “03” next to the large fuel tanks. Hop onto the crate and the corrugated metal roof, and either head southeast to the battlement watchtower (and building 05) or jump across to the west, up a ladder to stairs, a rickety wooden scaffolding and balcony, and an entrance inside.
Barbican (7F Upper Interior): Around seven levels above the bailey on the north side of the Prison are the four mighty bastion turrets supporting the bailey interior. Enter and discover the warden’s office (with three desks), a radio operator’s room adjacent to this office, and an exit onto the north ramparts. Or, head up the wooden interior stairs to a ladder and onto the barbican roof.
Barbican Roof (10F, 11F): Climb out of the trapdoor from the barbican interior to reach the roof. Any of the four bastion turrets has a ladder allowing even more progress upward, to the top of the Prison ramparts! This is the highest point in Verdansk, aside from the Gora Dam, and the views —and sniping potential — are exceptional!
Bailey (Exterior and Upper Interior): The huge courtyard known as the bailey features fuel tanks, tents, immovable trucks, two flat-roofed corrugated metal cover areas, missile batteries, and other areas of interest:
Barmkin and Northeast Turret: A defensive wall links the barbican to the perimeter battlements. Segmented within this area is a parked truck next to a small stone stage, an arched alcove (southeast), and a turret door (northeast). Climb the spiral steps inside the turret to get to and from the upper ramparts. Note the window halfway up the turret you can smash through to get in (usually via a parachute) or out (via the stairs).
Barmkin: Cells and Administrator’s Office (Northeast): Behind the barmkin are wood steps and a small cell block. The cells are on the ground level, and the arched windows house a corridor and two offices; one seemingly belongs to the Prison administrator.
Northwest Barmkin: There’s an almost identical barmkin to the northwest. It, too, has a turret and an office structure on the opposite side of the castle.
Water Tower Watchtower: Close to the entrance is a tall water tank on white metal support pillars. Climb the attached ladder to the balcony platform, and optionally onto the top of the water tank. Snipe from here but beware your limited cover.
Helipad: In need of a quick exit? Head to the helipad, in the central-south part of the bailey. Note you can hide around the elevated edge of the helipad.
Gantry Balcony, Barracks, and Battlements (East and West): On both the east and west sides of the bailey are attached brick structures three levels in height. They contain the remains of chairs, tables, and several barrack beds. Use the exterior steps to reach this area, or head down from the battlements; there are some prime hiding spots in these small corridors and chambers. These are the best locations to go to if you wish to reach the upper perimeter ramparts.
Green Tent and Inner Battlements (West): Munitions are stored under the ramparts, on the western covered battlements behind the green military tent. The large open window offers tremendous long-range combat potential.
Truck Park and Inner Battlements (South): Behind the helipad is a series of large arches, some with parked military trucks in them. There are five “bays” (archways), and openings to the coast; make an escape here by leaping from the battlements.
Fuel Tank Storage (East): Under building 05 and the pair of missile batteries are a couple of large fuel tanks under the eastern ramparts. Use the tanks as cover and the openings to parachute out of if you need an escape plan.
Battlements and Ramparts (Exterior): The massive, circular outer perimeter walls are accessed from the air or by climbing up from the barracks on either side (east and west) of the bailey.
Upper Watchtowers (East and West): These identical structures sit next to a turret and offer another method of ascending to the ramparts. As they are set back from the perimeter, they don’t offer commanding views of the zone, but you can quickly step onto the ramparts if you need that extra visibility. Instead, they offer protection, elevation, and good views down into the yard. Note that the western rampart watchtower is directly above the gulag showers sniping window, so you could jump from the watchtower, parachute down and swing back into the showers in one deft move.
Battlement Turrets (Six): Each of the six massive outer turrets features a door to access (on the lower battlements or barmkin in the case of the northeast and northwest turrets), and interior spiral stairs up to the ramparts. Climb the interior ladder to reach a small stone hut atop the turret, allowing access to the turret roof. Here you can use the hut as cover, and rake fire across the yard or out toward the surrounding area.
Offices and Storage Buildings (East and West): Sitting on the battlements between the turrets are three rectangular structures. On the east side, two of them are numbered (“05” and “07”), and all three are accessible. On the west side, the buildings aren’t numbered, and the low, center metal storage building (right of the turret) is inaccessible. These have single-level offices, storage, and bunk beds inside and can make good areas to retreat to, though they have limited escape routes.
Gun Batteries (South): Modern mortars sit in a row of four, all pointing toward the coast. They aren’t currently functional, and there’s not usually much of an enemy presence along the southern edge of this Prison, making it a reasonable escape option, providing you can use a parachute. The sandbags and low wall also make this a reasonable spot to take down enemies coming into the prison yard as you have elevated long-range views north, down the entrance tunnel to the bridge.
Ramparts: The upper perimeter of the Prison, running around almost all of the outer edge (except for the gun batteries area), offers excellent sniping potential and escape options. The thick stone crenellations act as cover, and you can hop over and parachute to flee the area (or down to a waiting vehicle) from anywhere along the rampart edge.
-
Prison Interior

Prison Interior: Inside is the “Spine of Zordaya,” a central observation tower and arsenal constructed within the walls of the Prison, with arterial-like stairs leading to circular balconies, cells, and shower areas where violent confrontations continue to be commonplace.
Upper Entrance (7F Interior): Access the vertical interior maze under the Prison yard via the tunnel entrance after crossing the bridge (under the barbican). Take either arched entrance on the side of the tunnel. These lead to stairs that link to a stone corridor and double doors at the far (south) end. This leads to a corridor with lockers and a caged metal bridge.
Control Room (7F Interior): Accessed from the caged bridge (north), or either gantry stairs from “A” Circle (east and west). There are desks, radio equipment, monitors and filing cabinets in this upper circular control chamber. The limited movement means traps can be set for those attempting to reach this location. Access either gantry stairs to head down. Note you can hop over the side of these (and any) gantry stairs and drop to the base of the interior. A parachute is recommended!
“A” Circle (6F Interior): This large circular corridor has cells along the outer edge. Cells to the north, east southeast, south, and southwest can be entered, used as ambush points, or checked for loot. Steps up to the control room are on the east and west sides. Steps down to the Arsenal 1 are on the north and south sides.
Arsenal 1 (5F Interior): Reach this central chamber via the stairs down from “A” Circle or up from “Б” Circle. This metal-floored room housed most of the Prison’s armaments in green lockers. Check the area for loot on your way up or down.
“Б” Circle (4F Interior): Note the Cyrillic letter “Б” on the stair entrance to this large circular corridor, constructed in a similar manner to “A” Circle. Cells to the north, southeast, and southwest can be entered, used as ambush points, or checked for loot. Steps up to Arsenal 1 are on the east and west sides. Steps down to Arsenal 2 are on the north and south sides. The double doors (west) lead into the gulag showers (Б West).
Arsenal 2 (3F Interior): Reach this central chamber via the stairs down from “Б” Circle or up from the “B” Circle. This metal-floored room once had a quantity of the Prison’s armaments in green lockers. Check the area for loot on your way up or down.
“B” Circle (2F Interior): Note the “B” on the stair entrance to this large circular corridor, constructed in a similar manner to “A” Circle. Cells to the north-northeast, northeast, south-southeast, and southwest are accessible, useful as ambush points, or checked for loot. Steps up to Arsenal 2 are on the east and west sides. A ladder down to the dirt basement is on the north and south sides. The double doors (west) lead into gulag showers (B West).
Dirt Basement (1F Interior): The overflow tunnel in the western wall under the gantry stairs leads down, past the broken floor of the gulag showers, to an outflow pipe. This exits the Prison building showers (gulag) but is also an excellent clandestine entrance.
Gulag Showers (2F, 4F Interior, Б and B West): One of at least four discovered showers areas in the complex, though all others are inaccessible from this location.
Entrances: The showers are accessible from four different thresholds:
The double doors (east wall) from the “Б” Circle leading to the upper side balcony and cells.
The double doors (east wall) from the “B” Circle leading to the main showers floor.
The open window from the exterior, if you drop in via parachute.
The massive hole in the southside of the gulag showers floor, accessing the overflow tunnel in the dirt basement.
Balcony: The gantry and stone balcony overlook the north and south sides of the showers. Balcony 1 is south, and Balcony 2 is north. Both have three cells on the exterior wall side and steps down to the main showers area via the window balcony.
Shower Floor: The main showers area is roughly symmetrical, with an initial trio of shower stalls on either side of a main tiled pathway, lockers along the lower walls and washbasins on either side. The central area has more shower stalls, and a massive hole in the floor (south) you can use to enter or exit. Farther west are stairs to the window balcony.
Note: Gulag Showers (Variants): There are three 1v1 gulag shower variants that you are randomly dragged into once you’re taken out during a Call of Duty: Warzone match.
-
Showers Exit (Gulag)

If you follow the dry stream through the pipe tunnel to the western side of the Prison exterior battlements, you’ll discover an overflow pipe. There’s a ladder next to the pipe leading to a narrow concrete balcony atop the pipe. Enter the pipe to reach the interior of the Prison, where you can follow a winding passage to the base of the gulag tower or visit the gulag showers (though this isn’t where you’ll be fighting for your life one-on-one). Knowledge of this hidden exit enables you to escape or infiltrate the prison more freely, and with stealth at the forefront of your tactics.
-
Camping Promontory: Ocean

Overlooking the Kastovian Sea to the south is a flat rock and scrub promontory, with the remnants of a campfire (including chairs and rolled tents). There are great views of the gulag and pastureland but little places to seek cover.
-
Show points of interest

-
Show boundaries

-
Show landmarks

-
Reset all overlays

Your Guide to Verdansk
Verdansk is a vast place and requires a large-scale investigation of every location across the Tac Map. With 40 total Points of Interest (POIs) — 20 of which are major (most shown in-game on your Tac-Map, as well as across the map as you drop in at the start of the match) — detailed in this guide, expect tactical overviews of areas ranging from the huge to the often overlooked. In addition, we provide an interactive map and details on ambush points, traversal strategies, and much more.
Welcome to Verdansk!
Welcome to Verdansk! You've arrived at the
Call of Duty®: Warzone™ Mobile version of the Tac-Atlas.
Please click below to reach the main
Call of Duty: Warzone — Verdansk Tac-Atlas.